Update 2012-01-23: Added note about .NET framework
Martin Hinshelwood wrote an excellent post recently http://nakedalm.com/team-foundation-server-2010-event-handling-with-subscribers/ ) about a new type of integration
available in TFS 2010, namely server side event handlers, that is executed within the TFS context. I wasn’t aware of this new feature and as Martin notes, there doesn’t seem to be any material/documentation of it at all.
Previously, when you wanted some custom action to be executed when some event occurs in TFS (check-in, build completed…) you wrote a web/WCF service with a predefined signature and subscribed to the event using bissubscribe.exe.
Usually you want to get more information from TFS than what is available in the event itself so you would have to use the TFS client object model to make new requests back to TFS to get that information.
The deployment of these web services is always a bit of a hassle, especially around security. Also there is no way to affect the event itself, e.g. to stop the event from finishing depending on some condition. This can be done using
server side events.
The deployment of a server side event handler couldn’t be simpler, just drop the assembly containing the event handlers into the Plugins folder of TFS, which is located at
C:Program FilesMicrosoft Team Foundation Server 2010Application TierWeb ServicesbinPlugins. TFS monitors this directory from any change and will restart itself automatically, so the latest version will
always be executed.
In this first post on this subject, I will describe how to set up your development environment to make it easy to both deploy and debug your event handler.
- Install TFS 2010
I recommend that you install a local copy of TFS 2010 on your development machine. For this scenario, you only need the Basic version which is a breeze to install. It took me about 10-15 minutes to install and configure it the last time I did it.
This will make your TFS development and customization much more efficient than using a share remote server, and you can pretty much assault it as much as you want since it is your private server!
- Run Visual Studio 2010 as admin
To be able to deploy your event handler automatically (see next step), you need to run Visual Studio in administration mode - Create the Event Handler project
To setup the project, create a standard C# class library.
Note that the project must be .NET 3.5 (or lower), NOT .NET 4.0 since TFS is running on .NET 2.0 it can’t load a .NET 4.0 assembly in the same app domain.Martin has written about what you need to reference in his post. Since he was using VB.NET in his sample, I thought that I include a C# version of a minimal WorkItemChanged event handler:
using System;
using System.Diagnostics;
using Microsoft.TeamFoundation.Common;
using Microsoft.TeamFoundation.Framework.Server;
using Microsoft.TeamFoundation.WorkItemTracking.Server;

namespace TFSServerEventHandler
{
    public class WorkItemChangedEventHandler : ISubscriber
    {
        public Type[] SubscribedTypes()
        {
            return new Type[1]{typeof(WorkItemChangedEvent)};
        }

        public EventNotificationStatus ProcessEvent(TeamFoundationRequestContext requestContext, NotificationType notificationType, object notificationEventArgs,
                                                    out int statusCode, out string statusMessage, out ExceptionPropertyCollection properties)
        {
            statusCode = 0;
            properties = null;
            statusMessage = String.Empty;
            try
            {
                if (notificationType == NotificationType.Notification && notificationEventArgs is WorkItemChangedEvent)
                {
                    WorkItemChangedEvent ev = notificationEventArgs as WorkItemChangedEvent;
                    EventLog.WriteEntry("WorkItemChangedEventHandler", "WorkItem " + ev.WorkItemTitle + " was modified");
                }

            }
            catch (Exception)
            {
            }
            return EventNotificationStatus.ActionPermitted;
        }

        public string Name
        {
            get { return "WorkItemChangedEventHandler"; }
        }

        public SubscriberPriority Priority
        {
            get { return SubscriberPriority.Normal; }
        }
    }
}
This event handler doesn’t do enything interesting, but just logs information about the modified work item in the event log.
- Deploy your event handler
Open the project properties and go to the Build tab. Modify the Output Path by browsing to the Plugins directory (see above). This will result in a newdeployment of your event handler every time you build. Neat! 🙂
If you look in the Event log after you compile your project, you will see entries from TFS Services that looks like this:
As you can see, TFS has noticed that a new version of the event handler has been dropped in the plugins folder and therefor it is performing a restart. You will notice that TFS becomes temporarily unavailable while this happens.Try modifying a work item and verify that information about it is written in the event log. (Note: You will need to create a event source called “WorkItemChangedEventHandler”, otherwise the EventLog.WriteEntry call will fail.
- Debug the event handler
Since these types of events aren’t very well documented it’s useful to debug the event handlers just to find out how your handler is called and what the parameters contain.
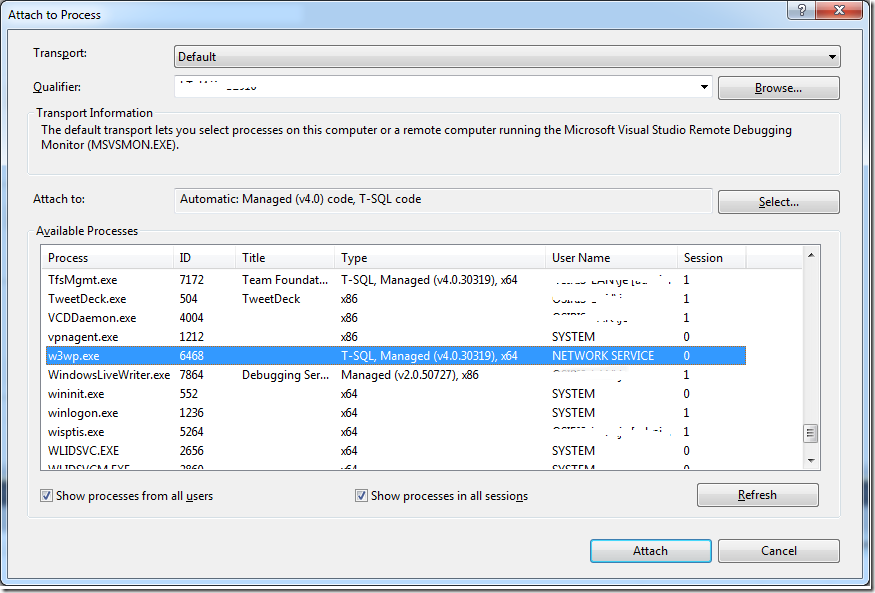
To do this, to to the Debug menu och select Attach to Process. Check both Show processes from all users and Show processes in all sessions and locate the w3wp process that hosts TFS.
Select Attach to start the debugging session. Set a break point in the ProcessEvent method and then modify a work item in TFS. This should cause your event handler to be executed immediately:



![clip_image002[5] clip_image002[5]](https://blogehn.azurewebsites.net/wp-content/uploads/2019/05/clip_image0025_thumb.jpg)
