Running Windows Container Build Agents for Azure Pipelines

In a previous post I talked about how to create a build environment, including an Azure DevOps build agent, using Docker and Windows Containers. Using Dockerfiles, we can specify everything that we need in order to build and test our projects. Docker gives us Infrastructure as Code (no more snowflake build servers) and isolation which makes it easy to spin up multiple agents quickly on one or more machines without interfering with each other.

What I didn’t talk about in that post is to actually depoy and run the Windows containers in a production environment. I showed how to start the agent using docker run, but for running build agents for production workloads, you need something more stable and maintainable. There are also some additional aspects that you will need to handle when running build agents in containers.

For hosting and orchestrating Windows containers there are a few different options:

  • Using Docker Compose
  • Docker Swarm
  • Kubernetes (which recently announced General Availability for running Windows Containers)

In this post I will show how to use Docker Compose to run the builds agents. In an upcoming post, I will use Azure Kubernetes services to run Windows container builds agents on multiple machines in the cloud (Support for Windows containers is currently in preview: https://docs.microsoft.com/en-us/azure/aks/windows-container-cli).

In addition to selecting the container hosting, there are some details that we want to get right:

  • Externalize build agent working directory
    We want to make sure that the working directory of the build agents is mapped to outside of the container. Otherwise we will loose all state when an agent is restarted, making all subsequent builds slower

  • Enable “Docker in docker”
    Of course we want our build agent to be able to build Dockerfiles. While it is technically possible to install and run Docker engine inside a Docker container, it is not recommended. Instead, we install the Docker CLI in the container and use Named Pipes to bind the Docker API from the host. That means that all containers running on the host will share the same Docker engine. An advantage of this is that they will all benefit from the Docker image and build cache, improving build times overall, and reducing the amount of disk space needed

  • Identity
    When accessing resources outside the container, the build agent will almost always need to authenticate against that resource. This could be for example a custom NuGet feed, or a network share. A Windows container can’t be domain joined, but we can use group Managed Service Accounts (gMSA) which is a special type of service account introduced in Windows Server 2012 designed to allow multiple computers to share an identity without needing to know its password.

    You can follow this post from Microsoft on how to create and use group Managed Service Accounts for Windows containers:
    https://docs.microsoft.com/en-us/virtualization/windowscontainers/manage-containers/manage-serviceaccounts

    This post assumes that you have created a gMSA called msa_BuildAgent .

Docker Compose

Docker compose makes it easy to start and stop multiple containers on a single host. All information is defined in a docker-compose.yml file, and then we can start everything using a simple docker-compose up command, and then docker-compose down to stop all containers, tearing down networks and so on.

We need to send in multiple parameters when starting the build agent containers, and to avoid making the docker-compose file too complex, we can extract all parameters to an external file. This also makes it easy to tokenize it when we run this from an automated process.


docker-compose.yml

version: ‘2.4’
services:
  agent1:
     image: ${IMAGE}:${VERSION}
     volumes:
       – type: npipe
         source: \\.\pipe\docker_engine
         target: \\.\pipe\docker_engine       
       – type: bind
         source: d:\w\${WORKFOLDERNAME}1
         target: c:\setup\_work
     env_file: .env
     environment:
       TFS_AGENT_NAME: ${AGENTNAME}-1
     restart: always
  agent2:
     image: ${IMAGE}:${VERSION}
     volumes:
       – type: npipe
         source: \\.\pipe\docker_engine
         target: \\.\pipe\docker_engine       
       – type: bind      
         source: d:\w\${WORKFOLDERNAME}2
         target: c:\agent\_work
     env_file: .env
     environment:
       TFS_AGENT_NAME: ${AGENTNAME}-2
     restart: always           

As you can see, this file defines two containers (agent1 and agent2), you can easily add more here if you want to.

Some comments on this file:

  • To enable “Docker in Docker”, we use the volume mapping of type npipe, which stands for named pipes. This binds to the Docker API running on the host
  • An addition volume is defined that maps c:\agent\_work to the defined path on the container host
  • We specify restart: always to make sure that these containers are restarted in case the build server is restarted

All values for the variables will be taken from an environment file (the env_file argument), that looks like this:

.env (env_file)

TFS_URL=<ORGANIZATIONURL>
TFS_PAT=<PERSONALACCESSTOKEN>
TFS_POOL_NAME=<AGENTPOOLNAME>
IMAGE=<BUILAGENTIMAGENAME>
VERSION=<BUILDAGENTIMAGETAG>
AGENTNAME=<CONTAINERNAME>
WORKFOLDERNAME=<WORKFOLDERNAME>
CREDENTIALSPEC=file://msa_BuildAgent.json

This file is placed in the same folder as the docker-compose.yml file.

Most of these parameters were covered in the previous post, the new ones here though are:

  • WORKFOLDERNAME
    This is the path on the container host where the working directory should be mapped to. Internally in the container, the work directory in the agent is set to c:\agent\_work

  • CREDENTIALSPEC
    This is the name of the credential specification file that you created if you followed the post that I linked to above, when creating the group Managed Service Account. That file is placed in the c:\ProgramData\Docker\CredentialSpec folder on your host

To start these build agents you simply run the following command in the same directory where you places the docker-compose.yml and the .env files:

docker-compose up –d

When you run this command, you will see something like:

Creating network “build_default” with the default driver
Creating build_agent1_1 …
Creating build_agent2_1 …
Creating build_agent1_1 … done
Creating build_agent2_1 … done

To stop all the containers, including tearing down the network that was created you run :

docker-compose down

Automating the process

The process of deploying and updating builds agent containers on a server should of course be automated. So we need something that runs on our build servers that can pull the build agent container images from a container registry, and then start the agents on that machine.

One way to do this with Azure DevOps is to use Deployment Groups, which let you run deployments on multiple machines either sequentially or in parallell. 

Here is an image that shows what this could look like:

image

Here I have two build servers running Windows Server 2019 Core. The only things that are installed on these servers are Docker, Docker Compose and a Deployment Group agent. The deployment group agent will be used to stop the build agent containers, pull a new verison of the build agent image and then start them up again.

Here is the deployment process in Azure Pipelines:

image

The process work like this:

  1. The image version is updating by modifying the .env file that we defined before with the build number of the current build

  2. We run Docker login to authenticate to the container registry where we have the build agent container image. In this case we are using Azure Container Reigstry, but any registry will do

  3. The new version of the image is then pulled from the registry. This can take a while (Windows Containers are big) but usually only a few small layers need to be pulled after you have pulled the initial image the first time

  4. When we have the new image locally, we shut down the agents by running docker-compose down

  5. And finally, we start the agents up again by running docker-compose up –d

Deployment groups are powerful in that they let you specify how to roll out new deployments oacross multiple servers.

If you do not want to restart all of your build agents at the same time, you can specify thise in the settings of the deployment group job:

image

Note: One thing that is not handled by this process is graceful shutdown, e.g. if a build is currently running it will be stopped when shutting down the agents. It would be fully possible to utilize the Azure Pipelines API to first disable all agents (to prevent new builds from starting) and then wat until any currently running builds have finished, before shutting them down. I just haven’t done that yet Smile

Hopefully this post was helpful if you want to run Windoes Continaer build agents for Azure Pipelines on your servers!

Accessing Azure Artifacts feed in a Docker build

I’ve recently given talks at conferences and user groups on the topic of using Docker as a build engine, describing the builds using a Dockerfile. This has several advantages, such as fully consistent build no matter where you run it, no dependencies necessary except Docker.

Image result for docker

Some things become a bit tricker though, I’ve blogged previously about how to run unit tests in a Docker build, including getting the test results out of the build container afterwards.

Another thing that you will soon hit if you start with Dockerfile builds, is how to restore packages from an authenticated NuGet feed, such as Azure Artifacts. The reason this is problematic is that the build will run inside a docker container, as a Docker user that can’t authenticate to anything by default. If you build a projects that references a package located in an Azure Artifacts feed, you’ll get an error like this:

Step 4/15 : RUN dotnet restore -s “https://pkgs.dev.azure.com/jakob/_packaging/DockerBuilds/nuget/v3/index.json” -s “https://api.nuget.org/v3/index.json” “WebApplication1/WebApplication1.csproj”
—> Running in 7071b05e2065
/usr/share/dotnet/sdk/2.2.202/NuGet.targets(119,5): error : Unable to load the service index for source
https://pkgs.dev.azure.com/jakob/_packaging/DockerBuilds/nuget/v3/index.json. [/src/WebApplication1/WebApplication1.csproj]
/usr/share/dotnet/sdk/2.2.202/NuGet.targets(119,5): error :   Response status code does not indicate success: 401 (Unauthorized). [/src/WebApplication1/WebApplication1.csproj]
The command ‘/bin/sh -c dotnet restore -s “
https://pkgs.dev.azure.com/jakob/_packaging/DockerBuilds/nuget/v3/index.json” -s “https://api.nuget.org/v3/index.json” “WebApplication1/WebApplication1.csproj”‘ returned a non-zero code: 1

The output log above shows a 401 (Unauthorized) when we run a dotnet restore command.

Using the Azure Artifacts Credential Provider in a Dockerfile

Image result for azure artifacts

To solve this, Microsoft supplies a credential provider for Azure Artifacts, that you can find here https://github.com/microsoft/artifacts-credprovider

NuGet wil look for installed credential providers and, depending on context, either prompt the user for credentials and store it in the credential manager of the current OS, or for CI scenarios we need to pass in the necessary informtion and the credential provider will then automatically do the authentication.

To use the credential provider in a Dockerfile build, you need to download and configure it, and also be sure to specify the feed when you restore your projects. Here is snippet from a Dockerfile that does just this:

NB: The full source code is available here https://dev.azure.com/jakob/dockerbuilds/_git/DockerBuilds?path=%2F4.%20NugetRestore&version=GBmaster

# Install Credential Provider and set env variables to enable Nuget restore with auth

ARG PAT
RUN wget -qO- https://raw.githubusercontent.com/Microsoft/artifacts-credprovider/master/helpers/installcredprovider.sh | bash
ENV NUGET_CREDENTIALPROVIDER_SESSIONTOKENCACHE_ENABLED true
ENV VSS_NUGET_EXTERNAL_FEED_ENDPOINTS “{\”endpointCredentials\”: [{\”endpoint\”:\”https://pkgs.dev.azure.com/jakob/_packaging/DockerBuilds/nuget/v3/index.json\”, \”password\”:\”${PAT}\”}]}”

# Restore packages using authenticated feed
COPY [“WebApplication1/WebApplication1.csproj”, “WebApplication1/”]
RUN dotnet restore -s “https://pkgs.dev.azure.com/jakob/_packaging/DockerBuilds/nuget/v3/index.json” -s “https://api.nuget.org/v3/index.json” “WebApplication1/WebApplication1.csproj”

The  VSS_NUGET_EXTERNAL_FEED_ENDPOINTS  is an environment variable that should contain the endpoint credentials for any feed that you need to authenticate against, in a JSON Format. The personal access token is sent to the Dockerfile build using an argument called PAT.

To build this, create a Personal Access Token in your Azure DevOps account, with permissions to read your feeds, then run the following command:

docker build -f WebApplication1\Dockerfile -t meetup/demo4 . –build-arg PAT=<token>

You should now see the restore complete successfully

Creating a Windows Container Build Agent for Azure Pipelines

Having automated builds that are stable and predictable is so important in order to succeed with CI/CD. One important practice to enable this is to have a fully scriptable build environment that lets you deploy multiple, identical, build envionment hosts. This can be done by using image tooling such as Packer from HahsiCorp. Another option is to use Docker which is what I am using in this post.

Using Docker will will crete a Dockerfile that specifies the content of the image in which builds will run. This image should contain the SDK’s and tooling necessary to build and test your projects. It will also contain the build agent for your favourite CI server that will let you spin up a new agent in seconds using the docker image.


In this post I will walk you through how to create a Windows container image for Azure Pipelines/Azure DevOps Server that contains the necessary build tools for building .NET Framework and .NET Core projects.

I am using Windows containers here because I want to be able to build full .NET Framework projects (in addition to .NET core of course). If you only use .NET Core things are much simpler, there is even an existing Docker image from Microsoft thath contains the build agent here: https://hub.docker.com/r/microsoft/vsts-agent/


All files referred to in this blog post are available over at GitHub:
https://github.com/jakobehn/WindowsContainerBuildImage


Prerequisites:

You need to have Docker Desktop install on your machine to build the image.

I also recommend using Visual Studio Code with the Docker extension installed for authoring Dockerfiles (see https://code.visualstudio.com/docs/azure/docker)

Specifying the base image

All Docker images must inherit from a base image. In this case we will start with one of the images from Microsoft that ships with the full .NET Framework  SDK, microsoft/dotnet-framework.

If you have the Docker extension in VS Code installed, you can browse existing images and tags directly from the editor:

image

I’m going to use the image with .NET Framework 4.7.2 SDK installed running in Windows Server Core:

image

Installing Visual Studio Build Tools

In order to build .NET Framework apps we need to have the proper build tools installed. Installing Visual Studio in a Docker container is possible but not recommended. Instead we can install Visual Studio Build Tools, and select wich components to install.

To understand which components that are available and which identifer they have, this page is very userful. It contains all available components that you can install in Visual Studio Build Tools 2017:
https://docs.microsoft.com/en-us/visualstudio/install/workload-component-id-vs-build-tools?view=vs-2017

In the lines shown below, I’m first downloading and installing Visual Studio Log Collection tool (vscollect) that let’s us capture the installation log. Then we download the build tools from the Visual Studio 2017 release channel feed.

Finally we are instaling the build tools in quiet mode,specifying the desired components. Of course you might wamt to change this list to fit your needs.

image

Installing additional tooling

You will most likely want to install additional tooling, besides the standard VS build tools. In my case, I want to install Node, the latest version of NET Core SDK and also web deploy. Many of these things can be installed easily using chocolatey, as shown below:

image

Installing .NET Core SDK can be done by simply downloading it and extract it and update the PATH environment variable:

image

Installing and configuring the Azure Pipelines Build Agent

Finally we want to installl the Azure Pipelines build agent and configure it. Installing the agent will be done when we are building the Docker image. Configuring it against your Azure DevOps organization must be done when starting the image, which means will do this in the CMD part of the Dockerfile, and supply the necessary parameters.

image

The InstallAgent.ps1 script simply extracts the downloaded agent :

image

ConfigureAgent.ps1 will be executed when the container is started, and here we are using the unattended install option for the Azure Pipelines agent to configure it against an Azure DevOps organization:

image

Building the Docker image

To build the image from the Dockerfile, run the following command:

docker build -t mybuildagent:1.0 -m 8GB .

I’m allocating 8GB of memory here to make sure the installation process won’t be too slow. In particular installing the build tools is pretty slow (around 20 minutes on my machine) and I’ve found that allocating more memory speeds it up a bit. As always, Docker caches all image layers so if you make a change to the Docker file, the build will go much faster the next time (unless you change the command that installs the build tools Smile

When the build is done you can run docker images to see your image.

Running the build agent

To start the image and connect it to your Azure DevOps organization, run the following command:

docker run -d -m 4GB –name <NAME> –storage-opt “size=100GB” -e TFS_URL=<ORGANIZATIONURL>-e TFS_PAT=<PAT> -e TFS_POOL_NAME=<POOL> -e TFS_AGENT_NAME=<NAME> mybuildagent:1.0

Replace the parameters in the above string:

  • NAME
    Name of the builds agent as it is registered in the build pool in Azure DevOps. Also the docker container will use the same name, which can be handy whe you are running multiple agents on the same host
  • ORGANIZATIONURL
    URL to your Azure DevOps account, e.g. https://dev.azure.com/contoso
  • PAT
    A personal access token that you need to crete in your Azure DevOps organization Make sure that the token has the AgentPools (read, manage) scope enabled
  • POOL
    The name of the agent pool in Azure DevOps that the agent should register in

When you run the agent from command line you will see the id of the started Docker container. For troubleshooting you can run docker logs <id> to see the output from the build agent running in the container

image

After around 30 seconds or so, you should see the agent appear in the list of available agents in your agent pool:

image

Happy building!

Publish a GitHub Release from Visual Studio Team Services

The new build system in Team Foundation Server 2015 and Visual Studio Team Services has from the start made it very easy to integrate with GitHub. This integration allows you to create a build in TFS/VSTS that fetches the source code from a GitHub repository. I have blogged about this integration before, at http://blog.ehn.nu/2015/06/building-github-repositories-in-tfs-build-vnext/.


Publisinh a GitHubRelease from VSTS

This integration allows you to use GitHub for source code, but use the powerful build system in TFS/VSTS to run your automated builds. But, when maintaining the project at GitHub you often want to publish your releases there as well, with the output from your build.

To make this easy, I have developed a custom build task lets you publish your build artifacts into a release at GitHub.

The task is available over at the new Visual Studio Marketplace, you can find the extension here:
https://marketplace.visualstudio.com/items?itemName=jakobehn.jakobehn-vsts-github-tasks


image

To use it, just press the Install button and select the VSTS account where you want to install it. After this, the Publish GitHub Release build task will be available in your build task catalog, in the Deploy category.

image


From Team Foundation Server 2015 Update 2, it is possible to install the extensions from the VS Marketplace on premise. To do so, use the Download button and follow the instructions.


After adding the build task to a build definition, you need to configure a few parameters:

image

These parameters are:

  • Application Name
    You can use any name here, this is what is sent to the GitHub API in the request header.
  • Token
    Your GitHub Personal Access Token (PAT). For more information about GitHub tokens, please see https://help.github.com/articles/creating-an-access-token-for-command-line-use/

    Repository Name
    The name of the repository where the release should be created

  • Owner
    The GitHub account of the owner of the release
  • Tag Name
  • A unique tag for the release. Often it makes sense to include the build number here
  • Release Name
    The name of the release. Also, including the build number here can make sense
  • Draft
    Enable this to create a draft release
  • Prerelease
    Enable this to create a prerelease

    Assets to upload
    Specified which files that should be included in the GitHub release


Hope that you will find this extension useful, if you find bugs or have feature suggestions, please report them on the GitHub site at https://github.com/jakobehn/VSTSGitHubTasks

TFS 2015 Update 2 RC1 Available – With VS Release Management vNext

Today Brian Harry announced that the first release of TFS 2015 Update 2 is available. It is an RC with a go-live license, which means that Microsoft will support you if you install it in production, and it will be a direct supported upgrade to RTM once it is released.

Read the full release notes for Update 2 RC1 here: https://www.visualstudio.com/en-us/news/tfs2015-update2-vs


One huge thing with the release is that Update 2 includes the new Release Management vNext feature that has up until now only been available in the service (although you can use that for on premise TFS and deployments). But now you don’t have to rely on VSTS for hosting the service, it is now part of TFS 2015 Update 2!


And of course, if you want to learn (a lot) more about hwo to implement continuous delivery using TFS 2015, with the new build and release management features, grab a copy of our latest book on the topic, Continuous Delivery with Visual Studio ALM 2015:


book

Deploy Azure Web Apps with Parameterization

I have blogged before about how to deploy an Azure Web App using the new build system in TFS 2015/Visual Studio Team Services. In addition to configure an Azure service endpoint, it is really only a matter of using the built-in Azure Web App Deployment task.

However, in many cases I have decided not to use this task myself since it has been lacking a key feature: Applying deployment parameters using the SetParameter.xml file.

As I have mentioned a gazillion times, building your binaries once and only once is a key principle when implementing continuous delivery. If you are using web deploy for deploying web applications (and you should), you must then use Web Deploy parameters to apply the correct configuration values at deployment time.


Under the hood the Azure Web App Deployment  task uses the Publish-AzureWebsiteProject cmdlet that uses web deploy to publish a web deploy package to Microsoft Azure. Up until recently, this cmdlet did not support web deploy parameters, the only thing that you could substitute was the connecting string, like so:

Publish-AzureWebsiteProject -Name site1 -Package package.zip -ConnectionString @{ DefaultConnection = "my connection string" }

However, it is actually possible to specify the path to the SetParameter.xml file that is generated together with the web deploy package. To do this, you can use the –SetParametersFile parameter, like so:

Publish-AzureWebsiteProject -Name Site1 -Package package.zip -SetParametersFile package.SetParameters.xml

When using the Azure Web App Deployment task, there is no separate parameter for this but you can use the Additional Arguments parameter to pass this information in:

image

Note: In this case, I am using the Azure Web App Deployment task as part of a release definition in Visual Studio Release Management, but you can also use it in a regular build definition.

This will apply the parameter values defined in the QBox.Web.SetParameters.xml file when deploying the package to the Azure Web App.

If you are interested, here is the pull request that implemented support for SetParameters files: https://github.com/Azure/azure-powershell/pull/316

Downloading Build Artifacts in TFS Build vNext

Since a couple of months back, Microsoft new Release Management service is available in public preview in Visual Studio Team Services. According to the current time plan, it will be released for on-premise TFS in the next update (Update 2).

Using a tool like release management allows you to implement a deployment pipeline by grabbing the binaries and any other artifacts from your release build, and then deploy them across different environments with the proper configuration and approval workflow. Building your binaries once and only once is a fundamental principal of implementing continuous delivery, too much can go wrong if you build your application every time you deploy it into a new environment.


However, sometimes you might not have the opportunity to setup a release management tool like VSTS or Octopus Deploy, but you still want to be able to build your binaries once and deploy them. Well, you can still implement your deployment using TFS Build, but instead of building your source code during every build we download the artifacts from another build that already has completed.

Let’s look at how we can implement this using PowerShell and the REST API in TFS/VSTS.In this sample we will execute this script as part of a TFS build, in order to create a “poor mans” deployment pipeline. If you want to use the script outside of TFS Build, you need to replace some environment variables that are used in the script below.

Downloading Build Artifacts using PowerShell and the REST API

First of all, to learn about the REST API and other ways to integrate and extend Visual Studio, TFS and Visual Studio Team Services, take a look at https://www.visualstudio.com/integrate. This is a great landing page that aggregate a lot of information about extensibility.

Here is a PowerShell script that implements this functionality, as well as a few other things that is handy if you implement a deployment pipeline from a build definition.

[CmdletBinding()] param( [Parameter(Mandatory=$True)] [string]$buildDefinitionName, [Parameter()] [string]$artifactDestinationFolder = $Env:BUILD_STAGINGDIRECTORY, [Parameter()] [switch]$appendBuildNumberVersion = $false ) Write-Verbose -Verbose ('buildDefinitionName: ' + $buildDefinitionName) Write-Verbose -Verbose ('artifactDestinationFolder: ' + $artifactDestinationFolder) Write-Verbose -Verbose ('appendBuildNumberVersion: ' + $appendBuildNumberVersion) $tfsUrl = $Env:SYSTEM_TEAMFOUNDATIONCOLLECTIONURI + $Env:SYSTEM_TEAMPROJECT $buildDefinitions = Invoke-RestMethod -Uri ($tfsURL + '/_apis/build/definitions?api-version=2.0&name=' + $buildDefinitionName) -Method GET -UseDefaultCredentials $buildDefinitionId = ($buildDefinitions.value).id; $tfsGetLatestCompletedBuildUrl = $tfsUrl + '/_apis/build/builds?definitions=' + $buildDefinitionId + '&statusFilter=completed&resultFilter=succeeded&$top=1&api-version=2.0' $builds = Invoke-RestMethod -Uri $tfsGetLatestCompletedBuildUrl -Method GET -UseDefaultCredentials $buildId = ($builds.value).id; if( $appendBuildNumberVersion) { $buildNumber = ($builds.value).buildNumber $versionRegex = "d+.d+.d+.d+" # Get and validate the version data $versionData = [regex]::matches($buildNumber,$versionRegex) switch($versionData.Count) { 0 { Write-Error "Could not find version number data in $buildNumber." exit 1 } 1 {} default { Write-Warning "Found more than instance of version data in buildNumber." Write-Warning "Will assume first instance is version." } } $buildVersionNumber = $versionData[0] $newBuildNumber = $Env:BUILD_BUILDNUMBER + $buildVersionNumber Write-Verbose -Verbose "Version: $newBuildNumber" Write-Verbose -Verbose "##vso[build.updatebuildnumber]$newBuildNumber" } $dropArchiveDestination = Join-path $artifactDestinationFolder "drop.zip" #build URI for buildNr $buildArtifactsURI = $tfsURL + '/_apis/build/builds/' + $buildId + '/artifacts?api-version=2.0' #get artifact downloadPath $artifactURI = (Invoke-RestMethod -Uri $buildArtifactsURI -Method GET -UseDefaultCredentials).Value.Resource.downloadUrl #download ZIP Invoke-WebRequest -uri $artifactURI -OutFile $dropArchiveDestination -UseDefaultCredentials #unzip Add-Type -assembly 'system.io.compression.filesystem' [io.compression.zipfile]::ExtractToDirectory($dropArchiveDestination, $artifactDestinationFolder) Write-Verbose -Verbose ('Build artifacts extracted into ' + $Env:BUILD_STAGINGDIRECTORY)

This script accepts three parameters:

buildDefinitionName
This is a mandatory parameter where you can specify the name of the build definition from which you want to download the artifacts from. This script assumes that the build definition is located in the same team project as the build definition in which this script is running. If this is not the case, you need to add a parameter for the team project.

artifactsDestinationFolder
This is an optional parameter that let’s you specify the folder where the artifacts should be downloaded to. If you leave it empty, it will be downloaded to the staging directory of the build (BUILD_STAGINGDIRECTORY)

appendBuildNumberVersion
A switch that indicates if you want to append the version number of the linked build to the build number of the running build. Since you are actually releasing the build version that you are downloading artifacts from, it often makes sense to use this version number for the deployment build. The script will extract a 4 digit version (x.x.x.x) from the build number and then append it to the build number of the running build.

As an example, if the latest release build has the build number MyApplication-1.2.3.4, the build will extract 1.2.3.4 and append this to the end of the build number of the running build.


Running the script in TFS Build

Running a PowerShell script in TFS Build is really easy, but I’ll include it here anyway. Typically you will run this script in the beginning of a build in order to get the build artifacts, and then add the tasks related to deploying the artifacts in whatever way that fits.

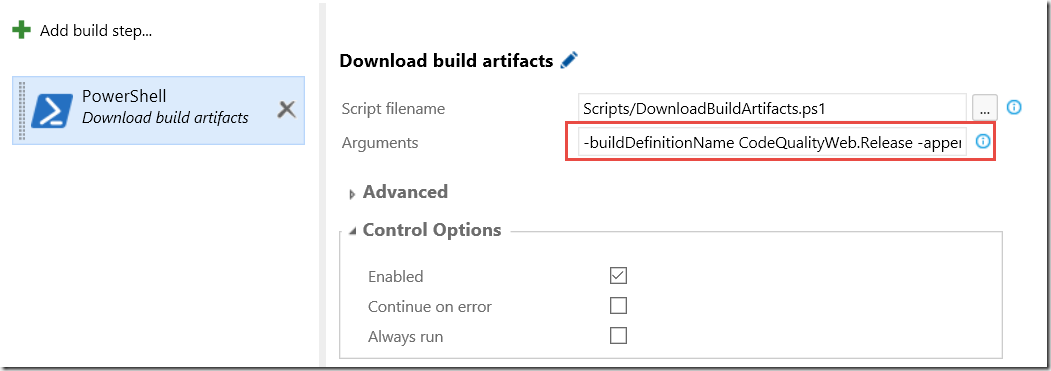
Add the script to source control and then add a PowerShell task to the build definition and select the script from the repository. Then specify the parameters of the tasks in the argument field

image

Here is a sample argument:

-buildDefinitionName MyApplication.Release –appendBuildNumberVersion

Where MyApplication.Release is the name of the build definition that have produced the build artifacts that we want to release.

Running this script as part of the build will not download the artifacts from the latest successful build of the linked build definition and place them in the staging directory. In addition it will append the version number of the linked build (x.x.x.x) to the end of the running build.

NB: You need to consider where to place this script. Often you’ll want to put this script together with the application that you are deploying, so that they can change and version together.


Hope you will find this script useful, le me know if you have any issues with it!

Happy building!


PS: If you want to learn more about implementing Continuous Delivery using Visual Studio Team Services and TFS, grab a copy of my and Mathias Olausson’s latest book “Continuous Delivery with Visual Studio ALM 2015