Deploy On Premise Builds with Visual Studio Release Management vNext

Microsoft’s new version of Visual Studio Release Management is currently in public preview in VSTS. It is currently targeted for the TFS 2015 Update 2 version that should be shipped later this spring.

However, even if you are not all in on Visual Studio Team Services, you can still use this service! Since the build/release agents that are used can run on premise without any necessary firewall ports being opened inbound, you have full access to any internal TFS servers and application servers that you want to deploy to.


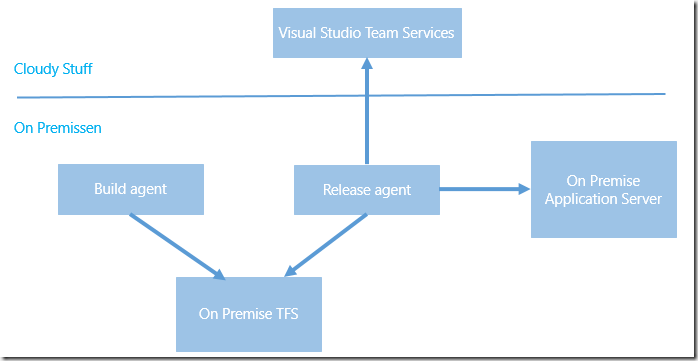
The following image illustrates the different components involved here.

 image


As you can see everything is running on premise, except Visual Studio Team Services of course. Since the release agent is also running on premise, it can connect to the on premise TFS and download the build artifacts, and it can access the on premise application servers and deploy the artifacts.


Lets’s walk through how you can use Visual Studio Release Management today to deploy builds from your on premise TFS build server to an on premise web server.

Creating the Release Definition

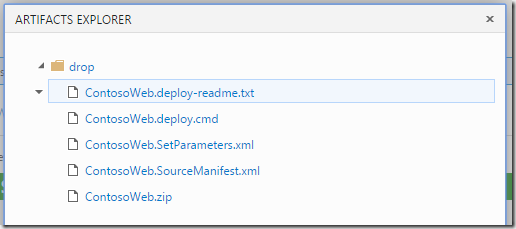
  1. I’m not going to walk through how to create a build definition in TFS, there are plenty of documentation on that. Let’s just look at the artifacts of the build that we will deploy:

    image 

  2. Nothing special here, this is the standard output from a build that runs msdeploy to create web deploy packages.
  3. Now, to be able to consume the build artifacts from a release definition, we need to setup a service endpoint for the TFS server. In the new build and release management system, service endpoints are a fundamental concept. They encapsulate the information, including credentials, that is needed to integrate with an external system. Example of service endpoints include Azure subscriptions, Jenkins build servers and Chef servers. In addition we can create Generic service endpoints, which contains a server URL and a user name and a password. This is what we will use here.
  4. Service endpoints also have there own security groups, which means that we can for example make sure that only certain people can use a service endpoint that points to the production Azure subscription

    Service points are scoped to the team project level, and are available on a separate tab on the admin page. In this case, we will create a Team Build endpoint, where we supply the URL of the TFS server and the necessary credentials for it:

    image

  5. With the service endpoint done, we can move on to create a release definition. In this example, I will define two environments, Dev and Prod that will just point to two different web sites on the same server.

     image

    As you can see, I only have two tasks in each environment. The first task is a custom task that replaces any tokens found in the files that matches the supplied pattern.. This lets me apply environment specific values during the build. In this case, I will update the *.SetParameter.xml file that is used together with web deploy.

    Also, I use the configuration functionality to supply the machine name of the web server and the name of the web site that I will deploy this to. As you can see below, I will deploy both dev and production to the same server, but to different web sites. Not entirely realistic, but you should get the idea here. You can see that I use the variable $(webSite) in the task above, where I run the generated web deploy command file.

    image

  6. Now, the part that is different here compared to a standard release definition is the linking of artifacts. Here we will select “Team Build (external)”, which in this context mean any TFS server that is defined as a service endpoint. In the Service dropdown we select the service endpoint that we created earlier (TFS).We also need to supply the name of the team project and the name of the build definition, as shown below.

    image


    1. NOTE
      : When linking to an external build like this, we do it by name. This means that if you change the name of the build definition or the team project, you will have to change this artifact definition.
  7. Now we can save the release definition and start a release. A big difference compared to when you have linked to a VSTS build is that RM won’t locate the existing builds for you, so you have to supply the build number yourself of the build that you want to release.
  8. image
  9. When the release has finished we can see that the selected build version (1.0.0.6) has been deployed to both environments:
  10. image


Summary

As you can see, there is nothing that stops you from start using the new version of Visual Studio Release Management, even if you have everything else on premise.
Inmeta Visual Studio Extension Gallery – version 2.0

This year at the second MVP summit I presented a new solution for hosting a private extension gallery. Since then I have finished up the code and put it up on the CodePlex site so you can use it as you want to.
In this blog post I will walk through the background and how you deploy and use the solution.

Note: The sourcecode is available at http://inmetavsgallery.codeplex.com/ as a new 2.0 release. I have branched the original source code so that it is still available.
Background

Little more than a year ago, I blogged about how to host your own private gallery for hosting Visual Studio extensions. The solution that I put up on CodePlex (http://inmetavsgallery.codeplex.com/) was a ASP.NET web service that scans a folder or share and generates the corresponding Atom Feed XML that Visual Studio expects when browsing extensions, using the Extension Manager. See the blog post for details on how this works.
Although this solution works fine (we are using it internally at Inmeta) there are some things that have been nagging me:

  • There is no easy way to upload or update extensions.
  • Since the file system is the data storage, the service rescanned the whole structure on every request, which could become a bottleneck when the number of clients and/or extensions increase
  • I miss some of the features that are available in the “real” Visual Studio Gallery, such as showing the number of downloads and the average rating of each extension

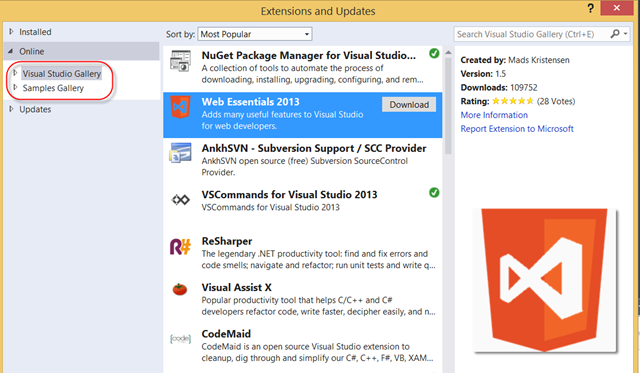
The last bullet is what made start looking at how this works in Visual Studio. As you know Visual Studio comes with two extension galleries by default, the Visual Studio Gallery and the Samples Gallery:

image
The standard Visual Studio Gallery

When selecting an extension here, Visual Studio shows among other things how many downloads this extension has, and the average rating together with the number of votes. Also it shows icons for the extension and a small preview image when selected.
It is also possible to search on different metadata, such as popularity, number of downloads or most recent for example. All in all, this is a much nicer experience than what the was possible using the official private extension gallery mechanism.

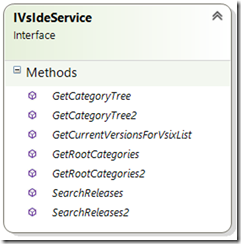
When I dug into the details of how this works, it turns out that Visual Studio internally uses a completely different protocol for communicating with these two galleries. It uses a standard (but completely undocumented) WCF SOAP service with the following interface:


image 
The WCF SOAP interface that Visual Studio communicates with


So basically, there are methods available for displaying the category tree (GetRootCategories(2) and GetCategoryTree(2)), checking for updates (GetCurrentVersionsForVsixList) and for searching available extensions (SearchReleases(2)).
You can see how these methods matches to how the Visual Studio Extension Manager works when you browse, search and update your extensions.

So, with a (lot of) help from Fiddler I decrypted the protocol that was used and managed to implement a service that works in the same way that the Visual Studio Gallery does.


Solution
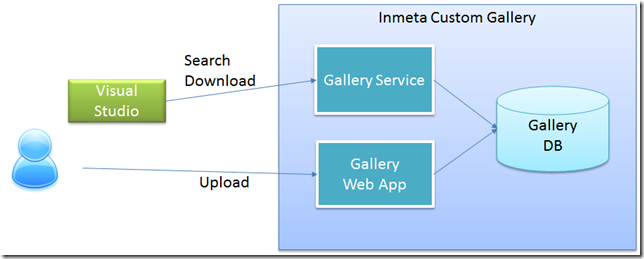
The new version of the Inmeta Gallery is a ASP.NET web application that consists of three parts:

  • A WCF service implementing the IVsIdeService interface
  • An ASP.NET web application where you can upload and rate visual studio extensions
  • A SQL database for storing the extensions.

image
Inmeta Visual Studio Gallery overview


This makes it easy to deploy, it is just one web application that contains both the service that VS communicates with and the web application where you can browse and upload the extensions.

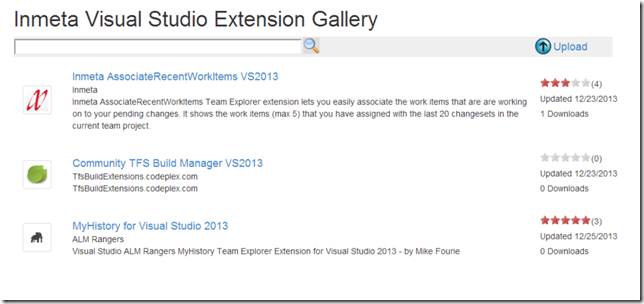
The web application is simple, it shows the 10 most downloaded extensions together with the same information that you see in Visual Studio, and you can search extension by name or description. 

Here is a screenshot:

image
Screenshot of the Inmeta Visual Studio Extension Gallery

When select an extension you will see the full details of the extension, as shown below. Here you can download the extension, give it a rating and if desired delete it completely.


image
Extension details page

Note that if you rate it you need to press Update to store the new value.


Deployment

  • Server
    The CodePlex release for this solution is a simple web deploy package, that you can deploy to a local or remote IIS web server. I’ve attached the standard files from the Visual Studio publising wizard, so you’ll get the command files that simplifies the deployment, See http://msdn.microsoft.com/en-us/library/dd465323(v=vs.110).aspx for information on creating and deploying a Web Deploy Package using Visual Studio.

    Note that the web application is using Entitiy Framework Code First which means that it will try to create the database the first time the code is executed. In order to do so, it must have proper permission on the target SQL server of course. If you need to deploy the database in any other manner, just download the source code take it from there.

  • Client
    It is not possible to add a private extension gallery of this type using Visual Studio, it will always create a Atom Feed gallery extension point. Since these settings are stored in the registry, it is easy to do this using a .reg file.
    The registry settings for a Visual Studio Gallery looks like this:

    image

    Note the VSGallery string that is highlighted in te image above. This is the “secret” setting that causes Visual Studio to use the WCF protocol instead of the simple Atom Feed protocol
    There is a .reg file available on the CodePlex site that you can use for registering the gallery for every client.


Hopefully you wil find this new version of the Inmeta Visual Studio Gallery service usable, please post any issues and/or suggestions to the CodePlex site!

New Book: Pro Team Foundation Service

The last couple of months I have been working together with Mathias Olausson, Mattias Sköld and Joachim Rossberg on a new book project for Apress that has just been published. The book is called Pro Team Foundation Service and covers all aspects of working with Team Foundation Service, Microsoft’s hosted version of Team Foundation Server in the cloud. I have mainly worked on the chapter related to automated build and continuous deployment, but also with some of the other chapters.

It has been a quite hectic  project due to a tight schedule, but at the same time it has been a lot of fun to work on this book together with late night meetings and weekends filled with book writing and chapter editing.

During the project we’ve had great help from several people at Microsoft, Jamie Cool, Will Smythe, Anutthara Bharadwaj, Ed Blankenship and Vijay Machiraju. Also a big thanks to Brian Harry for writing the foreword to the book. In addition I’d like to thank my colleague Terje Sandstrøm for helping out with Technical Review of large parts of the book.

Here is some information about the book, you can find it on Amazon here:
http://www.amazon.com/Team-Foundation-Service-Mathias-Olausson/dp/1430259957#_

Check it out and let us know what you think!

clip_image001

Pro Team Foundation Service gives you a jump-start into Microsoft’s cloud-based ALM platform, taking you through the different stages of software development. Every project needs to plan, develop, test and release software and with agile practices often at a higher pace than ever before.
Microsoft’s Team Foundation Service is a cloud-based platform that gives you tools for agile planning and work tracking. It has a code repository that can be used not only from Visual Studio but from Java platforms and Mac OS X. The testing tools allow testers to start testing at the same time as developers start developing. The book also covers how to set up automated practices such as build, deploy and test workflows.

This book:

· Takes you through the major stages in a software development project.

· Gives practical development guidance for the whole team.

· Enables you to quickly get started with modern development practices.

With Microsoft Team Foundation Service comes a collaboration platform that gives you and your team the tools to better perform your tasks in a fully integrated way.


What you’ll learn

· What ALM is and what it can do for you.

· Leverage a cloud-based ALM platform for quick improvements in your development process.

· Improve your agile development process using integrated tools and practices.

· Develop automated build, deployment and testing processes.

· Integrate different development tools with one collaboration platform.

· Get started with ALM best-practices first time round.


Who this book is for

Pro Team Foundation Service is for any development team that wants to take their development practices to the next level. Microsoft Team Foundation Service is an excellent platform for managing the entire application development lifecycle and being a cloud-based offering it is very easy to get started. Pro Team Foundation Service is a great guide for anyone in a team who wants to get started with the service and wants to get expert guidance to do it right.


Table of Contents

1. Introduction to Application Lifecycle Management

2. Introduction to Agile Planning, Development, and Testing

3. Deciding on a Hosted Service

4. Getting Started

5. Working with the Initial Product Backlog

6. Managing Team and Alerts

7. Initial Sprint Planning

8. Running the Sprint 

9. Kanban

10. Engaging the Customer

11. Choosing Source Control Options

12. Working with Team Foundation Version Control in Visual Studio

13. Working with Git in Visual Studio

14. Working in Heterogeneous Environments

15. Configuring Build Services

16. Working with Builds

17. Customizing Builds

18. Continuous Deployment

19. Agile Testing

20. Test Management

21. Lab Management

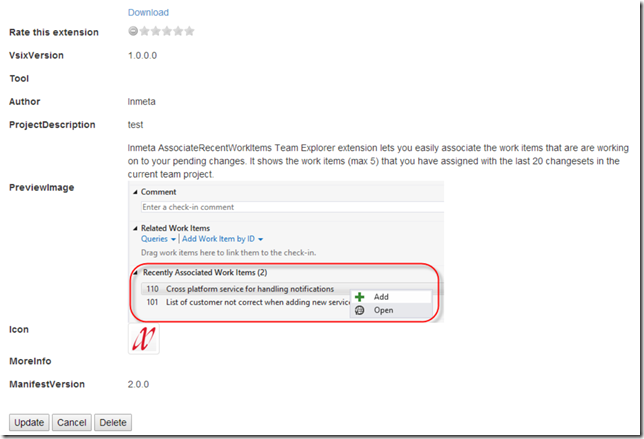
Extending Team Explorer 2012 – Associating Recent Work Items

Extension available at: http://visualstudiogallery.msdn.microsoft.com/9ed2d30c-a692-42b0-a21d-cdc8d2bf322c


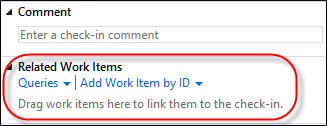
I have been playing around a bit lately with extending Team Explorer 2012, mostly because it is fun but also to fix a little nagging feature that should have been there from the beginning. Often I (and a lot of other people) find myself wanting to associate several consecutive changesets to the same work item. The problem is that Team Explorer does not remember this, instead I have to either remember the ID or use a query that hopefully will match the work item.

image 
Where is the work item that I just associated with?
 
True, when using the My Work page and the teams and sprint backlogs are correctly setup, you can find “your” work items there, but every so often this is not the case, and off I go to locate that work item again.

So this seemed to be a good feature to implement and at the same time learn a little about how to extend Team Explorer in Visual Studio 2012.

There is a great sample posted by Microsoft over at MSDN, it also talks about the main extension points and classes/interfaces that you need to know about. You can find it here: http://code.msdn.microsoft.com/windowsdesktop/Extending-Explorer-in-9dccd594. If you have developed extensions to Visual Studio before, you will be relieved to know that this new extension model for Team Explorer is purely based on standard .NET/WPF and MEF, no weird COM interfaces.

You can add new pages to Team Explorer, you can add new sections to existing pages and you can add navigation links to the Home screen. All these extensions are discovered by Team Explorer using the Managed Extensibility Framework (MEF). You just need to attribute your classes with the correct attribute and it will be found by Team Explorer. The attributes also control where your extension will appear. This extension is a Section that should appear inside the Pending Changes page:

 image
Example of attributing a Team Explorer extension

The last property (35) is a priority number that controls when the extension is created and also where it will placed relative to the other sections. The existing Related Work Items section has priority 30, so 35 will place our extension right below it.

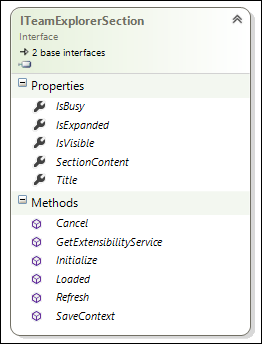
We also need to implement the ITeamExplorerSection interface, that contains properties and methods that needs to be implemented for anything to show up.

image
ITeamExplorerSection interface

The most interesting property here  is the SectionContent property which is where you return the content of your extensions. This is typically a WPF user control in which you can add any controls you like. 

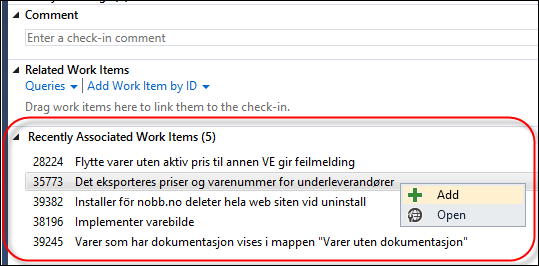
This is how the extension appear inside the Pending Changes page. It will analyze your recent changesets in the current team project and extract the last 5 associated work items and show them in a list.
From the list you can then easily add a work item to the current pending changes by right-clicking on it and select Add. You’ll note that the work item will then disappear from the list, since you are not likely interested in adding it again.

image

Recently Associated Work Item section

I encourage you to read the MSDN article for more information about the possibilities to extend Team Explorer 2012. Also, try out the extension and let me know it you find it useful!

TFS Build: Running Static Code Analysis for Specific Configuration

Running Static Code Analysis (SCA) is something that you should be doing regularly to verify your code base against a large set of rules that will check your code for potential problems and how it comply with standard patterns such as naming conventions for example. Microsoft include several different rule sets that you can use for starters, but you can build your own rule sets as well, that contain the rule that you want to use, In addition, you can write your own custom rules and add these to your rule sets.

What you will notice quickly when you start running SCA for larger solutions is that it can take a lot of time. Therefore, you normally don’t want to run this on your local build but instead run it as part of your automated builds. It is recommended to set up a specific build for your projects that measures code quality, by running for example SCA, Code Metrics and Code Coverage. All these things take time to complete, so don’t put these in your Check-In builds, but in a Quality Assurance (QA) build.


Configuring Static Code Analysis

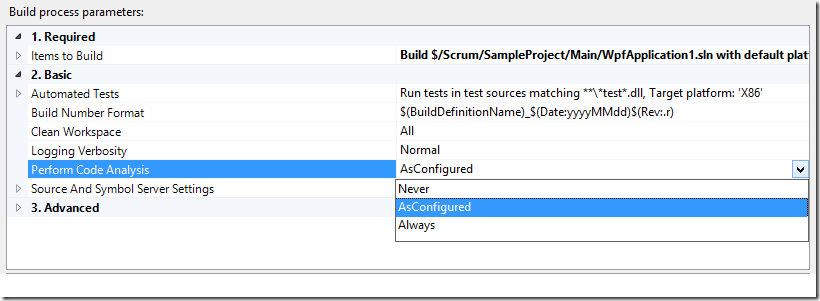
With Team Foundation Build, it is easy to run Static Code Analysis as part of the build, just modify the Perform Code Analysis process parameter in your build definition:

image


There are three possible values that you can use here:

  • Never – Never run Static Code Analysis
  • As Configured – If the project is configured to run Static Code Analysis for the current configuration, then SCA will be executed
  • Always – Always run Static Code Analysis, independent of how the projects are configured

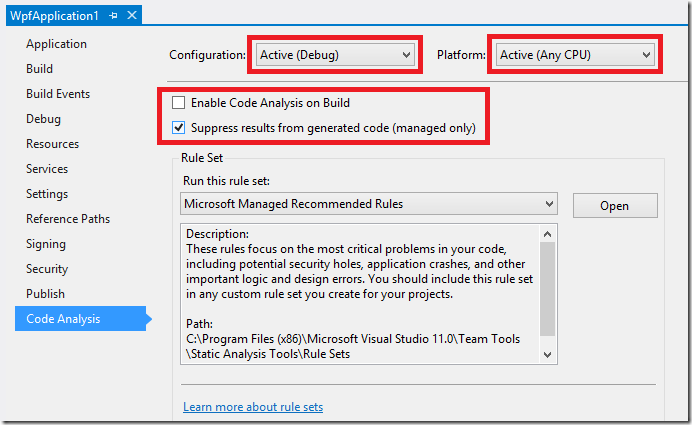
If you select As Configured, you need to make sure that you have configured your projects correctly. This is done by opening the Properties window for your project and select the Code Analysis tab:

image 

As you can see, the Code Analysis settings are specific to the Configuration and Platform for the project. This means that you can, for example, run code analysis only on Debug builds and not on Release builds.

Now, while using project specific settings like this to control when SCA is executed works, it has some drawbacks. When the solutions start to grow in size, it can be hard to make sure that the settings in every project is correctly configured. Also, as mentioned before, you typically don’t want to run SCA at all on your local builds, since it makes your build times longer. This can be solved by for example making sure that only the Release configuration has the Enable Code Analysis on Build property set to true, and then you only build the Debug configuration locally.

A better way to solve this is to control this completely from the build definition instead. You do this by setting the Perform Code Analysis process parameter to Always, as shown above. This will make sure that SCA are run for all projects, no matter how they are configured.

Running SCA for specific configurations

A problem that we faced recently at a customer that are running big builds (1+ hours) is that they are building both the and Debug and Release configurations as part of their builds. We wanted to run SCA on these builds, and we don’t want to configure each project (the solutions has 150+ projects in it). But, setting Perform Code Analysis to Always, this will result in SCA being run for both Debug and Release builds resulting in a considerable increase in build time.

So, how can we make sure that SCA is executed on all projects, but only on on (or several) configurations? One way of doing this is to customize your build template and add a parameter that specifies these configurations.

Here are the steps to accomplish this:

  1. If creating a new build template from scratch, branch the DefaultTemplate.11.1.xaml build process template.
  2. Open the template in Visual Studio
  3. Select the top Sequence activity and expand the Arguments tab
  4. At the bottom of the list, add a new parameter called RunSCAForTheseConfigurations with StringList as type

      image

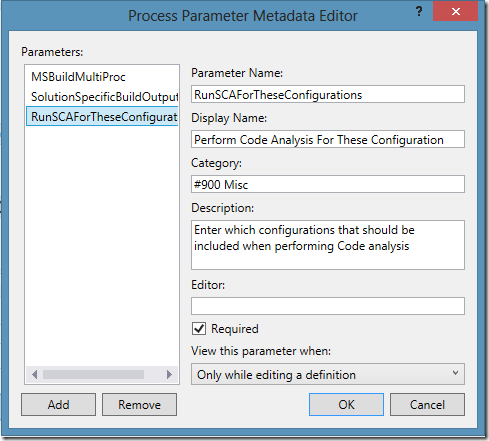
  5. Locate the MetaData process parameter and click on the browse button on the very right
  6. Add a new entry for the new parameter

    image

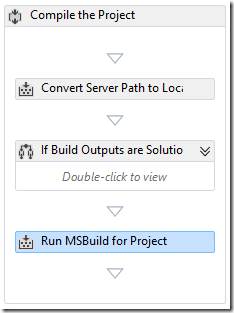
  7. Inside the workflow, locate the MSBuild activity that is used for compiling the projects. It is right at the end of the Compile the Project sequence:

    image

  8. Right-click the MSBuild activity and select Properties

  9. Locate the RunCodeAnalysis property and open the expression editor

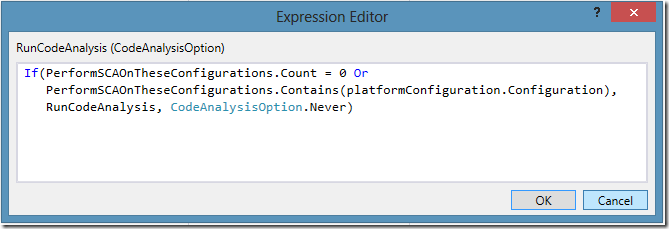
  10. Enter the following expression

    image 

    The expression evaluates if the current configuration (platformConfiguration.Configuration) is specified in our new property.

  11. Save the workflow and check it in

Now you can create a new build definition and enter one or more configurations in the new property:


Since this is a property of type StringList, you can add multiple configurations here if you want to.

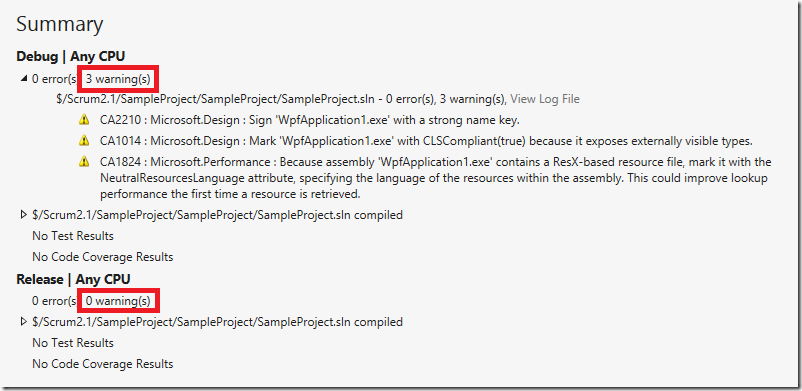
You can see from this build summary that SCA has only been performed on the Debug configuration, and not for Release.

image


Conclusion

I have shown one way to implement automatically running Static Code Analysis on a subset of configurations for a build that builds multiple solutions. This is very useful when you have large builds that compile multiple configurations.

Hope you found this post useful.

Book “Team Foundation Server 2012 Starter” published!

During the summer and fall this year, me and my colleague Terje Sandstrøm has worked together on a book project that has now finally hit the stores!
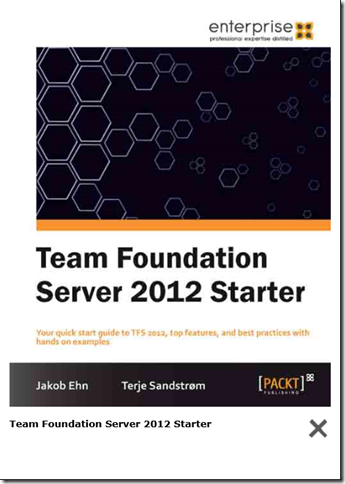
The title of the book is Team Foundation Server 2012 Starter and is published by Packt Publishing.

You can find it at http://www.packtpub.com/team-foundation-server-2012-starter/book or from Amazon http://www.amazon.com/dp/1849688389 

                      image 

The book is part of a concept that Packt have with starter-books, intended for people new to Team Foundation Server 2012 and who want a quick guideline to get it up and working. It covers the fundamentals, from installing and configuring it, and how to use it with source control, work items and builds. It is done as a step-by-step guide, but also includes best practices advice in the different areas. It covers the use of both the on-premises and the TFS Services version. It also has a list of links and references in the end to the most relevant Visual Studio 2012 ALM sites.

Our good friend and fellow ALM MVP Mathias Olausson have done the review of the book, thanks again Mathias!

We hope the book fills the gap between the different online guide sites and the more advanced books that are out. Check it out and please let us know what
you think of the book!

Book Description

Your quick start guide to TFS 2012, top features, and best practices with hands on examples


Overview

  • Install TFS 2012 from scratch
  • Get up and running with your first project
  • Streamline release cycles for maximum productivity


In Detail

Team Foundation Server 2012 is Microsoft’s leading ALM tool, integrating source control, work item and process handling, build automation, and testing.

This practical “Team Foundation Server 2012 Starter Guide” will provide you with clear step-by-step exercises covering all major aspects of the product.
This is essential reading for anyone wishing to set up, organize, and use TFS server.

This hands-on guide looks at the top features in Team Foundation Server 2012, starting with a quick installation guide and then moving into using it for your
software development projects. Manage your team projects with Team Explorer, one of the many new features for 2012.

Covering all the main features in source control to help you work more efficiently, including tools for branching and merging, we will delve into the Agile Planning
Tools for planning your product and sprint backlogs.

Learn to set up build automation, allowing your team to become faster, more streamlined, and ultimately more productive with this
“Team Foundation Server 2012 Starter Guide”.


What you will learn from this book

  • Install TFS 2012 on premise
  • Access TFS Services in the cloud
  • Quickly get started with a new project with product backlogs, source control, and build automation
  • Work efficiently with source control using the top features
  • Understand how the tools for branching and merging in TFS 2012 help you isolate work and teams
  • Learn about the existing process templates, such as Visual Studio Scrum 2.0
  • Manage your product and sprint backlogs using the Agile planning tools


Approach

This Starter guide is a short, sharp introduction to Team Foundation Server 2012, covering everything you need to get up and running.


Who this book is written for

If you are a developer, project lead, tester, or IT administrator working with Team Foundation Server 2012 this guide will get you up to speed quickly
and with minimal effort.

Using Private Extension Galleries in Visual Studio 2012


Updated January 13th 2013:  Added note about ASP.NET MVC 4.0 prerequirement

Note: The installer and the complete source code is available over at CodePlex at the following location: http://inmetavsgallery.codeplex.com


Extensions and addins are everywhere in the Visual Studio ALM ecosystem! Microsoft releases new cool features in the form of extensions and the list of 3rd party extensions that plug into Visual Studio just keeps growing. One of the nice things about the VSIX extensions is how they are deployed. Microsoft hosts a public Visual Studio Gallery where you can upload extensions and make them available to the rest of the community. Visual Studio checks for updates to the installed extensions when you start Visual Studio, and installing/updating the extensions is fast since it is only a matter of extracting the files within the VSIX package to the local extension folder.

But for custom, enterprise-specific extensions, you don’t want to publish them online to the whole world, but you still want an easy way to distribute them to your developers and partners. This is where Private Extension Galleries come into play. In Visual Studio 2012, it is now possible to add custom extensions galleries that can point to any URL, as long as that URL returns the expected content of course (see below).Registering a new gallery in Visual Studio is easy, but there is very little documentation on how to actually host the gallery.

Visual Studio galleries uses Atom Feed XML as the protocol for delivering new and updated versions of the extensions. This MSDN page describes how to create a static XML file that returns the information about your extensions. This approach works, but require manual updates of that file every time you want to deploy an update of the extension.

Wouldn’t it be nice with a web service that takes care of this for you, that just lets you drop a new version of your VSIX file and have it automatically detect the new version and produce the correct Atom Feed XML?

Well search no more, this is exactly what the Inmeta Visual Studio Gallery Service does for you 🙂

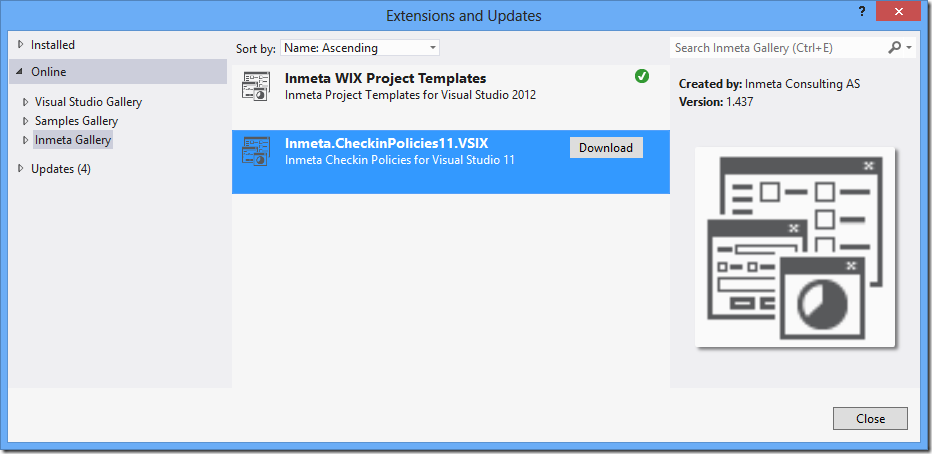
image

Here you can see that in addition to the standard Online galleries there is an Inmeta Gallery that contains two extensions (our WIX templates and our custom TFS Checkin Policies). These can be installed/updated i the same way as extensions from the public Visual Studio Gallery.

Installing the Service

  1. The service uses ASP.NET MVC 4.0, so make sure that you have this installed on your web server.
  2. Download the installer (Inmeta.VSGalleryService.Install.msi) for the service and run it.
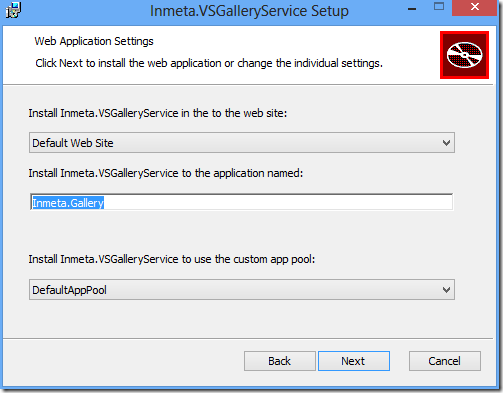
    The installation is straight forward, just select web site, application pool and (optional) a virtual directory where you want to install the service.

    image 

    Note: If you want to run it in the web site root, just leave the application name blank

  3. Press Next and finish the installer.
  4. Open web.config in a text editor and locate the the <applicationSettings> element
  5. Edit the following setting values:
    • FeedTitle
      This is the name that is shown if you browse to the service using a browser. Not used by Visual Studio
    • BaseURI
      When Visual Studio downloads the extension, it will be given this URI + the name of the extension that you selected. This value should be on the following format:
      http://SERVER/[VDIR]/gallery/extension/

    • VSIXAbsolutePath
      This is the path where you will deploy your extensions. This can be a local folder or a remote share. You just need to make sure that the application pool identity account has read permissions in this folder
  6. Save web.config to finish the installation
  7. Open a browser and enter the URL to the service. It should show an empty Feed page:

    image 

Adding the Private Gallery in Visual Studio 2012
Now you need to add the gallery in Visual Studio. This is very easy and is done as follows:

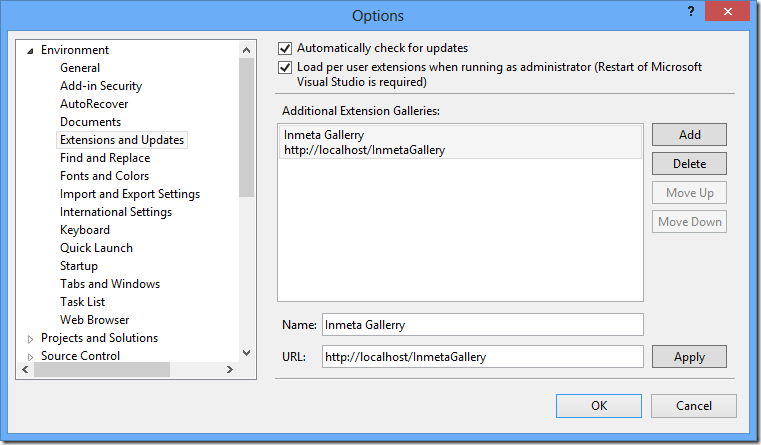
  1. Go to Tools –> Options and select Environment –> Extensions and Updates

  2. Press Add to add a new gallery
  3. Enter a descriptive name, and add the URL that points to the web site/virtual directory where you installed the service in the previous step

     image

  4. Press OK to save the settings.

Deploying an Extension
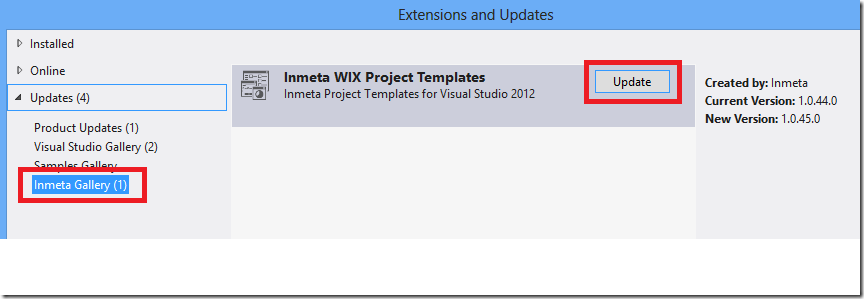
This one is easy: Just drop the file in the designated folder! 🙂  If it is a new version of an existing extension, the developers will be notified in the same way as for extensions from the public Visual Studio gallery:

image

I hope that you will find this sever useful, please contact me if you have questions or suggestions for improvements!

TFS Build: Dependency Replication using Community TFS Build Extensions

I have posted before on how to implement dependency replication using TFS Build, once for TFS 2008 using MSBuild and then for TFS 2010 using Windows Workflow. The last post was not complete (I could not post all implementation details back then for various reasons), so I decided that I should post a new solution for this, but this time using the Community TFS Build Extensions library.

If it is a good idea to store your dependencies in source control or not is a question that is well debated. I’m not going to argue pros and cons here, but for those of you that want to go this way here is a build process template that will get you started.

An interesting fact is that Microsoft actually have added this feature as part of the hosted TFS (TFS Services) running on Windows Azure, but decided post-Beta that this feature was not to be included in the on-premise version of TFS. The feature might reappear in the on-premise version at some point in the future but nothing is confirmed yet. For hosted TFS, this feature is a must since users would not be able to access the network shares that TFS Build normally use as drop location.

Features of the DependencyReplication.xaml build process template

I have added a new Build Process template called DependencyReplication.xaml to the TFS Build Extensions that performs the following steps, in addition to the common default template:

  • Accepts a source control folder input parameter where the binaries should be stored (DeployFolder)
  • Versions all assemblies, using the TfsVersion activity
  • Copies to binaries to the the deploy folder
  • Check in the binaries. The check-in comment includes the version number (using the TfsSource activity)
  • If any errors occurs as part of the replication, it will undo any pending changes as part of the build

I have uploaded the build process template to the CodePlex site, so it is available at $/teambuild2010contrib/CustomActivities/MAIN/Source/BuildProcessTemplates/DependencyReplication.xaml.

Note
: The build process template uses the latest version of the activities, so make sure that you download the latest source and compile it. I had to make some additions to the library to support the functionality of the build process template. The changes will be included in the next official release, but until then you must download the latest bits and build it yourself.


How to use the Build Process Template

  1. Add the DependencyReplication.xaml file to source control. You can add it wherever you like. This sample assumes that you add it to $/Demo/BuildProcessTemplates/
  2. Make sure that you have added the necessary TFSBuildExtension assemblies to the Version Control path for Custom assemblies. See this link for how to do this.
    Since this template only uses a few of the build activities, you only need to add the following assemblies:
    • TfsBuildExtensions.Activites.dll
    • TfsBuildExtensions.TfsUtilities.dll
    • Ionic.Zip.dll
  3. Create a new build definition.
  4. In the process tab, click the Show Details button
  5. Click New and then the Select an existing XAML file radio button and browse to the DependencyReplication.xaml file that you just added:

    image

  6. Note that you will now have an additional, required, process parameter called DeployFolder, located in the Misc category.
    Enter the source control folder path where you want the binaries to be stored.

    Note: This path must exist in source control, and must also be a part of the workspace for the current build definition otherwise the build will fail. This is a limitation of the current implementation. It can be implemented by modifying the workspace at build time, as I did in my first post on dependency replication.

    image

  7. You must also change the Build Number Format parameter to be $(BuildDefinitionName)_1.0.0$(Rev:.r)

    Note: This build process template uses the built-in functionality for incrementing the build number, so the version number will be a part of the build number itself which gives you a nice traceability between the build and the generated assemblies. It then parses the version number from the Build number, so you need to have the four-part version number as part of the build number format. If you have some other way of managing version numbers, you will need to change the build process template correspondingly.

    The 1.0.0 part above can obviously have any value, it will represent your Major.Minor.Revision part of the generated version number.

  8. Save the build definition and queue a build

After the build has finished, you should see that the binaries have been added to source control in the given path.

Note that all files in the binaries folder will be added to source control. If this is not what you want, you need to modify the build process template. An option here would be to add the filter expression (*.*) as a process parameter to make it configurable per build definition.

If you download the binaries you should see that they have the same version number that was included in the build number for that particular build.
If you view history of the folder, you will see that the build service account (in my case the Network service) have checked in the files with a comment containing the version number:

image

If you have check-in policies enabled for the team project, they will be overridden as part of the check-in with a comment.


I hope that you will find this build process template useful. It is by no means a full solution, it lacks some error checking and also it should handle the case where the DeployFolder path is outside the workspace for the build definition. Let me know if you really need this feature and I will consider adding it to the template Ler. Of course, you can add it yourself and post it back to the community.

Deploying SSDT Projects with TFS Build

As many of you probably have noticed by now, Visual Studio Database Projects are not supported in the next version of Visual Studio (currently named
Visual Studio 11 Beta). When you open a solution containing a VSDB project, VS11 wants to convert it to a SQL Server Developer Tools project instead.

This project type ships with SQL Server and has a feature set that covers most of the functionality of the VSDB project, plus some new features, such
a support for SQL 2012 and SQL Azure. A feature comparison list between the two project types can be found here:
http://blogs.msdn.com/b/ssdt/archive/2011/11/21/sql-server-data-tools-ctp4-vs-vs2010-database-projects.aspx

Once you have converted your project to a SSDT project, you will find that most of the functionality is very similar to VSDB, how you work with
schema objects, schema comparisons etc. Deploying a SSDT project is called Publish and is available in the Visual Studio context menu:

image

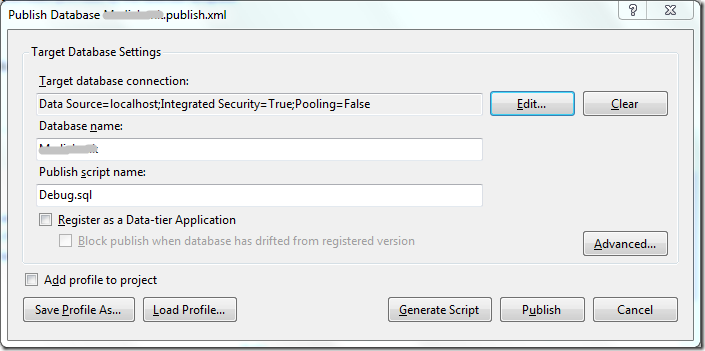
When you invoke the Publish command, Visual Studio will launch the Publish Profile dialog, where you can configure how and where you want to
deploy the database:

image

There are lots of options that you can configure, and these options are often different depending on the target environment. For example, locally you
typically want to recreate the database every time you deploy, but when deploying to a test server, you probably only want to update it incrementally
without removing any existing data. The settings that you enter can be stored in a separate profile file, which you will use when you are deploying the database.

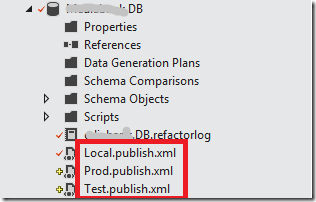
So, create a publish profile for each environment that you want to deploy to. In the following example, I have one profile for deploying to my local
machine, and in addition publish profiles for the test and production environments:

image

(Note that you can right-click a publish profile and mark it as default. This is the profile that will be chosen when you select Publish in Visual Studio, so
in this case I would select Local.publish.xml)

The Publish command calls the Publish MSBuild target which will eventually call the SqlPublishTask MSBuild task which will do the work of deploying your
database. This means that the deployment of the database project is easy to integrate into TFS Build, since you can just specify that you want to invoke
the Publish target as part of your build:

image

Here, I have chosen to deploy the database using the Test profile, which would typically by a remote server used for testing of the build.

Using SQLCMD variables
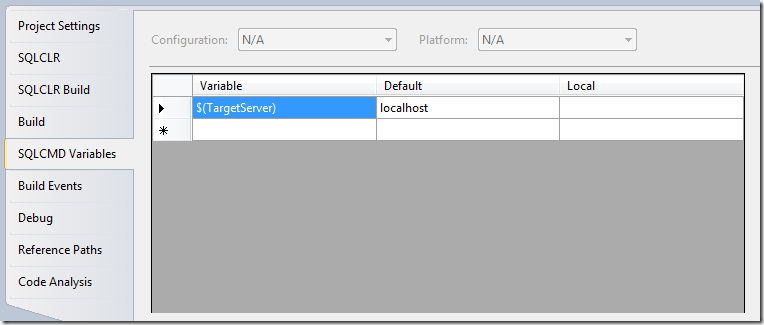
Sometimes you need to use parameters in your scripts, e.g. values that you can pass in dynamically when the script is executed. These are called
SQLCMD variables, and you can define these on the properties page of the database project:

image

Here I have defined a variable called $(TargetServer), and given it a default value of localhost. Then I have references this variable inside a post
deployment script in side the project, like this:

EXEC master..xp_cmdshell 'bcp Daatabase.[dbo].[Table] in "TableContent.dat" -T -c -S$(TargetServer)'


This is a scenario we had at a client recently, where they used the BCP utility to bulk insert lots of data into a few tables as part of the deployment.

To be able to run BCP against different target servers (dev, test etc) in my build, I used the SQLCMD variable.

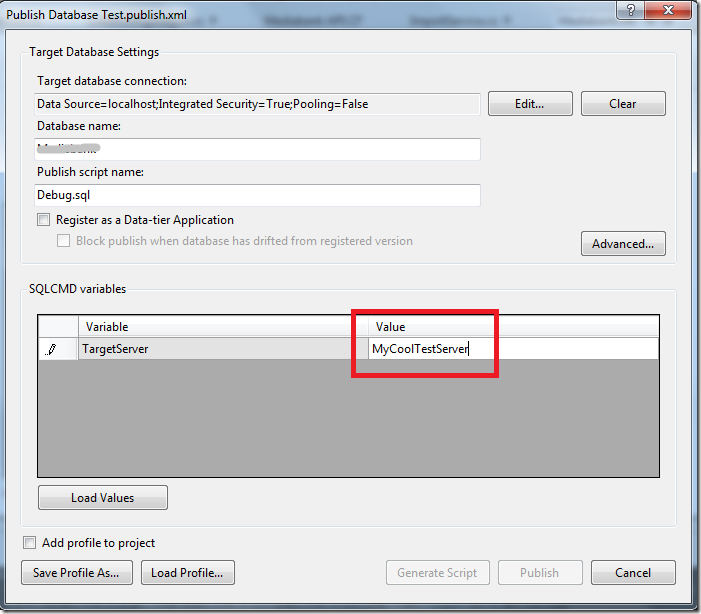
When you publish your database from Visual Studio, it will prompt you to give the variables a value. But when deploying from a build, the value need

to be set per configuration. This is done by opening the publish profile file for the target environment and store that value there:

image

Select “Save Profile As” and save it as your target publish profile. Since we are specifying our publish profile in our build definition, it will populate

the variables with the correct values.