Building Visual Studio Setup Projects with TFS 2010 Team Build

UPDATE: 2010-09-15 – Added details about the use of the ExitCode variable


One of the most common complaints from people starting to use Team Build is that is doesn’t support building Microsoft’s own Setup and Deployment project (*.vdproj). When creating a default build definition that compiles a solution containing a setup project, you’ll get the following warning:

The project file “MyProject.vdproj” is not supported by MSBuild and cannot be built.


This is what the problem is all about. MSBuild, that is used for compiling your projects, does not understand the proprietary vdproj format defined by Microsoft quite some time ago. Unfortunately there is no sign that this will change in the near future, in fact the setup projects has barely changed at all since they were introduced. VS 2010 brings no new features or improvements hen it comes to the setup projects.

VS 2010 does include a limited version of InstallShield which promises to be more MSBuild friendly and with more or less the same features as VS setup projects. I hope to get a closer look at this installer project type soon.

But, how do we go about to build a Visual Studio setup project and produce an MSI as part of a Team Build process? Well, since only one application known to man understands the vdproj projects, we will have to installa copy of Visual Studio on the build server. Sad but true. After doing this, we use the Visual Studio command line interface (devenv) to perform the build.

In this post I will show how to do this by using the InvokeProcess activity directly in a build workflow template. You’ll want to run build your setup projects after you have successfully compiled the projects.
 

  1. Install Visual Studio 2010 on the build server(s)


  2. Open your build process template /remember to branch or copy the xaml file before modifying it!)


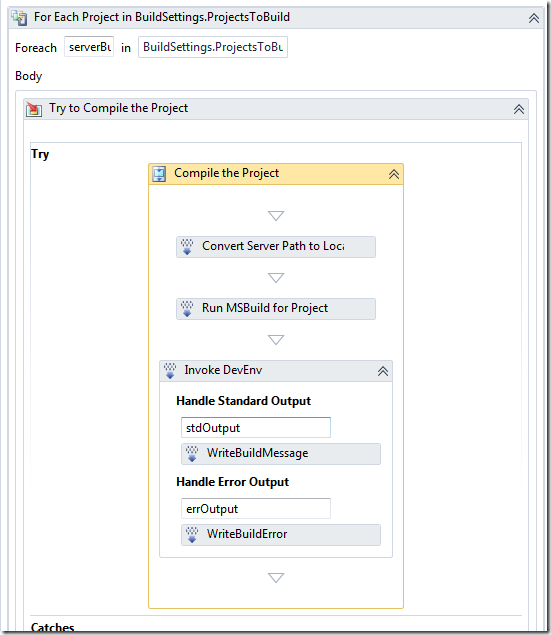
  3. Locate the Compile the Project activity


  4. Select the activity and open the Variables tab at the lower right
  5. Add a new variable called ExitCode of type Int32. This variable will contain the exit code from the devenv process and can be validated for errors.

    image

  6. Drop an instance of the InvokeProcess activity from the toolbox onto the designer, after the Run MSBuild for Project activity


  7. Drop an instance of the WriteBuildMessage activity inside the Handle Standard Output section.
    • Set the Importance property to Microsoft.TeamFoundation.Build.Client.BuildMessageImportance.High
      (NB: This is necessary if you want the output from devenv to show up in the build log when running the build with the default verbosity)
    • Set the Message property to stdOutput


  8. Drop an instance of the WriteBuildError activity to the Handle Error Output section
    • Set the Message property to errOutput


  9. Select the InvokeProcess activity and set the values of the parameters to:

    image 

    Note that the Result is piped to the ExitCode variable.

  10. The finished workflow should look like this:

    image 


  11. This will generate the MSI files, but they won’t be copied to the drop location. This is because we are using devenv and not MSBuild, so we have to do this explicitly


  12. Drop a Sequence activity somewhere after the Copy to Drop location activity.


  13. Create a variable in the Sequence activity of type IEnumerable<String> and call it GeneratedInstallers


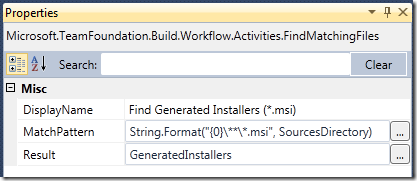
  14. Drop a FindMatchingFiles activity in the sequence activity and set the properties to:

    image 


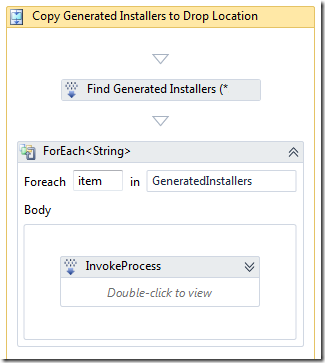
  15. Drop a ForEach<String> activity after the FindMatchingFiles activity. Set the Value property to GeneratedInstallers


  16. Drop an InvokeProcess activity inside the ForEach activity.
    •  FileName: “xcopy.exe”
    • Arguments: String.Format(“””{0}”” “”{1}”””, item, BuildDetail.DropLocation)

  17. The Sequence activity should look like this:

    image 


  18. Save the build process template and check it in.


  19. Run the build and verify that the MSI’s is built and copied to the drop location.


Note 1: One of the drawback of using devenv like this in a team build is that since all the output from the default compilations is placed in the Binaries folder, the outputs is not avaialable when devenv is invoked, which causes the whole solution to rebuild again. In TFS 2008, this was pretty simple to fix by using the CustomizableOutDir property. In TFS 2010, the same feature is not avaialble. Jim Lamb blogged about this recently, have a look at it if you have a problem with this: http://blogs.msdn.com/jimlamb/archive/2010/04/13/customizableoutdir-in-tfs-2010.aspx
 

Note 2: Although the above solution works, a better approach is to wrap this in a custom activity that you can use in your builds. I will come back to this in a future post.

Speed up loading of test results from builds in Visual Studio

I still see people complaining about the long time it takes to load test results from a TFS build in Visual Studio. And they make a valid point, it does take a very long time to load the test results, even for a small number of tests. The reason for this is that the test results is not just the result of the test run but also all the binaries that were part of the test run. This often also means that the debug symbols (*.pdb) will be downloaded to your local machine. This reason for this behaviour is that it letsyou re-run the tests locally.

However, most of the times this is not what the developer will do, they just want to know which tests failed and why. They can then fix the tests and rerun them locally. It turns out there is a way to load only the test results, which is much faster. The only tricky bit is to find the location of the .trx file that is generated during the build. Particularly in TFS 2010 where you often have multiple build agents, which of corse results in different paths to the trx file.

Note: To use this you must have read permission to the build folder on the build agent where the build was executed.

  1. Open the build result for the build
  2. Click View Log
  3. Locate the part where MSTest is invoked. When using test containers, it looks like this:

     image

    Note: You can actually search in the log window, press Ctrl+F and you will get a little search box at the bottom. Nice!

  4. On the MSTest command line call, locate the /resultsfileroot parameter, which points to the folder where the test results are stored
  5. Note that this path is local for the build server, so you need to replace the drive letter with the server name:

    D:BuildsProjectTestResults

    to

    ProjectTestResults”>\<BuildServer>ProjectTestResults

  6. Double-click on the .trx file and you will notice that it loads much faster compared to opening it from the build log window

Executing legacy MSBuild scripts in TFS 2010 Build

When upgrading from TFS 2008 to TFS 2010, all builds are “upgraded” in the sense that a build definition with the same name is created, and it uses the UpgradeTemplate  build process template to execute the build. This template basically just runs MSBuild on the existing TFSBuild.proj file. The build definition contains a property called ConfigurationFolderPath that points to the TFSBuild.proj file.

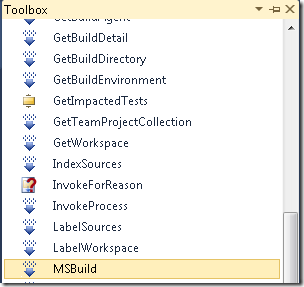
So, existing builds will run just fine after upgrade. But what if you want to use the new workflow functionality in TFS 2010 Build, but still have a lot of MSBuild scripts that maybe call custom MSBuild tasks that you don’t have the time to rewrite? Then one option is to keep these MSBuild scrips and call them from a TFS 2010 Build workflow. This can be done using the MSBuild workflow activity that is avaiable in the toolbox in the Team Foundation Build Activities section:

image

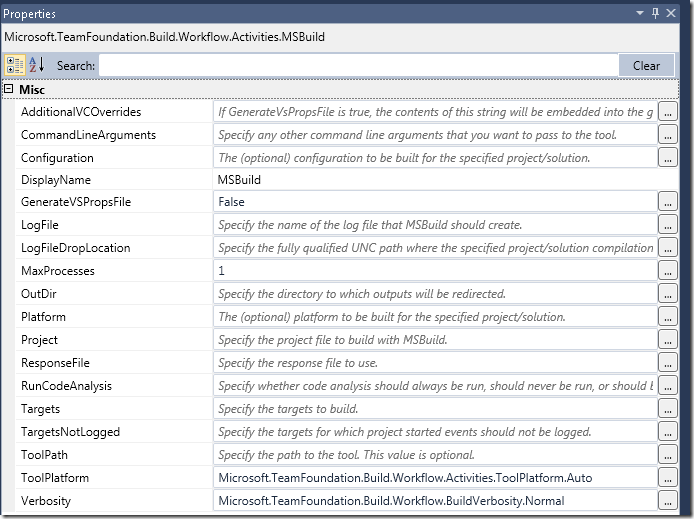
This activity wraps the call to MSBuild.exe and has the following parameters:

image

Most of these properties are only relevant when actually compiling projects, for example C# project files. When calling custom MSBuild project files, you should focus on these properties:

Property Meaning Example
CommandLineArguments Use this to send in/override MSBuild properties in your project “/p:MyProperty=SomeValue”

or

MSBuildArguments (this will let you define the arguments in the build definition or when queuing the build)

LogFile Name of the log file where MSbuild will log the output “MyBuild.log”
LogFileDropLocation Location of the log file BuildDetail.DropLocation + “log”
Project The project to execute SourcesDirectory + “BuildExtensions.targets”
ResponseFile The name of the MSBuild response file SourcesDirectory + “BuildExtensions.rsp”
Targets The target(s) to execute New String() {“Target1”, “Target2”}
Verbosity Logging verbosity Microsoft.TeamFoundation.Build.Workflow.BuildVerbosity.Normal

Integrating with Team Build  

If your MSBuild scripts tries to use Team Build tasks, they will most likely fail with the above approach. For example, the following MSBuild project file tries to add a build step using the BuildStep task:


<?xml version="1.0" encoding="utf-8"?>

<
Project ToolsVersion="4.0" xmlns="http://schemas.microsoft.com/developer/msbuild/2003"> <Import Project="$(MSBuildExtensionsPath)MicrosoftVisualStudioTeamBuildMicrosoft.TeamFoundation.Build.targets" /> <Target Name="MyTarget"> <BuildStep TeamFoundationServerUrl="$(TeamFoundationServerUrl)" BuildUri="$(BuildUri)" Name="MyBuildStep" Message="My build step executed" Status="Succeeded"></BuildStep> </Target> </Project>

When executing this file using the MSBuild activity, calling the MyTarget, it will fail with the following message:

The “Microsoft.TeamFoundation.Build.Tasks.BuildStep” task could not be loaded from the assembly PrivateAssembliesMicrosoft.TeamFoundation.Build.ProcessComponents.dll. Could not load file or assembly ‘file:///D:PrivateAssembliesMicrosoft.TeamFoundation.Build.ProcessComponents.dll’ or one of its dependencies. The system cannot find the file specified. Confirm that the <UsingTask> declaration is correct, that the assembly and all its dependencies are available, and that the task contains a public class that implements Microsoft.Build.Framework.ITask.

You can see that the path to the ProcessComponents.dll is incomplete. This is because in the Microsoft.TeamFoundation.Build.targets file the task is referenced using the $(TeamBuildRegPath) property. Also note that the task needs the TeamFounationServerUrl and BuildUri properties. One solution here is to pass these properties in using the Command Line Arguments parameter:


image

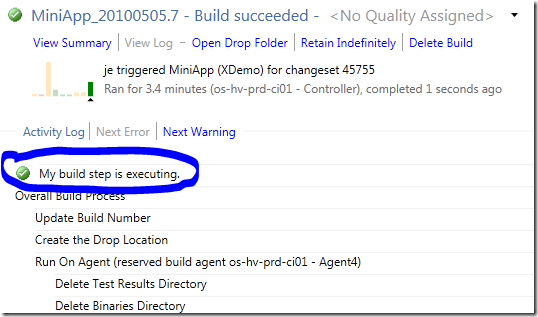
Here we pass in the parameters with the corresponding values from the curent build. The build log shows that the build step has in fact been inserted:


image

The problem as you probably spted is that the build step is insert at the top of the build log, instead of next to the MSBuild activity call. This is because we are using a legacy team build task (BuildStep), and that is how these are handled in TFS 2010.

You can see the same behaviour when running builds that are using the UpgradeTemplate, that cutom build steps shows up at the top of the build log.