Deploy On Premise Builds with Visual Studio Release Management vNext

Microsoft’s new version of Visual Studio Release Management is currently in public preview in VSTS. It is currently targeted for the TFS 2015 Update 2 version that should be shipped later this spring.

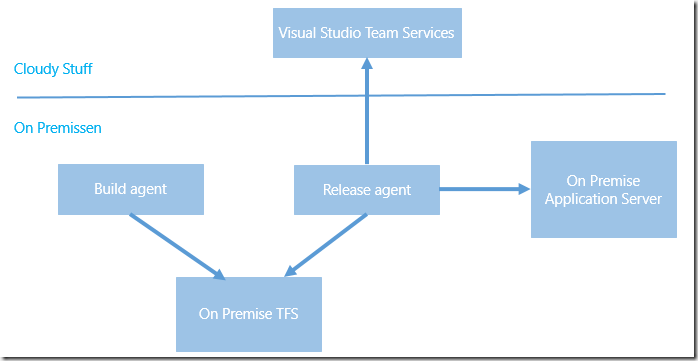
However, even if you are not all in on Visual Studio Team Services, you can still use this service! Since the build/release agents that are used can run on premise without any necessary firewall ports being opened inbound, you have full access to any internal TFS servers and application servers that you want to deploy to.


The following image illustrates the different components involved here.

 image


As you can see everything is running on premise, except Visual Studio Team Services of course. Since the release agent is also running on premise, it can connect to the on premise TFS and download the build artifacts, and it can access the on premise application servers and deploy the artifacts.


Lets’s walk through how you can use Visual Studio Release Management today to deploy builds from your on premise TFS build server to an on premise web server.

Creating the Release Definition

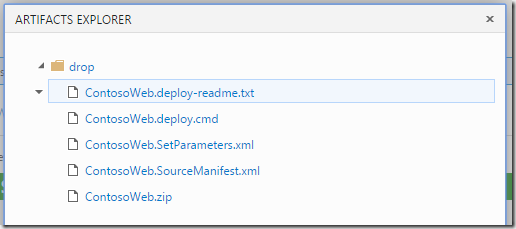
  1. I’m not going to walk through how to create a build definition in TFS, there are plenty of documentation on that. Let’s just look at the artifacts of the build that we will deploy:

    image 

  2. Nothing special here, this is the standard output from a build that runs msdeploy to create web deploy packages.
  3. Now, to be able to consume the build artifacts from a release definition, we need to setup a service endpoint for the TFS server. In the new build and release management system, service endpoints are a fundamental concept. They encapsulate the information, including credentials, that is needed to integrate with an external system. Example of service endpoints include Azure subscriptions, Jenkins build servers and Chef servers. In addition we can create Generic service endpoints, which contains a server URL and a user name and a password. This is what we will use here.
  4. Service endpoints also have there own security groups, which means that we can for example make sure that only certain people can use a service endpoint that points to the production Azure subscription

    Service points are scoped to the team project level, and are available on a separate tab on the admin page. In this case, we will create a Team Build endpoint, where we supply the URL of the TFS server and the necessary credentials for it:

    image

  5. With the service endpoint done, we can move on to create a release definition. In this example, I will define two environments, Dev and Prod that will just point to two different web sites on the same server.

     image

    As you can see, I only have two tasks in each environment. The first task is a custom task that replaces any tokens found in the files that matches the supplied pattern.. This lets me apply environment specific values during the build. In this case, I will update the *.SetParameter.xml file that is used together with web deploy.

    Also, I use the configuration functionality to supply the machine name of the web server and the name of the web site that I will deploy this to. As you can see below, I will deploy both dev and production to the same server, but to different web sites. Not entirely realistic, but you should get the idea here. You can see that I use the variable $(webSite) in the task above, where I run the generated web deploy command file.

    image

  6. Now, the part that is different here compared to a standard release definition is the linking of artifacts. Here we will select “Team Build (external)”, which in this context mean any TFS server that is defined as a service endpoint. In the Service dropdown we select the service endpoint that we created earlier (TFS).We also need to supply the name of the team project and the name of the build definition, as shown below.

    image


    1. NOTE
      : When linking to an external build like this, we do it by name. This means that if you change the name of the build definition or the team project, you will have to change this artifact definition.
  7. Now we can save the release definition and start a release. A big difference compared to when you have linked to a VSTS build is that RM won’t locate the existing builds for you, so you have to supply the build number yourself of the build that you want to release.
  8. image
  9. When the release has finished we can see that the selected build version (1.0.0.6) has been deployed to both environments:
  10. image


Summary

As you can see, there is nothing that stops you from start using the new version of Visual Studio Release Management, even if you have everything else on premise.
Deploy Azure Web Apps with Parameterization

I have blogged before about how to deploy an Azure Web App using the new build system in TFS 2015/Visual Studio Team Services. In addition to configure an Azure service endpoint, it is really only a matter of using the built-in Azure Web App Deployment task.

However, in many cases I have decided not to use this task myself since it has been lacking a key feature: Applying deployment parameters using the SetParameter.xml file.

As I have mentioned a gazillion times, building your binaries once and only once is a key principle when implementing continuous delivery. If you are using web deploy for deploying web applications (and you should), you must then use Web Deploy parameters to apply the correct configuration values at deployment time.


Under the hood the Azure Web App Deployment  task uses the Publish-AzureWebsiteProject cmdlet that uses web deploy to publish a web deploy package to Microsoft Azure. Up until recently, this cmdlet did not support web deploy parameters, the only thing that you could substitute was the connecting string, like so:

Publish-AzureWebsiteProject -Name site1 -Package package.zip -ConnectionString @{ DefaultConnection = "my connection string" }

However, it is actually possible to specify the path to the SetParameter.xml file that is generated together with the web deploy package. To do this, you can use the –SetParametersFile parameter, like so:

Publish-AzureWebsiteProject -Name Site1 -Package package.zip -SetParametersFile package.SetParameters.xml

When using the Azure Web App Deployment task, there is no separate parameter for this but you can use the Additional Arguments parameter to pass this information in:

image

Note: In this case, I am using the Azure Web App Deployment task as part of a release definition in Visual Studio Release Management, but you can also use it in a regular build definition.

This will apply the parameter values defined in the QBox.Web.SetParameters.xml file when deploying the package to the Azure Web App.

If you are interested, here is the pull request that implemented support for SetParameters files: https://github.com/Azure/azure-powershell/pull/316

Downloading Build Artifacts in TFS Build vNext

Since a couple of months back, Microsoft new Release Management service is available in public preview in Visual Studio Team Services. According to the current time plan, it will be released for on-premise TFS in the next update (Update 2).

Using a tool like release management allows you to implement a deployment pipeline by grabbing the binaries and any other artifacts from your release build, and then deploy them across different environments with the proper configuration and approval workflow. Building your binaries once and only once is a fundamental principal of implementing continuous delivery, too much can go wrong if you build your application every time you deploy it into a new environment.


However, sometimes you might not have the opportunity to setup a release management tool like VSTS or Octopus Deploy, but you still want to be able to build your binaries once and deploy them. Well, you can still implement your deployment using TFS Build, but instead of building your source code during every build we download the artifacts from another build that already has completed.

Let’s look at how we can implement this using PowerShell and the REST API in TFS/VSTS.In this sample we will execute this script as part of a TFS build, in order to create a “poor mans” deployment pipeline. If you want to use the script outside of TFS Build, you need to replace some environment variables that are used in the script below.

Downloading Build Artifacts using PowerShell and the REST API

First of all, to learn about the REST API and other ways to integrate and extend Visual Studio, TFS and Visual Studio Team Services, take a look at https://www.visualstudio.com/integrate. This is a great landing page that aggregate a lot of information about extensibility.

Here is a PowerShell script that implements this functionality, as well as a few other things that is handy if you implement a deployment pipeline from a build definition.

[CmdletBinding()] param( [Parameter(Mandatory=$True)] [string]$buildDefinitionName, [Parameter()] [string]$artifactDestinationFolder = $Env:BUILD_STAGINGDIRECTORY, [Parameter()] [switch]$appendBuildNumberVersion = $false ) Write-Verbose -Verbose ('buildDefinitionName: ' + $buildDefinitionName) Write-Verbose -Verbose ('artifactDestinationFolder: ' + $artifactDestinationFolder) Write-Verbose -Verbose ('appendBuildNumberVersion: ' + $appendBuildNumberVersion) $tfsUrl = $Env:SYSTEM_TEAMFOUNDATIONCOLLECTIONURI + $Env:SYSTEM_TEAMPROJECT $buildDefinitions = Invoke-RestMethod -Uri ($tfsURL + '/_apis/build/definitions?api-version=2.0&name=' + $buildDefinitionName) -Method GET -UseDefaultCredentials $buildDefinitionId = ($buildDefinitions.value).id; $tfsGetLatestCompletedBuildUrl = $tfsUrl + '/_apis/build/builds?definitions=' + $buildDefinitionId + '&statusFilter=completed&resultFilter=succeeded&$top=1&api-version=2.0' $builds = Invoke-RestMethod -Uri $tfsGetLatestCompletedBuildUrl -Method GET -UseDefaultCredentials $buildId = ($builds.value).id; if( $appendBuildNumberVersion) { $buildNumber = ($builds.value).buildNumber $versionRegex = "d+.d+.d+.d+" # Get and validate the version data $versionData = [regex]::matches($buildNumber,$versionRegex) switch($versionData.Count) { 0 { Write-Error "Could not find version number data in $buildNumber." exit 1 } 1 {} default { Write-Warning "Found more than instance of version data in buildNumber." Write-Warning "Will assume first instance is version." } } $buildVersionNumber = $versionData[0] $newBuildNumber = $Env:BUILD_BUILDNUMBER + $buildVersionNumber Write-Verbose -Verbose "Version: $newBuildNumber" Write-Verbose -Verbose "##vso[build.updatebuildnumber]$newBuildNumber" } $dropArchiveDestination = Join-path $artifactDestinationFolder "drop.zip" #build URI for buildNr $buildArtifactsURI = $tfsURL + '/_apis/build/builds/' + $buildId + '/artifacts?api-version=2.0' #get artifact downloadPath $artifactURI = (Invoke-RestMethod -Uri $buildArtifactsURI -Method GET -UseDefaultCredentials).Value.Resource.downloadUrl #download ZIP Invoke-WebRequest -uri $artifactURI -OutFile $dropArchiveDestination -UseDefaultCredentials #unzip Add-Type -assembly 'system.io.compression.filesystem' [io.compression.zipfile]::ExtractToDirectory($dropArchiveDestination, $artifactDestinationFolder) Write-Verbose -Verbose ('Build artifacts extracted into ' + $Env:BUILD_STAGINGDIRECTORY)

This script accepts three parameters:

buildDefinitionName
This is a mandatory parameter where you can specify the name of the build definition from which you want to download the artifacts from. This script assumes that the build definition is located in the same team project as the build definition in which this script is running. If this is not the case, you need to add a parameter for the team project.

artifactsDestinationFolder
This is an optional parameter that let’s you specify the folder where the artifacts should be downloaded to. If you leave it empty, it will be downloaded to the staging directory of the build (BUILD_STAGINGDIRECTORY)

appendBuildNumberVersion
A switch that indicates if you want to append the version number of the linked build to the build number of the running build. Since you are actually releasing the build version that you are downloading artifacts from, it often makes sense to use this version number for the deployment build. The script will extract a 4 digit version (x.x.x.x) from the build number and then append it to the build number of the running build.

As an example, if the latest release build has the build number MyApplication-1.2.3.4, the build will extract 1.2.3.4 and append this to the end of the build number of the running build.


Running the script in TFS Build

Running a PowerShell script in TFS Build is really easy, but I’ll include it here anyway. Typically you will run this script in the beginning of a build in order to get the build artifacts, and then add the tasks related to deploying the artifacts in whatever way that fits.

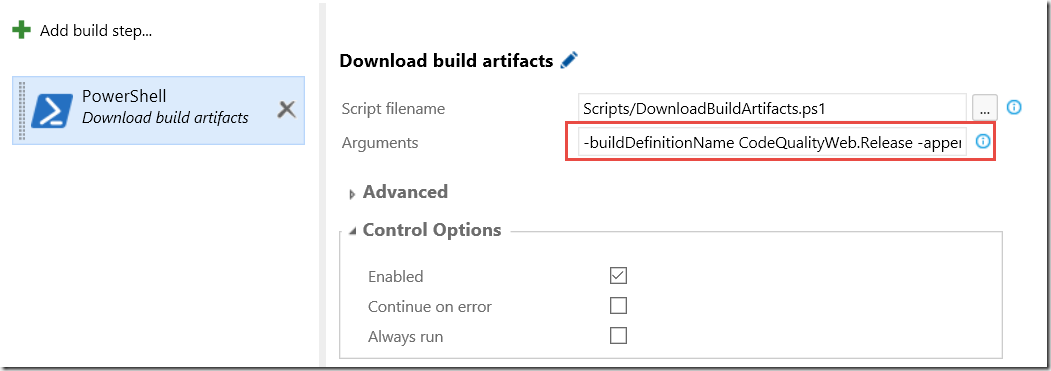
Add the script to source control and then add a PowerShell task to the build definition and select the script from the repository. Then specify the parameters of the tasks in the argument field

image

Here is a sample argument:

-buildDefinitionName MyApplication.Release –appendBuildNumberVersion

Where MyApplication.Release is the name of the build definition that have produced the build artifacts that we want to release.

Running this script as part of the build will not download the artifacts from the latest successful build of the linked build definition and place them in the staging directory. In addition it will append the version number of the linked build (x.x.x.x) to the end of the running build.

NB: You need to consider where to place this script. Often you’ll want to put this script together with the application that you are deploying, so that they can change and version together.


Hope you will find this script useful, le me know if you have any issues with it!

Happy building!


PS: If you want to learn more about implementing Continuous Delivery using Visual Studio Team Services and TFS, grab a copy of my and Mathias Olausson’s latest book “Continuous Delivery with Visual Studio ALM 2015