New functionality in TFS Build Manager – Managing Triggers and Build Resources

Yesterday we pushed out a new release (August 2012) of the Community TFS Build Extension, including a new version of the Community TFS Build Manager (1.0.4.6)

The two big new features in the Build Manager in this release are:

Set Triggers
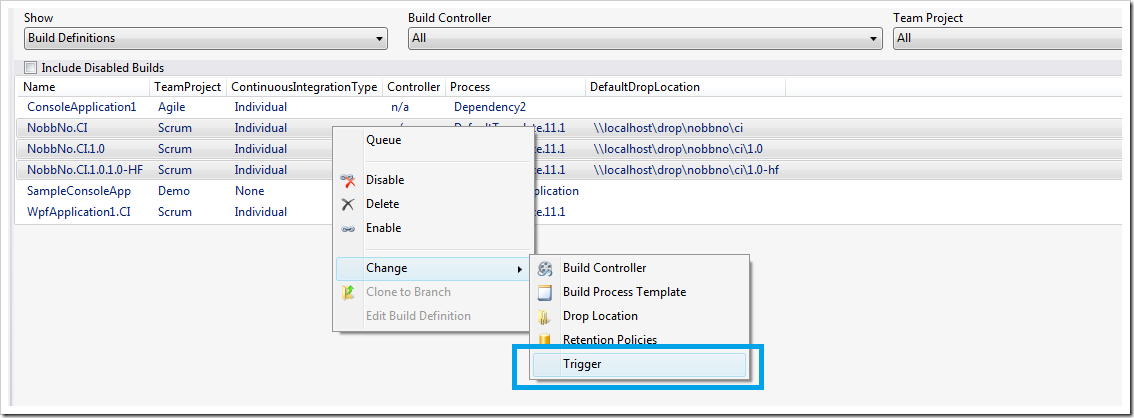
It is now possible to select one or more build definitions and update the triggers for them in one simple operation:

image

You’ll note that we have started collapsing the context menu a bit, the list of commands are getting long! Ler

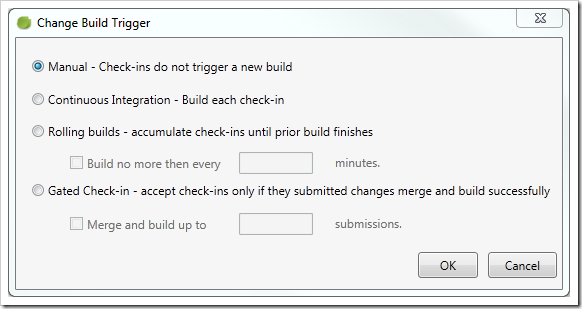
When selecting the Trigger command, you’ll see a dialog where the options should be self-explanatory:

image

The only thing missing here is the Scheduled trigger option, you’ll have to do that using Team Explorer for now.


Manage Build Resources
The other feature is that it is now possible to view the build controllers and agents in your current collection and also perform some actions against them. The new functionality is available by select the Build Resources item in the drop down menu:

image

Selecting this, you’ll see a (sort of) hierarchical view of the build controllers and their agents:

image

In this view you can quickly see all the resources and their status. You can also view the build directory of each build agent and the tags that are associated with them.
On the action menu, you can enable and disable both agents and controllers (several at a time), and you can also select to remove them.
By selecting Manage, you’ll be presented with the standard Manage Controller dialog from Visual Studio where you can set the rest of the properties. Hopefully we’ll be able to implement most of the existing functionality so that we can remove that menu option Ler
Our plan is to add more functionality to this view, such as adding new agents/controllers, restarting build service hosts, maybe view diagnostic information such as disk space and error logs.


Hope you’ll find the new functionality useful. Remember to log any bugs and feature requests on the CodePlex site.

Happy building!

TFS Build: Dependency Replication using Community TFS Build Extensions

I have posted before on how to implement dependency replication using TFS Build, once for TFS 2008 using MSBuild and then for TFS 2010 using Windows Workflow. The last post was not complete (I could not post all implementation details back then for various reasons), so I decided that I should post a new solution for this, but this time using the Community TFS Build Extensions library.

If it is a good idea to store your dependencies in source control or not is a question that is well debated. I’m not going to argue pros and cons here, but for those of you that want to go this way here is a build process template that will get you started.

An interesting fact is that Microsoft actually have added this feature as part of the hosted TFS (TFS Services) running on Windows Azure, but decided post-Beta that this feature was not to be included in the on-premise version of TFS. The feature might reappear in the on-premise version at some point in the future but nothing is confirmed yet. For hosted TFS, this feature is a must since users would not be able to access the network shares that TFS Build normally use as drop location.

Features of the DependencyReplication.xaml build process template

I have added a new Build Process template called DependencyReplication.xaml to the TFS Build Extensions that performs the following steps, in addition to the common default template:

  • Accepts a source control folder input parameter where the binaries should be stored (DeployFolder)
  • Versions all assemblies, using the TfsVersion activity
  • Copies to binaries to the the deploy folder
  • Check in the binaries. The check-in comment includes the version number (using the TfsSource activity)
  • If any errors occurs as part of the replication, it will undo any pending changes as part of the build

I have uploaded the build process template to the CodePlex site, so it is available at $/teambuild2010contrib/CustomActivities/MAIN/Source/BuildProcessTemplates/DependencyReplication.xaml.

Note
: The build process template uses the latest version of the activities, so make sure that you download the latest source and compile it. I had to make some additions to the library to support the functionality of the build process template. The changes will be included in the next official release, but until then you must download the latest bits and build it yourself.


How to use the Build Process Template

  1. Add the DependencyReplication.xaml file to source control. You can add it wherever you like. This sample assumes that you add it to $/Demo/BuildProcessTemplates/
  2. Make sure that you have added the necessary TFSBuildExtension assemblies to the Version Control path for Custom assemblies. See this link for how to do this.
    Since this template only uses a few of the build activities, you only need to add the following assemblies:
    • TfsBuildExtensions.Activites.dll
    • TfsBuildExtensions.TfsUtilities.dll
    • Ionic.Zip.dll
  3. Create a new build definition.
  4. In the process tab, click the Show Details button
  5. Click New and then the Select an existing XAML file radio button and browse to the DependencyReplication.xaml file that you just added:

    image

  6. Note that you will now have an additional, required, process parameter called DeployFolder, located in the Misc category.
    Enter the source control folder path where you want the binaries to be stored.

    Note: This path must exist in source control, and must also be a part of the workspace for the current build definition otherwise the build will fail. This is a limitation of the current implementation. It can be implemented by modifying the workspace at build time, as I did in my first post on dependency replication.

    image

  7. You must also change the Build Number Format parameter to be $(BuildDefinitionName)_1.0.0$(Rev:.r)

    Note: This build process template uses the built-in functionality for incrementing the build number, so the version number will be a part of the build number itself which gives you a nice traceability between the build and the generated assemblies. It then parses the version number from the Build number, so you need to have the four-part version number as part of the build number format. If you have some other way of managing version numbers, you will need to change the build process template correspondingly.

    The 1.0.0 part above can obviously have any value, it will represent your Major.Minor.Revision part of the generated version number.

  8. Save the build definition and queue a build

After the build has finished, you should see that the binaries have been added to source control in the given path.

Note that all files in the binaries folder will be added to source control. If this is not what you want, you need to modify the build process template. An option here would be to add the filter expression (*.*) as a process parameter to make it configurable per build definition.

If you download the binaries you should see that they have the same version number that was included in the build number for that particular build.
If you view history of the folder, you will see that the build service account (in my case the Network service) have checked in the files with a comment containing the version number:

image

If you have check-in policies enabled for the team project, they will be overridden as part of the check-in with a comment.


I hope that you will find this build process template useful. It is by no means a full solution, it lacks some error checking and also it should handle the case where the DeployFolder path is outside the workspace for the build definition. Let me know if you really need this feature and I will consider adding it to the template Ler. Of course, you can add it yourself and post it back to the community.

Community TFS Build Manager available for Visual Studio 2012 RC

I finally got around to push out a version of the Community TFS Build Manager that is compatible with Visual Studio 2012 RC. Unfortunately I had to do this as a separate extension,
it references different versions of the TFS assemblies and also some properties and methods that the 2010 version uses are now obsolete in the TFS 2012 API.

To download it, just open the Extension Manager, select Online and search for TFS Build:

image


You can also download it from this link:
http://visualstudiogallery.msdn.microsoft.com/cfdb84b4-285e-4eeb-9fa9-dad9bfe2cd10

The functionality is identical to the 2010 version, the only difference is that you can’t start it from the Team Explorer Builds node (since the TE has been completely rewritten and the
extension API’s are not yet published). So, to start it you must use the Tools menu:

image

We will continue shipping updates to both versions in the future, as long as it functionality that is compatible with both TFS 2010 and TFS 2012.

You might also note that the color scheme used for the build manager doesn’t look as good with the VS2012 theme….

image


Hope you will enjoy the tool in Visual Studio 2012 as well. I want to thank all the people who have downloaded and used the 2010 version!
For feedback, feature requests, bug reports please post this to the CodePlex site: http://tfsbuildextensions.codeplex.com

Deploying SSDT Projects with TFS Build

As many of you probably have noticed by now, Visual Studio Database Projects are not supported in the next version of Visual Studio (currently named
Visual Studio 11 Beta). When you open a solution containing a VSDB project, VS11 wants to convert it to a SQL Server Developer Tools project instead.

This project type ships with SQL Server and has a feature set that covers most of the functionality of the VSDB project, plus some new features, such
a support for SQL 2012 and SQL Azure. A feature comparison list between the two project types can be found here:
http://blogs.msdn.com/b/ssdt/archive/2011/11/21/sql-server-data-tools-ctp4-vs-vs2010-database-projects.aspx

Once you have converted your project to a SSDT project, you will find that most of the functionality is very similar to VSDB, how you work with
schema objects, schema comparisons etc. Deploying a SSDT project is called Publish and is available in the Visual Studio context menu:

image

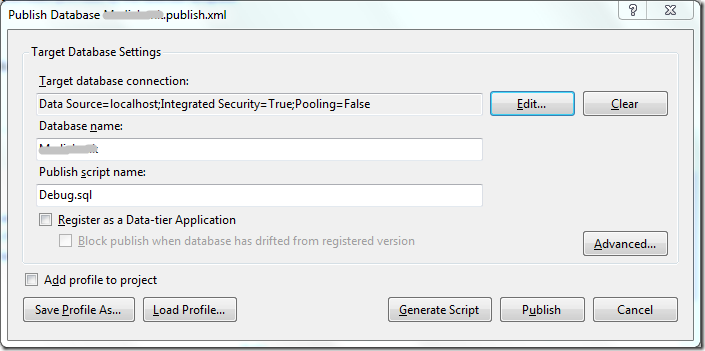
When you invoke the Publish command, Visual Studio will launch the Publish Profile dialog, where you can configure how and where you want to
deploy the database:

image

There are lots of options that you can configure, and these options are often different depending on the target environment. For example, locally you
typically want to recreate the database every time you deploy, but when deploying to a test server, you probably only want to update it incrementally
without removing any existing data. The settings that you enter can be stored in a separate profile file, which you will use when you are deploying the database.

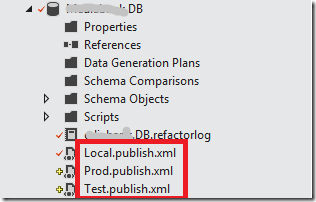
So, create a publish profile for each environment that you want to deploy to. In the following example, I have one profile for deploying to my local
machine, and in addition publish profiles for the test and production environments:

image

(Note that you can right-click a publish profile and mark it as default. This is the profile that will be chosen when you select Publish in Visual Studio, so
in this case I would select Local.publish.xml)

The Publish command calls the Publish MSBuild target which will eventually call the SqlPublishTask MSBuild task which will do the work of deploying your
database. This means that the deployment of the database project is easy to integrate into TFS Build, since you can just specify that you want to invoke
the Publish target as part of your build:

image

Here, I have chosen to deploy the database using the Test profile, which would typically by a remote server used for testing of the build.

Using SQLCMD variables
Sometimes you need to use parameters in your scripts, e.g. values that you can pass in dynamically when the script is executed. These are called
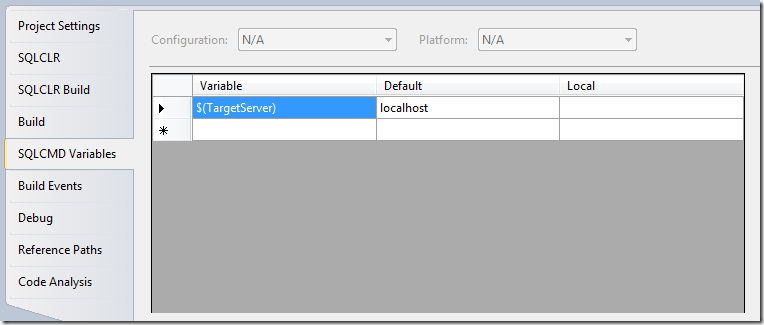
SQLCMD variables, and you can define these on the properties page of the database project:

image

Here I have defined a variable called $(TargetServer), and given it a default value of localhost. Then I have references this variable inside a post
deployment script in side the project, like this:

EXEC master..xp_cmdshell 'bcp Daatabase.[dbo].[Table] in "TableContent.dat" -T -c -S$(TargetServer)'


This is a scenario we had at a client recently, where they used the BCP utility to bulk insert lots of data into a few tables as part of the deployment.

To be able to run BCP against different target servers (dev, test etc) in my build, I used the SQLCMD variable.

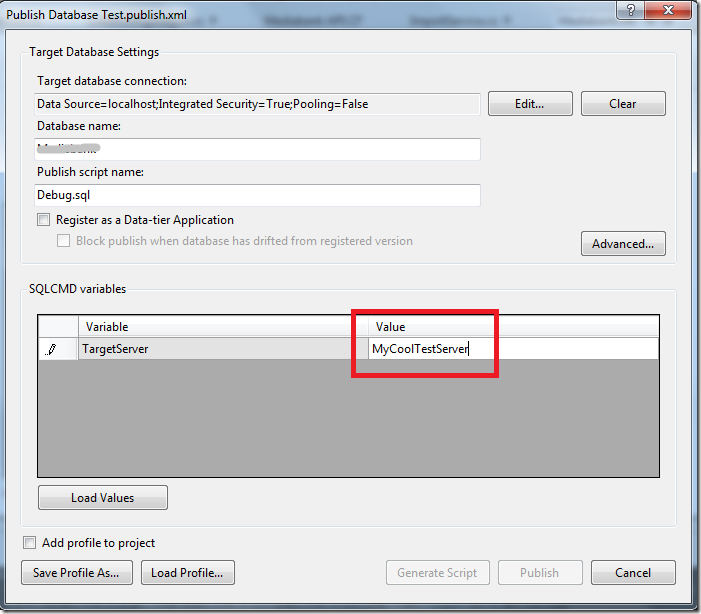
When you publish your database from Visual Studio, it will prompt you to give the variables a value. But when deploying from a build, the value need

to be set per configuration. This is done by opening the publish profile file for the target environment and store that value there:

image

Select “Save Profile As” and save it as your target publish profile. Since we are specifying our publish profile in our build definition, it will populate

the variables with the correct values.

Adding Fake Build Information in TFS 2010

We have been using TFS 2010 build for distributing a build in parallel on several agents, but where the actual compilation is done by a bunch of external tools and compilers, e.g. no MSBuild involved. We are using the ParallelTemplate.xaml template that Jim Lamb blogged about previously, which distributes each configuration to a different agent. We developed custom activities for running these external compilers and collecting the information and errors by reading standard out/error and pushing it back to the build log.

But since we aren’t using MSBuild we don’t the get nice configuration summary section on the build summary page that we are used to. We would like to show the result of each configuration with any errors/warnings as usual, together with a link to the log file.

TFS 2010 API to the rescue! What we need to do is adding information to the InformationNode structure that is associated with every TFS build. The log that you normally see in the Log view is built up as a tree structure of IBuildInformationNode objects. This structure can we accessed by using the InformationNodeConverters class. This class also contain some helper methods for creating BuildProjectNode, which contain the information about each project that was build, for example which configuration, number of errors and warnings and link to the log file.

Here is a code snippet that first creates a “fake” build from scratch and the add two BuildProjectNodes, one for Debug|x86 and one for Release|x86 with some release information:


TfsTeamProjectCollection collection = TfsTeamProjectCollectionFactory.GetTeamProjectCollection(new Uri("http://lt-jakob2010:8080/tfs")); IBuildServer buildServer = collection.GetService<IBuildServer>(); var buildDef = buildServer.GetBuildDefinition("TeamProject", "BuildDefinition"); //Create fake build with random build number var detail = buildDef.CreateManualBuild(new Random().Next().ToString()); // Create Debug|x86 project summary IBuildProjectNode buildProjectNode = detail.Information.AddBuildProjectNode(DateTime.Now, "Debug", "MySolution.sln", "x86", "$/project/MySolution.sln", DateTime.Now, "Default"); buildProjectNode.CompilationErrors = 1; buildProjectNode.CompilationWarnings = 1; buildProjectNode.Node.Children.AddBuildError("Compilation", "File1.cs", 12, 5, "", "Syntax error", DateTime.Now); buildProjectNode.Node.Children.AddBuildWarning("File2.cs", 3, 1, "", "Some warning", DateTime.Now, "Compilation"); buildProjectNode.Node.Children.AddExternalLink("Log File", new Uri(@"\serversharelogfiledebug.txt")); buildProjectNode.Save(); // Create Releaes|x86 project summary buildProjectNode = detail.Information.AddBuildProjectNode(DateTime.Now, "Release", "MySolution.sln", "x86", "$/project/MySolution.sln", DateTime.Now, "Default"); buildProjectNode.CompilationErrors = 0; buildProjectNode.CompilationWarnings = 0; buildProjectNode.Node.Children.AddExternalLink("Log File", new Uri(@"\serversharelogfilerelease.txt")); buildProjectNode.Save(); detail.Information.Save(); detail.FinalizeStatus(BuildStatus.Failed);

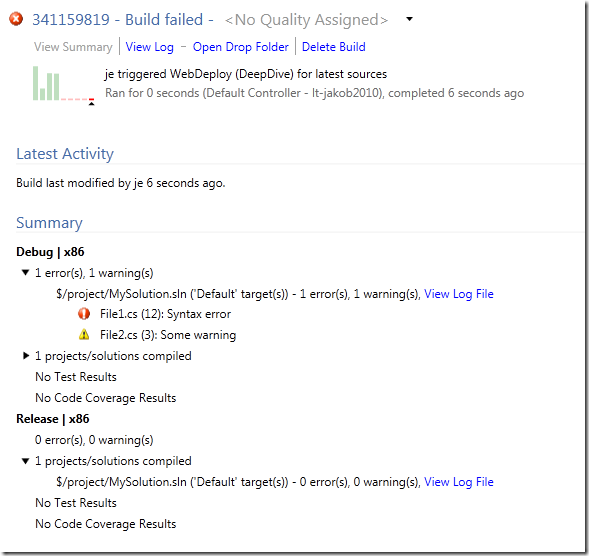
When running this code, it will a create a build that looks like this:

image


As you can see, it created two configurations with error and warning information and a link to a log file. Just like a regular MSBuild would have done.

This is very useful when using TFS 2010 Build in heterogeneous environments. It would also be possible to do this when running compilations completely outside TFS build, but then push the results of the into TFS for easy access. You can push all information, including the compilation summary, drop location, test results etc using the API.

Managing Build Templates with Community TFS Build Manager

A year ago I blogged about how to manage your build process templates using the TFS API. The main reason for doing this is that you can (and should!) store your “golden” build process templates in a common location in your TFS project collection, and then add them to each team project that requires those templates. This way, you can fix a bug or add a new feature in one place and have the change affect all build definitions.

However, by having the build process templates in a single location, the users must know where the build process templates are located and browse to that path and add it to the team project, before it will show up in the list of build process templates:

image

Unfortunately, you can’t manage the build process templates this way using Team Explorer, you have to resort to the TFS API to do these things.

Until now! Ler In the latest release of the Community TFS Build Manager I have added support for managing build process templates.

The templates are accessible by selecting “Build Process Templates” in the “Show” dropdown:

image

This will show all registered build process templates, either in the selected team project or in all team projects, depending on your current filter:

image

All build process templates in the XDemo team project. The grid is of course sortable as the rest of the application. This lets you easily see where the template is registered.

Note that several of the build process templates in the list above is stored in the Inmeta team project, which is our team project for storing all artifacts related to our software factory, including the build process templates and custom activities.

Now, we can right click on a build process template and perform any of the following actions:

image


  • Set As Default
    This will set the selected build process template as the default build process template in the corresponding team project. There can only be one default build process template per team project, so the tool will automatically scan for any other default build process templates and set them back to “Custom”. 
  • Add to Team Project(s)
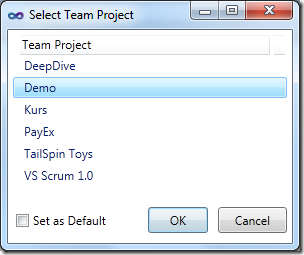
    This will let you select one or more team projects where you want to add this build process template to:

    image

    In the list you can select one or more team projects. You can also specify that the template(s) should be set as default by using the checkbox “Set as Default”.

  • Remove from Team Project(s)
    This does the opposite from the previous operation, it removes the selected build process template(s) from one or more team project. After this operation, the template will not be visible in the “Build Process file” dropdown when editing a build process template.

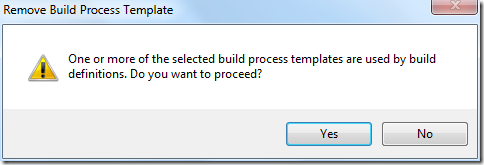
    Note: When removing a build process template, there might be build definitions using this template. If this is the case, the build manager will prompt you with a dialog before you proceed with the remove:

    image

Hope that you find the new functionality useful. Please report bugs and feature requests to the Community TFS Build Extensions CodePlex site

Handling Warnings and Errors with InvokeProcess in TFS 2010 Build

The InvokeProcess activity is very useful when it comes to running shell commands and external command line tools during a build process. When it comes to integrating with TFS source control during a build, the TF.exe command line tool can be your friend, as it lets you do most of the usual stuff such as check-in, checkout, add, modify workspaces etc.

However, it can be a bit tricky to handle the output from tf.exe, since it often produces warnings that is not necessarily a problem for your build. This is not a problem related only to tf.exe, but to all applications that produces errors and warnings on the canonical error format.

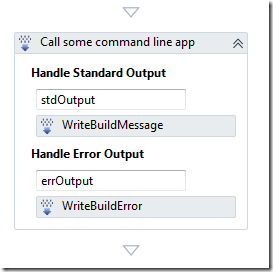
The normal way to use the InvokeProcess activity is to setup the necessary parameters to call the tool with the correct path, working directory and command line switches. Then you add a WriteBuildMessage activity to the Handle Standard Output action handler and a WriteBuildError to the Handle Error Output action handler. In addition, you store the Result output property from the InvokeProcess activity in a workflow variable that you can evaluate after the InvokeProcess activity has finished.

image


This will output all standard output from the application to the build log, and all errors will be written as errors to the build log and will partially fail the build.
If you try this with TF.exe you will probably notice a problem with warnings from the tool being reported as errors in the build, causing it to partially fail the build, even though the ReturnCode was zero.

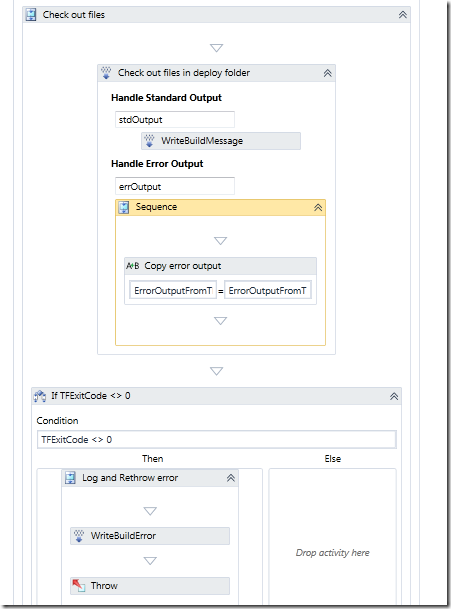
To solve this problem you need to collect the information that is passed to the Error Output action handler. Note that this handler is called several times so you need to handle formatting of the output in some way. Then, you check the ReturnCode from the InvokeProcess activity and in case this is <> 0, you write the collection information as an error to the build log (using WriteBuildError) and then throw an exception. Otherwise, just write the information to the build log using WriteBuildMessage, so you get all information out there.

The finished sample looks like this:

image

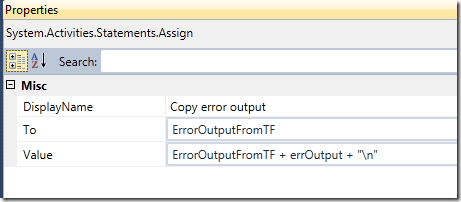
In the “Check out files” sequence I have defined a workflow variable called ErrorOutputFromTF of type string. In the “Handle Error Output” handler, I append the error to this variable, using the Assign activity:

image

I just append a newline character at the end to have all the errors on separate rows in the build log later. After the InvokeProcess activity I check the TFExitCode variable,  that was assigned the ResultCode value from the InvokeProcess activity previously, if it is <> 0 I write the ErrorOutputFromTF to the build error log and then I throw an exception.

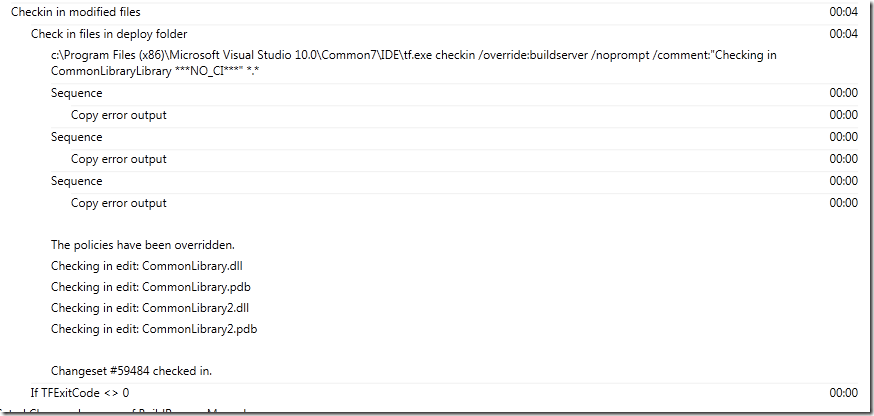
Here is a sample build log output:

image

Note that tf.exe in this case outputs information about check-in policies that have been overridden. This is an example of information that would cause the build to partially fail, but is now logged as information.

Introducing: Community TFS Build Manager

The latest release of the Community TFS Build Extensions include a brand new tool called Community TFS Build Manager and has been created for two reasons:

  1. An implementation of the Team Foundation Build API which is referenced by the Rangers Build Customization Guidance V2 (available H1 2012)
  2. Provide a solution to a real problem. The Community TFS Build Manager is intended to ease the management of builds in medium to large Team Foundation Server environments, though it does provide a few features which all users may find useful.

The first version of the tool has been implemented by myself and Mike Fourie. You can download the extension from the Visual Studio Gallery here:
http://visualstudiogallery.msdn.microsoft.com/16bafc63-0f20-4cc3-8b67-4e25d150102c


Note 1:
The full source is available at the Community TFS Build Extension site

Note 2: The tool is still considered alpha, so you should be a bit careful when running commands that modify or delete information in live environments, e.g. try it out first in a non-critical environment.

Note 3: The tool is also available as a stand alone WPF application. To use it, you need to download the source from the CodePlex site and build it.


Getting Started

You can either install the extension from the above link, or just open the Visual Studio Extension Manager and go to the Online gallery and search for TFS Build:
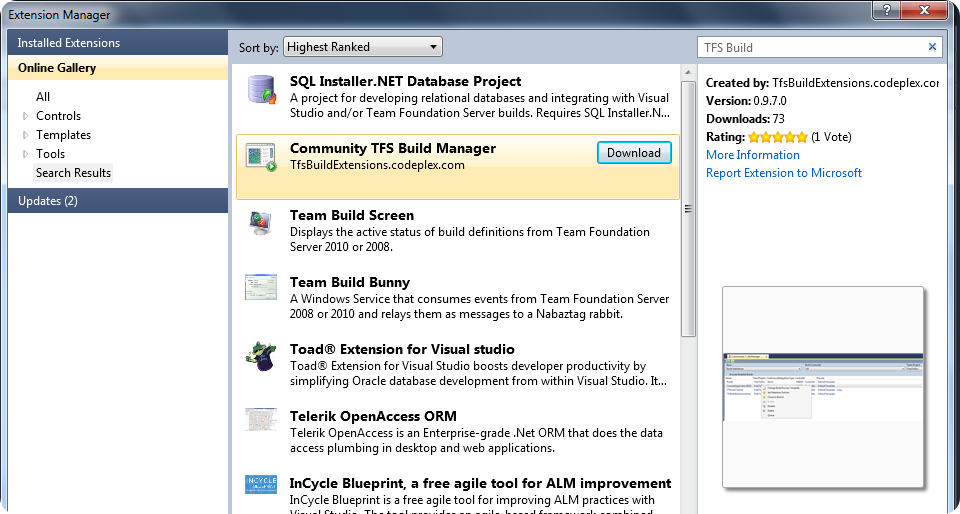
image


After installing the build manager, you can start it either from the Tools menu or from the Team Explorer by right-clicking on the Builds node on any team project:
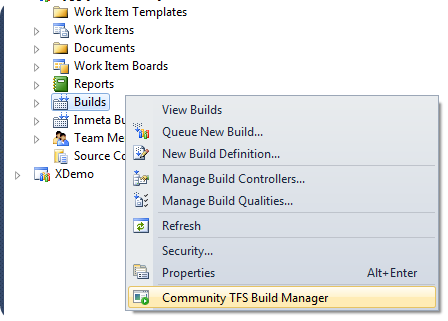
 

image

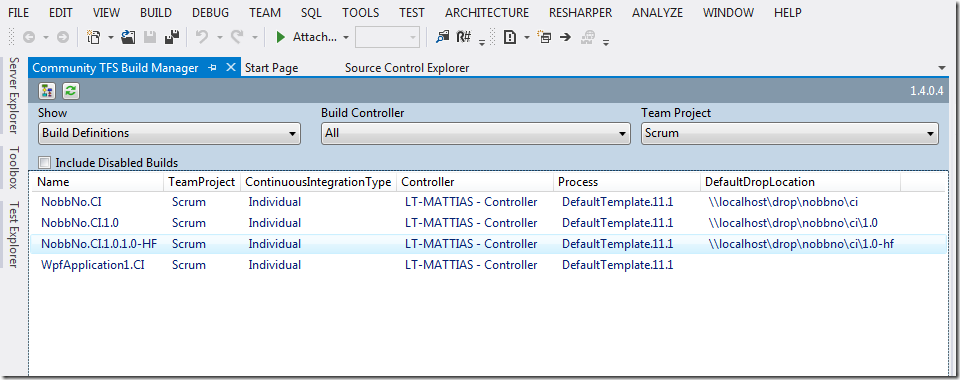
This will bring up a new tool window that will by default show all build definition in the currently selected team project.


View and sort Builds and Build Definitions across multiple Build Controllers and Team Projects
This has always been a major limitation when working with builds in Team Explorer, they are always scoped to a team project. It is particularly annoying when viewing queued builds and you
have no idea what other builds are running on the same controller. In the TFS Build Manager, you can filter on one/all build controllers and one/all team projects:

image


The same filters apply when you switch between Build Definitions and Builds. In the following screen shot, you can see that three builds from three different team projects are running on the same controller:

image

You can easily filter on specific team projects and/or build controllers. Note that all columns are sortable, just click on the header column to sort it ascending or descending.
This makes it easy to for example locate all build definitions that use a particular build process template, or group builds by team project etc.


Bulk operations on Build Definitions

The main functionality that this tool brings in addition to what Team Explorer already offers, is the ability to perform bulk operations on multiple build definitions/builds. Often you need to modify or
delete several build definitions in TFS and there is no way to do this in Team Explorer.


In the TFS Build Manager, just select one or more builds or build definitions in the grid and right-click. The following context menu will be shown for build definitions:
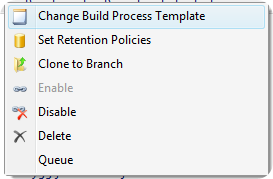
image


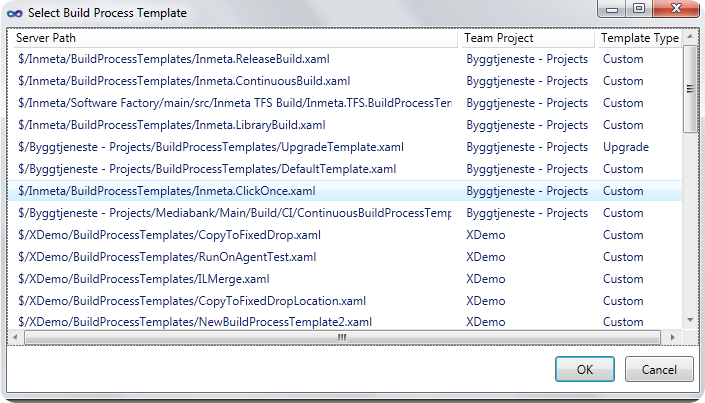
Change Build Process Templates

This command lets you change the build process template for one or more build definitions. It will show a dialog with all existing build process templates in the corresponding team projects:
image


Queue

This will queue a “default” build for the the selected build definitions. This means that they will be queued with the default parameters.


Enable/Disable

Enables or disables the selected build definitions. Note that disabled build definitions are by default now shown. To view disabled build definitions, check the Include Disabled Builds checkbox:


image


Delete

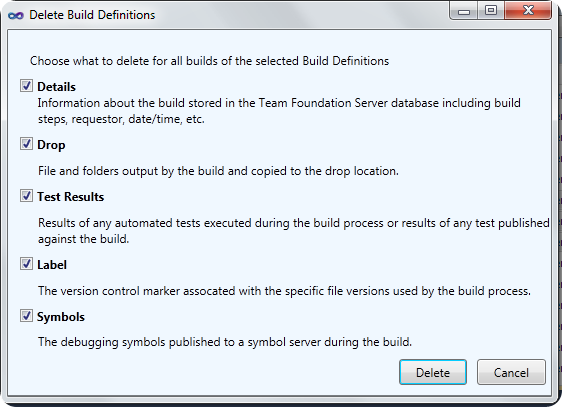
This lets you delete one ore more build definitions in a single click. In Team Explorer this is not possible, you must first delete all builds and then delete the build definition. Annoying! Ler

TFS Build Manager will prompt you with the same delete options as in Team Explorer, so no functionality is lost:
image


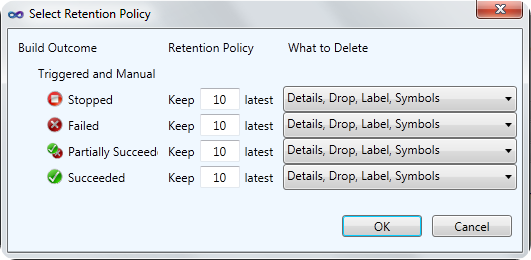
Set Retention Policies

Allows you to set retentions policies to several build definitions in one go. Note that only retention policies for Triggered and Manual build definitions can be updated, not private builds. 
This feature also gives you the same options as in Team Explorer:
image


Clone to Branch

My favorite feature Ler Often the reason for cloning a build definition is that you have created a new source code branch and now you want to setup a matching set of builds for the new branch. When using the Clone build definition feature of the TFS Power Tools, you must update several of the parameters of the build definition after, including:

  • Name
  • Workspace mappings
  • Source control path to Items to builds (solutions and/or projects)
  • Source control path to test settings file
  • Drop location
  • Source control path to TFSBuild.proj for UpgradeTemplate builds

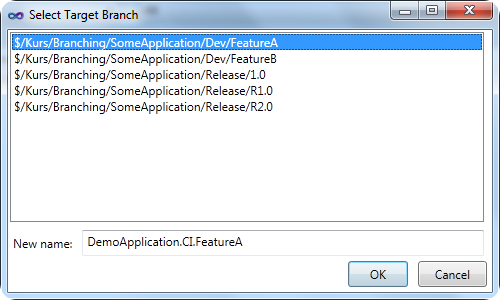
All this is done automagically when using the Clone to Branch feature! When you select this command, the build manager will look at the Items to build path (e.g. solution/projects) and find all child branches to this path and display them in a dialog:
image

When select one of the target branches, the new name will default to the source build definition with the target branch name appended. Of course you can modify the name in the dialog. After pressing OK, a new build definition will be created and all the parameters listed above will be modified accordingly to the new branch.


Bulk operations on Builds

You can also perform several actions on builds, and more will be added shortly. In the first release, the following features are available:


Delete

This will delete all artifacts of the build (details, drops, test results etc..). It should show the same dialog as the Delete Build Definition command, but currently it will delete everything.

Open Drop Folders

Allows you to open the drop folder for one or more builds


Retain Indefinitely

Set one or more builds to be retained indefinitely.


Bonus Feature – Generate DGML for your build environment

This feature was outside spec, but since I was playing around with generating DGML it was easy to implement this feature and it is actually rather useful. It quickly gives you an overview of your build resources, e.g. which build controllers and build agents that exist for the current project collection, and on what hosts they are running. The command is available in the small toolbar at the top, next to the refresh button:
image

Here is an example from our lab environment:

image

The dark green boxes are the host machine names and the controller and agents are contained within them.

Note: Currently the only way to view DGML files are with Visual Studio 2010 Premium and Ultimate.


I hope that many of you will find this tool useful, please report issues/feature requests to the Community TFS Build Extensions CodePlex site!

TF237165: Team Foundation could not update the work item because of a validation error on the server.

I often use the VS 2010/TFS 2010 evaluation virtual machines that Microsoft publishes every 6 months with the latest bits. It’s a great timesaver to use an image where everything is already setup and also contains a bit of sample data that is useful when you want to demo something for customers.


There is one thing that has always been a, albeit small, but still very annoying problem and that is that the builds always partially fail when you start using the image. When you want to demo the powerful feature of associated work items in a build, you’ll find yourself with your pants down since the build fails when trying to update the associated work item! Even when looking at the historical builds for the Tailspin Toys project, you will notice that they also partially failed:

image


If you look at the error message in the build details, you’ll see the following error:


image

The work item ‘XX’ could not be updated: ‘TF237165: Team Foundation could not update the work item because of a validation error on the server. This may happen because the work item type has been modified or destroyed, or you do not have permission to update the work item.’

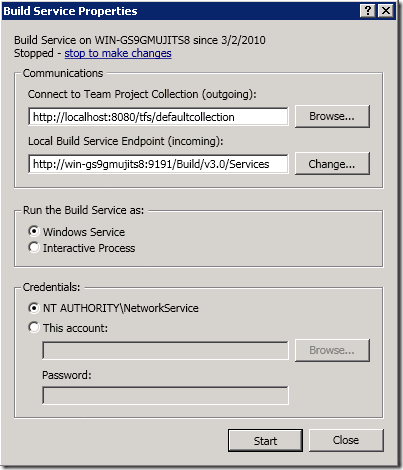
The problem here is that the build agent by default is running as the NT AUTHORITYSYSTEM account, which is an account that do not have permission to modify work items. Your best option here is to switch account and use the Network Service account instead. Open TFS Administration Console, and select the Build Configuration node. Press the Stop link in the Build Service section:


image


Select Properties and select NT AUTHORITYNetworkService as Credentials


image


Press Start to start the build service with the new credentials.


If you would queue a new build now, the build would fail because of conflicting workspace mappings. The reason for this is that we haven’t changed the working folder path for the build agents, so when the build agent try to create a new workspace, the local path will conflict with the workspace previously created by NT AUTHORITYSYSTEM.

So to resolve this we can do two things:

  1. (Preferred). Delete the team build workspaces previously created by the SYSTEM account. To do this, start a Visual Studio command prompt and type:

    tf.exe workspace /delete <workspacename>;NT AUTHORITYSYSTEM


    If you need to list the workspaces to get the names, you can type:

    tf workspaces /owner:NT AUTHORITYSYSTEM /computer: <buildserver>

  2. (Less preferred, but good if you want to switch back later to the old build service account) 

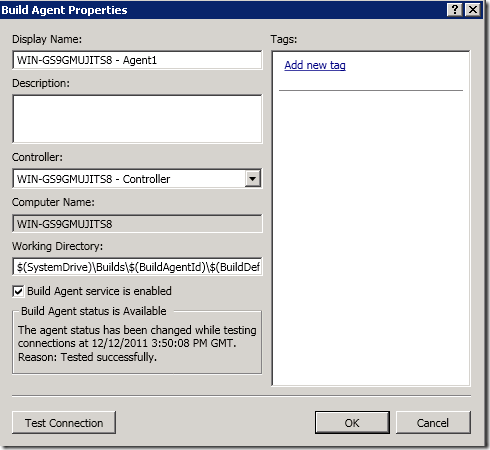
    You can also modify the working folder path for the build agents, so that they don’t conflict with the existing workspaces. Click Properties on the build agent(s) and modify the Working Directory proprerty:

    imageb

    In this case, you can for example change it to $(SystemDrive)BuildsNS$(BuildAgentId)$(BuildDefinitionPath)  where NS = Network Service.

TFS 2010 Build – Troubleshooting the TF215097 error

Anyone working with developing custom activities in TFS 2010 Build has run into the following dreadful error message when running the build:

TF215097: An error occurred while initializing a build for build definition TeamProjectMyBuildDefinition: Cannot create unknown type ‘{clr-namespace:[namespace];assembly=[assembly]}Activity

What the error means is that when the TFS build service loads the build process template XAML for the build definition, it can’t create an instance of the customer workflow activity that is referenced from it.

The problem here is that there are several steps that all need to be done correctly for this process to work.

Make sure that:

  • When developing custom workflow, you keep the XAML builds template workflows in one project, and the custom activities in another project. The template workflow project shall reference the custom activities project.
    This setup also makes sure that your custom activities show up in the toolbox when designing your workflow.
  • You have checked in the modified version of the XAML workflow (easy to forget)
  • Your custom activity has the the BuildActivityAttribute:

    image

  • Your custom activity is public (common mistake…)
  • You have configured your build controller with the path in source control where the custom activities are located

    image

  • Verify that all dependencies for the custom activity assembly/assemblies have been checked into the same location as the assembly
    NB: You don’t need to check in TFS assemblies and other references that you know will be in the GAC on the build servers.
  • The reference to the custom activity assembly in the XAML workflow is correct:
  • xmlns:obc="clr-namespace:Inmeta.Build.CustomActivities;assembly=Inmeta.Build.CustomActivities"


But, even if you have all these step done right, you can still get the error. I had this problem recently when working with the code metrics activities for the http://tfsbuildextensions.codeplex.com/ community project.

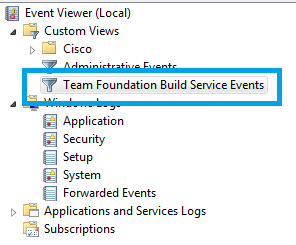
The thing that saved me that time was the Team Foundation Build Service Events eventlog. This is a somewhat hidden “feature” that is very useful when troubleshooting build problems. You find it under Custom View

in the event log on the build servers


image

In this case I had the following message there:

Service ‘LT-JAKOB2010 – Agent1’ had an exception:

Exception Message: Problem with loading custom assemblies: Method ‘get_BuildAgentUri’ in type ‘TfsBuildExtensions.Activities.Tests.MockIBuildDetail’ from assembly ‘TfsBuildExtensions.Activities.Tests, Version=1.0.0.0, Culture=neutral, PublicKeyToken=null’ does not have an implementation. (type Exception)

Which made me realize that I had by accident checked in one of the test assemblies into the custom activity source control folder in TFS.


Unfortunately this whole process with developing you own custom activities is problematic and error prone, hopefully this will be better in future versions of TFS. Once you have your setup working however, changing and adding new custom activities is easy. And deployment is a breeze thanks to the automatic downloading and recycling of build agents that the build controller handles.