VSTS 2010: Enabling Test Impact Analysis

A really cool new feature in VSTS 2010 is Test Impact Analysis which let developers view what tests that are affected by the current code changes. Pieter Gheysens wrote a blog post on how to set this up in the CTP, but things have changed a bit in Beta 1 so I thought that I would show how it is done. Since it still is a bit unintuitive to enable it, it might change once again in the RTM. The reason that it is a bit unintuitive to set it up, is because you need to have the following things:

  • You must use Test Metadata files when running your tests. You can’t use Test Assemblies
  • You must have code coverage enabled in your test settings. VSTS use the code coverage information from a test run to determine which tests that are impacted by a code change.
  • You must setup a team build in TFS with test impact analysis enabled. The build will publish the test results including the code coverage information and VSTS will read information from this build.

So, lets set it up:

  1. First you will (obviously) need a solution containing some tests. Note that I don’t explicitly write unit tests here, because it might as well for example web tests. Check in your solution.
  2. Enable Code Coverage for you current test settings. See my previous post on how to do this
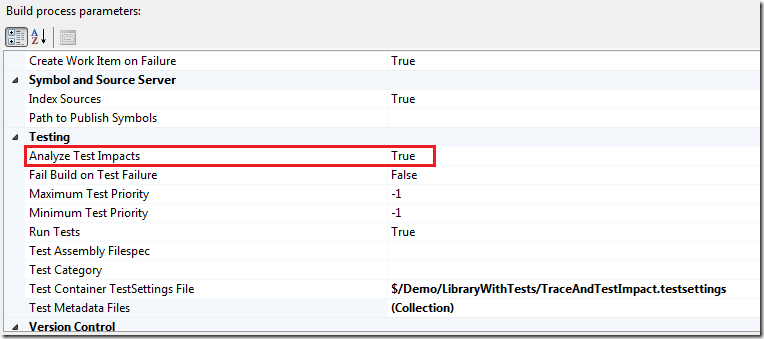
  3. Create a new team build and select your solution. Then set the Analyze Test Impacts parameter to true

    image

  4. Select the Test Container TestSettings File and make sure that it is the one in which you have enabled code coverage. In the figure above, I have selected $/Demo/LibraryWithTests/TraceAndTestImpact.testsettings

  5. Save the build definition and queue a new build. Make sure it finishes successfully and that the tests were executed
  6. Now, change some code that you know is called by one or more tests.
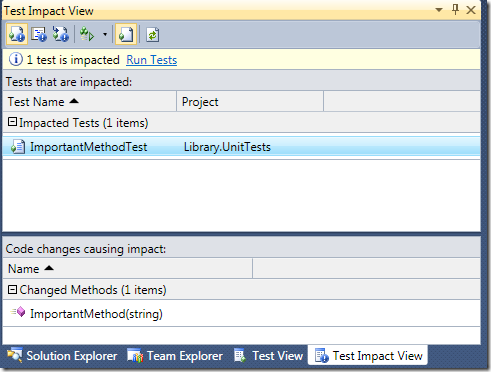
  7. Switch to the Test Impact View, that is located in the Test –> Windows submenu. First off you can select the button on the top left, called  Show Impacted Tests, that will show all tests that are impacted by all your current code changes.In this case, one test was impacted (ImportedMethodTest). When you select the test, you can see in the bottom part of view what code changes that caused the impact

    image

    The next button  is called Show Code Changes and shows the opposite information, e.g. what code changes that has been done, and for each code change it lists the affected test.
    Note that there is Run Tests link in the view. This is also available as a button. This lets you run all the tests that are affected by your code change. This is a very nice feature, that will speed up your development considerably (at least if you have many tests….)

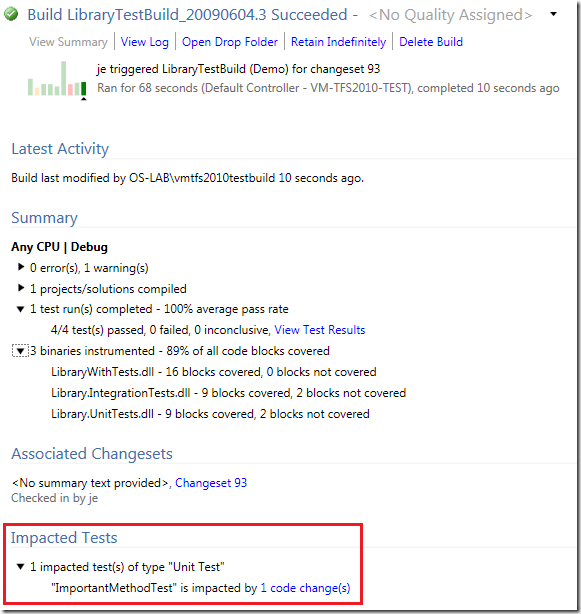
  8. Check in your code change and queue a new build. When the build finishes, open the build summary. This will show you, in addition to the test and code coverage information, what tests that were impacted.

    image

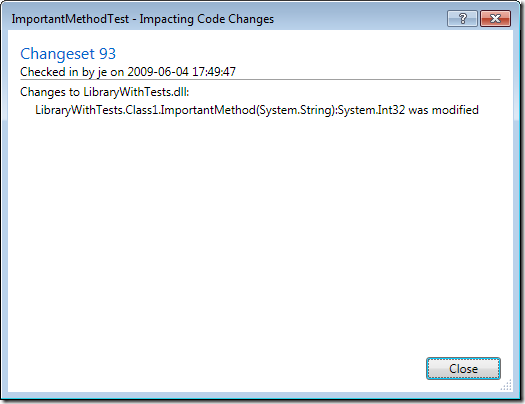
    If you click the 1 code change(s) link next to the test, a dialog that lists all the methods that had impact on that test is shown

    image

TFS Team Build 2010: Executing Unit Tests

There are some changes and improvements in the area of executing unit tests in Team Build 2010. Mostly the changes make it easier to define which unit tests you want to execute as part of the build. In this post I will go through the different options that you have when it comes to running unit tests and enabling code coverage.

To configure test settings for a Team Build, you select Edit Build Definition in Team Explorer, and then go to the Build Process tab. In the Build process parameters box there is a section for the testing parameters. To change the parameters, just edit them and hit the save button. There is no need to check anything in or out to change the parameters. Only changes to the build process require you to check in the build process file (.xaml)


Running Unit Tests from Test List(s)
If you like to manage your tests using test lists (I don’t!), this option lets you run all the tests from one or more test lists. Here I have created two test lists, ImportantTests and LessImportantTests. Each test list contains two unit tests from two different assemblies.

image

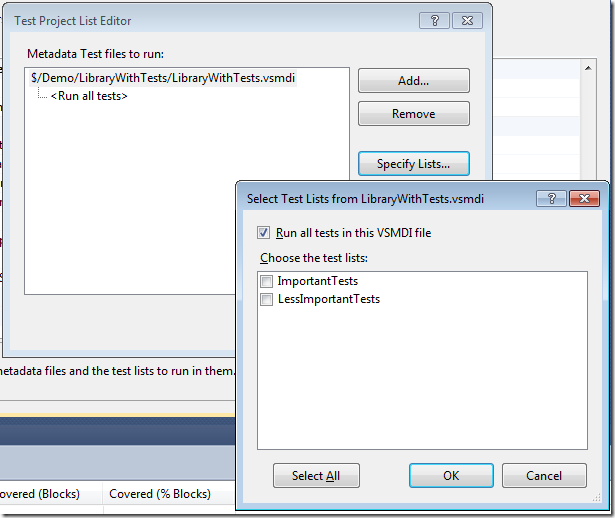
To run all the tests from these test lists in a team build, locate the Test Metadata Files parameter and press the browse button to the right. This brings up a dialog that lets you choose which test metadata files (.vsmdi files) that you want to execute tests from. By default, all the tests will be executed. To filter this, click the Specify Lists button and you can select one or more test lists instead:


image


Running Unit Tests from Test Assemblies (a.k.a. Test Containers)
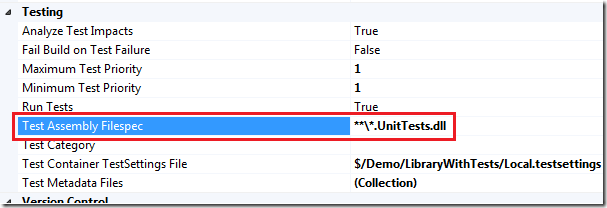
Since managing test lists in VSTS doesn’t scale very well, a common approach is to use Test Assemblies instead. In previous versions this was called Test Containers. So instead of creating different test lists to group your tests, you create several unit test assemblies and group your unit tests by adding them to the corresponding unit test assembly. For example you can have one (or more) assembly that contain pure unit tests, another set of assemblies that contain integration tests that you might only want to run in your nightly builds. To specify which test assemblies you want to execute, you use the Test Assembly Filespec parameter. This parameters contains a search pattern that should match the names of your test assemblies.


image

To use this approach in your company, you need to define a naming scheme for your unit test assemblies, such as Project.UnitTests.dll, Project.IntegrationTests.dll and so on.


Running Unit Tests by Priority
In addition to selecting which unit tests to execute, you can now further filter the tests by using the Priority attribute on your test methods. This is an attribute that has been around since .NET 2.0, but strangely enough there was no support of using it when running tests, neither in Visual Studio or in Team Build. In TFS 2010 however you can define a minimum and maximum test priority for your team build, meaning that all tests with a priority within that range will be executed as part of the build.


Here is how you decorate your test method with a priority.

/// <summary>

 ///A test for ImportantMethod

 ///</summary>

 [TestMethod()]

 [DeploymentItem("LibraryWithTests.dll")]

 [Priority(1)]

 public void ImportantMethodTest()

 {

     Class1 target = new Class1(); // TODO: Initialize to an appropriate value

     string arg = "42"; // TODO: Initialize to an appropriate value

     int expected = 42; // TODO: Initialize to an appropriate value

     int actual;

     actual = target.ImportantMethod(arg);

     Assert.AreEqual(expected, actual);

 }


Then, set the priority range in your build definition

image

Note that this is an additional filter that is applied to, in this case, all unit tests in all test assemblies that end with UnitTests.dll.


Running Unit Tests by Category
In addition to Priority, you can also filter your tests by using categories. This is very similar to priorities, but instead of working with numeric ranges, you define categories with meaningful names and apply them to your test methods.

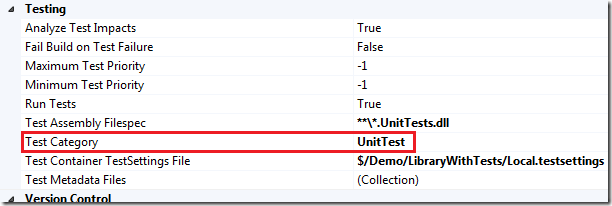
To use this approach, decorate your test methods with the TestCategory attribute and then specify one or more test categories in your build definition.


image

According to the tooltip you should be able to construct the filter by using logical operators such as & and | , but this doesn’t seem to work in Beta 1.

Enabling Code Coverage in a Team Build


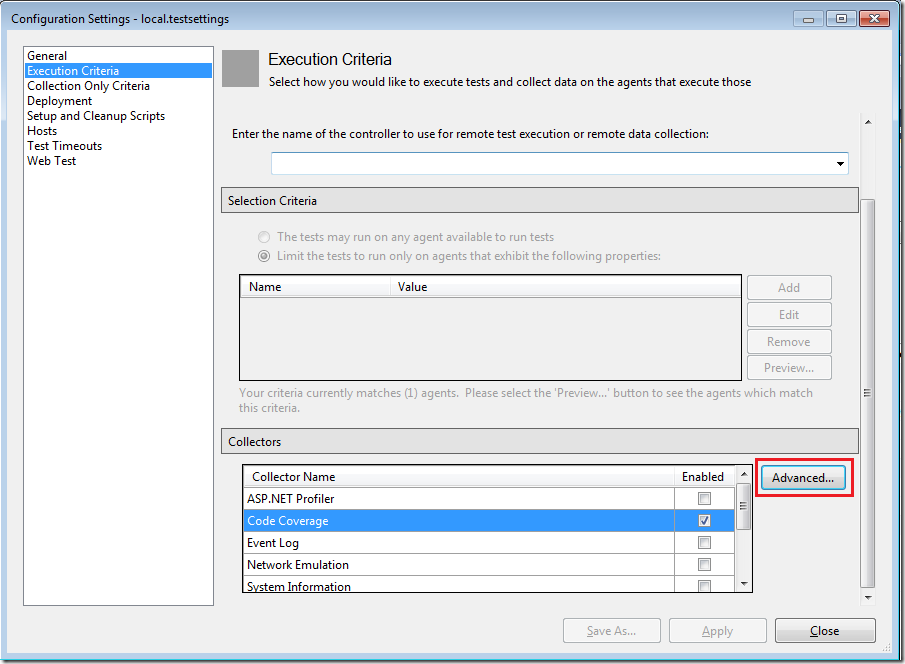
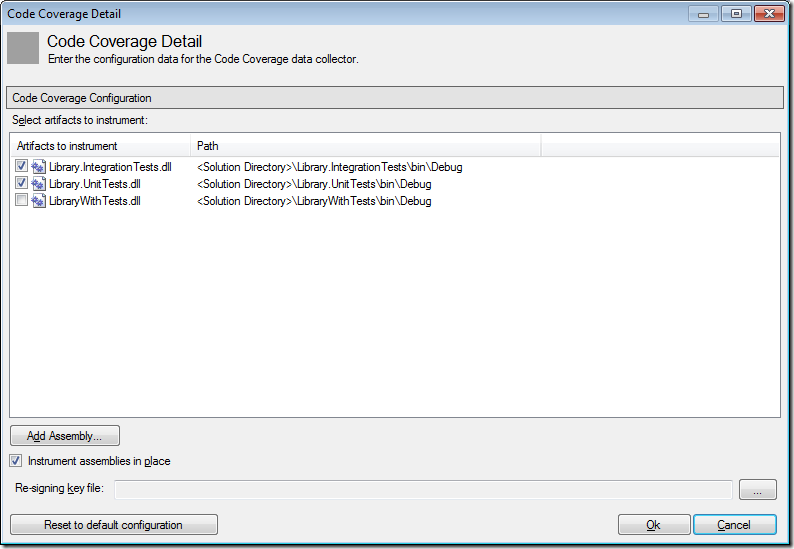
When running unit tests you normally want to know how much of your code is actually tested, a.k.a. code coverage. The way you enable this for your tests and in your team build has changed a bit. First, the previous *.testrunconfig files has been renamed into *.testsettings. To enable code coverage, double click on your .TestSettings file and select the Execution Criteria tab. Here you will see a totally new Collectors section that contains information about what data you want to collect when executing test. One of them is code coverage. The GUI is a bit weird in Beta 1, since you are supposed to first select the Code Coverage checkbox, and then click the Advanced button to specify which assemblies that should be instrumented for code coverage.

image


image


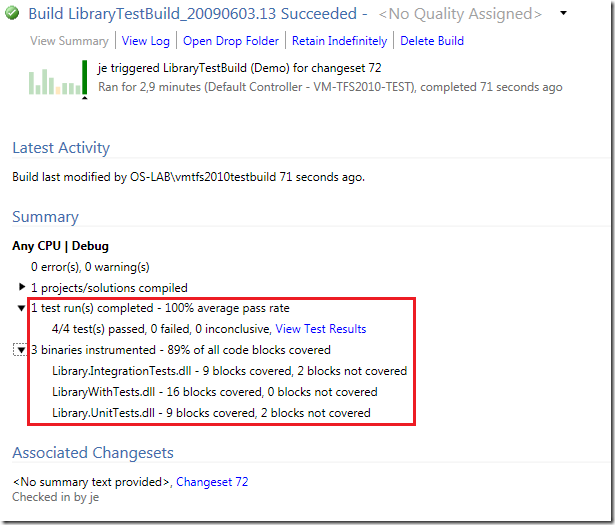
Next, in your team build definition you must specify the name of the test settings file you want to use. This is done using the Test Container TestSettings File parameter. Save the build definition, check in the test settings file and queue a new build. When it has finished, open the build summary that will show you the numbers on number of executed/passed/failed tests, and also the overall code coverage.


 image


Very nice summary view indeed! If you want to look at the test results in detail, you click the “View Test Results” link which will download the test run to your local machine and then open it in the Test Results window.

Working with Build Definitions in TFS Team Build 2010

Disclaimer: This blog post discusses features in the TFS 2010 Beta 1 release. Some of these  features might be changed in the RTM release.

In my last post I talked about the new major features of Team Build in TFS 2010. This time, I will go into more detail on how you work with build definitions. In TFS 2010, the whole build process is now implemented on top of Windows Workflow Foundation 4.0 (WF4). This means that everything that has to do with creating and customizing builds in TFS 2010 is now done using a workflow designer UI. This means that you no longer have to remember all the different MSBuild targets when you want to insert some custom logic in your build. On the other hand, you obviously need to understand how a default team build process is implemented, which activities does what, what WF properties and variables that exist. And eventually you might also have to learn how to implement custom workflow activites when you need more functionality than what is included in the standard team build activities.

Note that MSBuild is still used to actually compile all the projects. The output from the compilations are available in a separate log file that is available from the build summary view.


So, lets create a new build definition. When you select the New Build Definition menu item, you get a dialog that looks very much like the one in TFS 2008.


General
This tab just contains the name and the description of your build. There is also a checkbox that lets you disable the build definition, in case you want to work on it more before making it enabled.

image

Trigger
Here you define how this build should be queued. The only new option here in 2010 is Gated Check-in, which is a very cool feature that will stop you from check in in anything that breaks the build.


image

Workspace
This tab has not changed since 2008. Here you define the workspace for the build, i.e. what part of the source control tree that should be downloaded as part of the build. Here I set the $/Demo/WpfApplication1 as my workspace root. You always want to make your workspace as small as possible to speed up build time.

image


Build Defaults
In the previous version of Team Build you select which build agent that should run the build. In 2010, you now select a Build Controller. The build controller manages a pool of build agents that will be selected by an algorithm that takes into account the queue length on each build agent, in a round-robin fashion (although this algorithm is not yet documented, and it is not clear if you can implement your own algorithm)

In addition to must enter the drop location for the build.


image

Process


Now we come to the interesting part! Here you select the Build process file, which is a Windows Workflow XAML file that must be located somewhere in your TFS source control repository. By default for all new team projects, there are two build process files created automatically, DefaultTemplate and UpgradeTemplate. The default template is the standard Team Build process, with the get, label, compile etc.. The UpgradeTemplate process file can be used to execute legacy builds, i.e. TFSBuild.proj files.  

image


This functionality, e.g. selecting a build process template from a list, is in itself a nice improvement from earlier versions where you always had to create a standard build process and the modify the TFSBuild.proj accordingly. (Lots of people instead wrote applications that create TFSBuild.proj programattically to simplify the process).

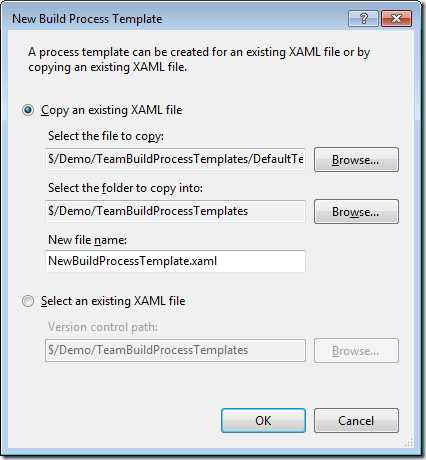
However, you should not use the default template as the process file for your builds. Instead you should create a new template from the default template and use this one instead. You do this by clicking on the New button:

image

This mechanism lets you create a set of build process templates (for example you can have one template for CI builds, one for nightly builds, one for relase builds etc… These templates can be stored in a dedicated location in source control and any changes to them should only be allowed for the build managers. Application developers can then setup new builds from the existing templates and should only need to modify the parameters (see below) which are not part of the template but stored together with the build definition.


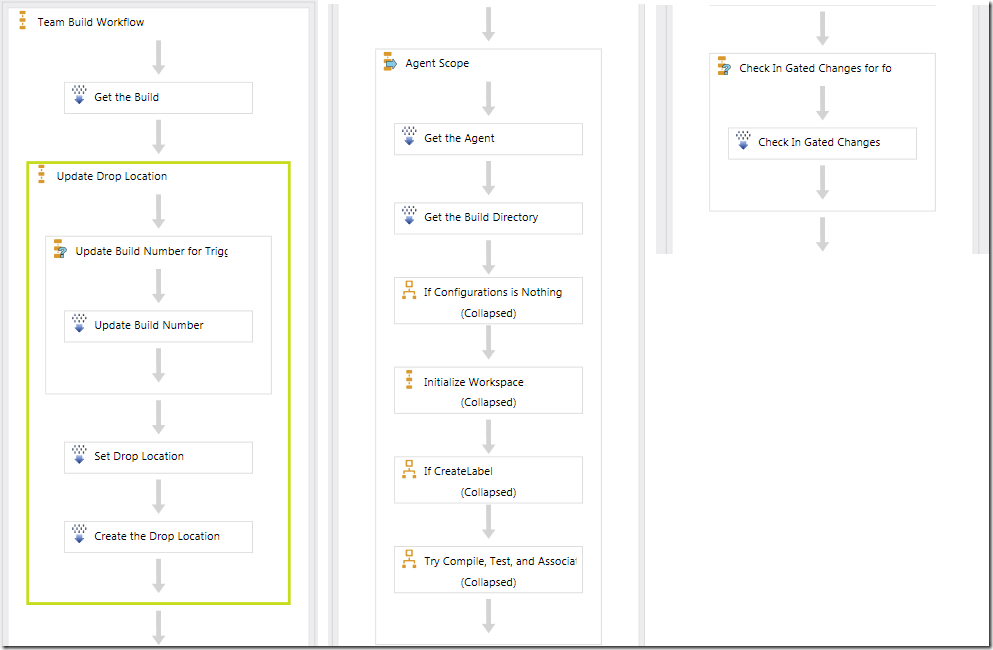
You can view and/or edit the build process file by clicking the link which takes you to the source control explorer, then double-click the xaml file to open it up in the workflow designer. The following (slightly MSPaint hacked) screen shot show you the top level process of the DefaultTemplate build process:


image

You can drill-down into the different activities to see how the process is designed. In my next post I will show how to customize the build process by adding new activities to it.


When you have selected the build process template, you then go through the parameters of the build. The properties are defined in the build process as arguments to the workflow and corresponds to the MSBuild properties in the previous versions. If you have used team build before, you’ll definitely recognize many of the properties. The most important ones are:


Build Process Parameter Meaning Sample
Projects to Build The list of build projects  
Configurations to Build The list of configurations to build, on the format configuration|platform Debug|Any CPU, Release|Any CPU
Build Number Format The format of the unique build number that is generated for each build $(BuildDefinitionName)_$(Date:yyyyMMdd)$(Rev:.r)
Clean Workspace Controls what artifacts that should be deleted before the build starts. All – Deletes both sources and outputs (Full rebuild)
Outputs – Deletes outputs, and get only the sources that have changed (Incremental Get)
None = Leave existing outputs and sources in place (Incremental Build)
MSBuild Arguments Additional command line arguments to pass to MSBuild.exe. /p:Configuration=Debug
Associate Changesets and Work Items Control if Team Build should associate changesets and work items with the build True/False. Consider False for continuous builds to speed them up.


Retention Policy
In this tab you select how builds should be retained. Note that you now can select a different configuration for manual/triggered builds and private build.Private here means builds with the Gated Check-in trigger enabled. You will typically want to retain fewer private builds compared with the manual/triggered builds:


image
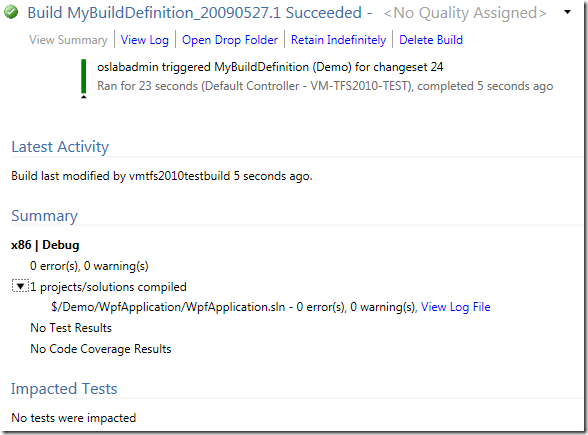
Ok, you are done! Save the build definition and queue a build in the team explorer. When the build finishes, double click it to see the Build summary view:


image


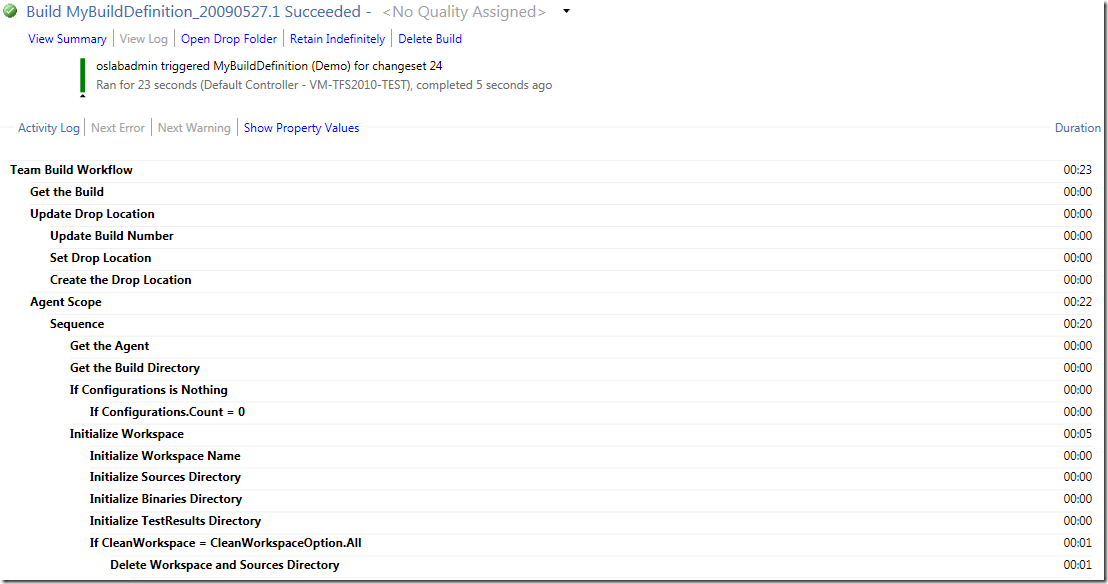
For a detailed view of the build, click the View Log link:

image


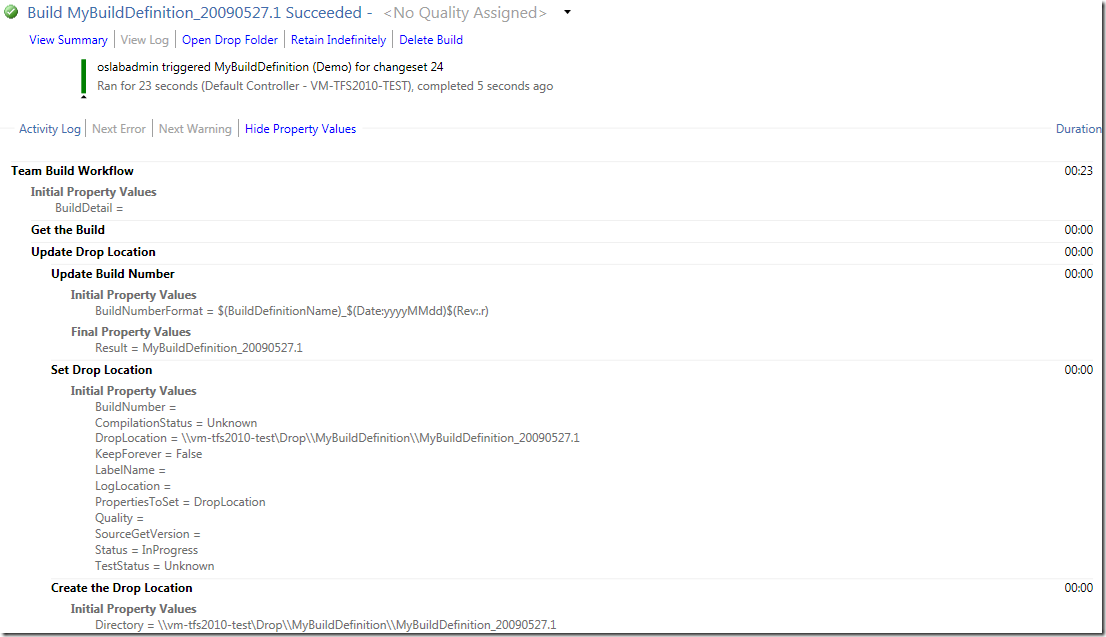
A nice feature here is the Show Property Values link. This show the log, but in addiotn it shows each in/out property for each activity. This is very useful when trying to troubleshoot a failing build:

image


OK, this was a quick walkthrough of how to create a basic build definition in Team Build 2010. In my next post, I will show how to customize the build process using the workflow designer!

TFS Team Build 2010: What’s New?

VSTS 2010 Beta 1 is finally available. Beta 1 is a huge release a contains tons of new functionality in almost all areas of Team System. We at Osiris Data have been using Team System since the first beta, and we also help our customers how to adopt TFS in their organization. So for us VSTS 2010 is a very exciting release.

I am planning to post several blog entries about the new functionality of VSTS 2010, in particular I will focus on Team Foundation Server (TFS) and Team Build. I have been working a lot with Team Build 2005 and 2008 and have been looking forward to the 2010 release. VSTS 2008 was a minor release for TFS, so a lot of missing features and change requests haven’t been implemented until now.

So, in this blog post I will run through the new functionality in Team Build 2010, and then I will follow up with several blog posts that go into more detail on the different areas.

Build Controllers lets you pool your builds
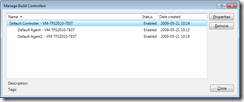
In TFS 2005/2008 you could only assign a team build to one build agent. In 2010, you assign a team build to a Build Controller instead. The Build Controller will now be responsible for managing a custom pool of Build Agents and will select a Build Agent to run the Team Build The following screenshot show the Manage Build Controllers dialog which in this case show one build controller that contains two build agents.
 

image

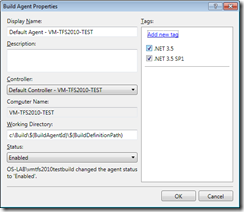
Often you need to have several different build agents that have different configurations. For example, you might need .NET 3.5 SP1 on one build agent to be able to build applications that rely on SP1, but then you have apps that still need to be built without SP1 installed. In 2010, you can use tags to tell Team Build which build agent to choose. You create the tags in the Build Agent Properties dialog:
image 

To assign a build definition to one or more tags, you use the Agent Requirements property in the process tab of the build definition:

image


Build Process are defined using Windows Workflow 4.0
Team Build 2005 and 2008 relies solely upon MSBuild to drive the build process. MSBuild is a powerful language designed for building applications. It is also lets you extend the build process by using tasks which are .NET classes that implement a certian interface.

The problem with MSBuild is that the learning curve is rather steep, it is quite unintuitive for most people. In addition, Team Build 2005/2008 hides the entire build process in a separate targets file. Although this does hide all the hairy details from the user from , it also makes customizing a team build very complex. The order in which the team build targets are executed is very hard to visualize by just looking at the MSBuild file. One of the most common questions from team build users is I want to run my things after my project is built/tested/dropped, how do I do it?

2010 to the resuce! The build process of a team build is now completely driven by Windows Workflow 4.0. This means a whole new UI for editing your build process, and you need to learn how to write/use workflow activities when you need to extend your builds instead of MSBuild. Here is a snapshot of parts of a build process in the workflow designer in VSTS 2010, and also the Toolbos with some of the available team build activities:
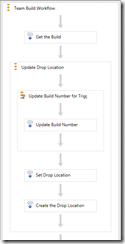
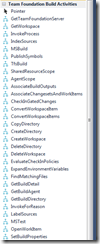
image            image

You should recognize most of the activities from the corresponding team build tasks in Team Build 2005/2008. The default build process is still the same, get the sources, label the sources, build the projects, test the projects etc.

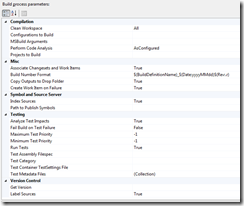
So now the entire build process is visible when extending a team build. For most times, you don’t have to change the build process itself, but just modify the build properties to fit your needs. There are several new build properties that lets you customize the build that previously was quite difficult/cumbersome:
 

image

I will go into more detail on these properties in an upcoming blog post.

Reusing Build Definitions using Build Process Templates
When creating builds for a larger system, you often find yourself defining a set of builds (CI, Nightly, Release etc) for the different applications. These builds are often defined using the exact same (or very similar) build definition process. In TFS 2005/2008, there is no way to easily resuse build definitions as templates for new builds.

TFS 2010 supports this by adding a feature called Build Process Templates. When creating a new build, you select from a list of build process templates that contain the actual build process. These templates are workflow XAML files that are located in source control  in the TeamBuildProcessTemplates folder:

image 

By default, there are two build process templates when you create a new team project, DefaultTemplate and UpgradeTemplate. DefaultTemplate is the standard build process that performs a complete build of your app. The UpgradeTemplate is a sort of placeholder build template that is used to execute legacy TFSBuild.proj files. This means that you can still use your existing team build definitions when upgrading to TFS 2010.

In a later post, I will show how you can create new build process templates for your particular scenarios, and how to share them between team projects.

The Build Summary and Log is now readable!
The Build summary screen has also been completely rewritten and lets you find the problem with the build much faster than in previous versions of Team Build. It also contains much more information, such as build times compared to the 9 previous builds and the list of properties that were sent into the build. Here is a screenshot of the Build Summary and the Activity Log:
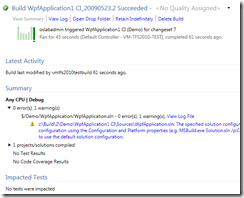
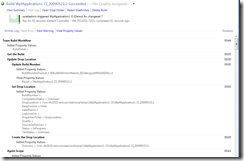
image         image

For more info about these screens, check out Jason Prickett’s blog: http://blogs.msdn.com/jpricket/archive/2009/05/12/tfs-2010-beta1-build-details-view-summary-section.aspx, http://blogs.msdn.com/jpricket/archive/2009/05/18/tfs-2010-beta1-build-details-view-log-view-section.aspx


Gated Checkins, a.k.a No More Broken Builds
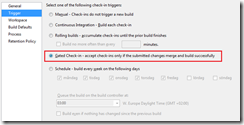
The gated checkin is a feature that has been requested for a long time and exisst in other build labs. The idea is very simple, when a checkin occurs, you want to ensure that that checkin does not break the build. At certain stages in a project, such as in the stabilization phase, broken builds cause lots of grief with people trying to fix the build to be able to push out a new version of the application to the testers. Team Build 2010 implements this by performing whats known as a Private Build in isolation from the source control system. This means that if the private build is succesful, the checkin will be executed. But if the build fails, the checkin will not be executed.

You turn on Gated checkin for a build by modifying the trigger of the build definition:
image

When a user tries to check in something that will trigger this build (e.g. inside the workspace of the build), the following dialog is shown:
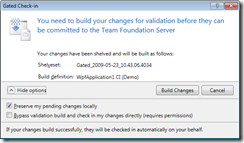
image

If the checkin affects several builds with the Gated Checkin trigger turned on, the user have to choose one of these builds.

Btw, there is an open source project on CodePlex that implements a variation of this for TFS 2008 called Buddy Build: http://www.codeplex.com/BuddyBuild


———————————-

Alright, I think that is enough for a summary post of the new features of Team Build 2010. As I mentioned previously, I will write several posts where I go into more detail on these new features and how they compare to the existing functionality in TFS 2005/2008.


Happy building!
Free Seminar on Visual Studio Team System 2010 in Oslo, Norway

On May 20th Terje and Mikael from my company (Osiris Data) will hold a seminar in Oslo, Norway where they will run through all (?) the new cool features in VSTS 2010. Expect to see demos on the new functionality for manual and UI testing, branch visualization, hierarchical work items, gated check-ins and lots of other stuff.

VSTS 2010 is a really huge release and if the rumours are true, the Beta 1 will be released in May, hopefully before the seminar 🙂

Check out the full agenda and registration details here:

http://msevents.microsoft.com/CUI/EventDetail.aspx?EventID=1032414271&EventCategory=1&culture=nb-NO&CountryCode=NO

How To: Automatically Enable Checkin Policies for new TFS Team Projects

When creating new team projects in TFS, the project is created from a project template, that basically is a set of XML files. Here you can define all your work item types, queries, reports, portal site and some other things. One of the things that you can’t specify here, is what checkin policies that you want to enable for that team project. At our company, we usually create a new team project for every customer so for every new customer we need to manually modify the checkin policies for that project to match our company policy.

That is tedious and easy to forget, so it must of course be automated! 🙂  Since TFS generates a ProjectCreatedEvent every time a team project is created, that seems like a good place to start. In addition we must find a way to enable a checkin policy on a given team project. After quite some searching around, I found a blog post by Buck Hodges that shows the API for reading and updating checkin policies for a team project.

The source code for the web service is shownbelow. To add a subscription for the ProjectedCreatedEvent and map it to the web service, use the following command line statement (bissubscribe is installed on the Team Foundation Server app tier):

“C:Program FilesMicrosoft Visual Studio 2008 Team Foundation ServerTF SetupBisSubscribe.exe” /eventType ProjectCreatedEvent /address http://SERVER/NewTeamProjectEventService/NewTeamProjectEventService.asmx /deliveryType Soap /domain http://TFSSERVER:8080

Note that the web service reads the assembly and the checkin policies (separated by 😉 from the app settings. As of now, this only makes it possible to read checkin policies from one assembly, but it should’n’t be that hard to extend the code to allow for mutiple assemblies. I will post an update when I have implemented this functionality.

Also note that the checkin policies must be installed on the server running the web service. I have not found another way to get a hold of the PolicyType references than to use the Workstation.Current.InstalledPolicyTypes property.

[WebService(Namespace = "http://tempuri.org/")]
[WebServiceBinding(ConformsTo = WsiProfiles.BasicProfile1_1)]
public class NewTeamProjectEventService
{
    [SoapDocumentMethod(Action = http://schemas.microsoft.com/TeamFoundation/2005/06/Services/Notification/03/Notify, 
RequestNamespace = "http://schemas.microsoft.com/TeamFoundation/2005/06/Services/Notification/03")] [WebMethod(MessageName = "Notify")] public EventResult Notify(string eventXml) { try { XmlDocument objXML = new XmlDocument(); objXML.LoadXml(eventXml); string projectName = (objXML.GetElementsByTagName("Name")[0] as XmlElement).InnerText; if (objXML.DocumentElement.Name == "ProjectCreatedEvent") { string strTFSServer = Properties.Settings.Default.TFSServer; TeamFoundationServer tfs = new TeamFoundationServer(strTFSServer, new NetworkCredential(Properties.Settings.Default.TFSLogin,
Properties.Settings.Default.TFSPassword,
Properties.Settings.Default.TFSDoman)); tfs.Authenticate(); VersionControlServer service = (VersionControlServer)tfs.GetService(typeof(VersionControlServer)); TeamProject teamProject = service.GetTeamProject(projectName); List<PolicyEnvelope> policies = new List<PolicyEnvelope>(); string assembly = Properties.Settings.Default.CheckinPolicyAssembly; foreach (string type in Properties.Settings.Default.CheckinPoliciesToApply.Split(';')) { Assembly checkinPolicyAssembly = Assembly.LoadFile(assembly); object o = checkinPolicyAssembly.CreateInstance(type); if (o is IPolicyDefinition) { IPolicyDefinition def = o as IPolicyDefinition; PolicyEnvelope[] checkinPolicies = new PolicyEnvelope[1]; bool foundPolicy = false; foreach (PolicyType policyType in Workstation.Current.InstalledPolicyTypes) { if (policyType.Name == def.Type) { policies.Add(new PolicyEnvelope(def, policyType)); foundPolicy = true; } } if (!foundPolicy) { throw new ApplicationException(String.Format("The policy {0} is not registered on this machine", def.Type)); } } else { throw new ApplicationException(String.Format("Type {0} in assembly {1} does not implement the IPolicyDefinition interface", type, assembly)); } } if (policies.Count > 0) { teamProject.SetCheckinPolicies(policies.ToArray()); } } } catch (Exception e) { EventLog.WriteEntry("NewTeamProjectEventService", e.Message + "n" + e.StackTrace); return new EventResult(false); } return new EventResult(true); } }


Now, there are other things that we also need to do manually for all new team projects. For example we must manually add the build service account to the Build Services group for the new team project. You can’t do this via the process template. So I might extend the project to allow for more things to be applied. Could be a candidate for trying out the MEF framework, so it can be a pluggable architecture.

Implementing Dependency Replication with TFS Team Build

A very common question from people is how to handle dependencies between projects/applications/team projects in TFS source control. A typical scenario is that you a common library/framework tucked away nicely somewhere in TFS source control, and now you have some applications that, in some way, needs to reference this project.

My colleague Terje has written an article on what he calls “Subsystem branching”, in which he talks about different ways to organize your source code in order to solve the above problem. Ther article can be found here:
http://geekswithblogs.net/terje/archive/2008/11/02/article-on-subsystem-branching.aspx

I won’t go through all the different scenarios again, but thought that I’d show how we do it. We normally use Terje’s solution 3 and 3b, namely Binary deployment branching with or without merging. Shortly, this means that we setup a team build for our common library that we start manually when we have checked in changes that need to be replicated to the applications that are dependent on the library. This build (in addition to compiling, testing and versioning) checks in the library outputs (typically *.dll and *.pdb) into a Deploy folder. This folder is branched to all dependent applications. After the checkin, we merge the folder to the application(s) that will be built against the new version of the library.

As Terje mentions, another approach to this problem is the TFS Dependency Replicator which is a very nice tool that automates copying the dependencies between different parts of the source control tree. The main objective that we have with that approach is that using copying gives you no traceability. You have no easy way to see which applications use which version of which library.

In this post, I thought I would show how to implement this using TFS Team Build. We will implement solution 3b from Terje’s post, which means that efter we check in the binaries from the library build, we will automatically merge those binaries to the dependent projects.


Custom Task or “plain” <Exec>?
I considered implementing a custom task to implement this kind of dependency replication. The problem however, is that once you start wrapping functionality in the TFS source control API, you find that you often end up reimplementing lots of stuff to not make the task to simplistic. There are myriads of options for the tf.exe commands, and different scenarios often require different usage of the commands. So to keep it flexible, I suggest that you use the command line tool tf.exe instead when you are working against TFS source control.  On the downside, you need to learn a bit more MSBuild…. 🙂

Sample Scenario

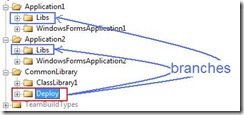
BranchScenario

We have one CommonLibrary project, which just contains a ClassLibrary1 project. In addition, we have the Deploy folder that is used for the resulting binary. Then we have two applications (Application1 and Application2) that each simple contains a WpfApplication project.In addition, each application has a Libs folder that is a branch from the Deploy folder. (The Deploy/Libs names have become a naming convention for us).So, we want a release build for CommonLibrary that builds the ClassLibrary1 assembly and checks it in to the Deploy folder, and then merges it to Application1Libs and Application2Libs.

Workspace Mappings

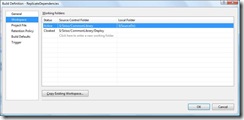
Now, before starting to go all MSbuild crazy, we need to discuss what the workspace for this build definition should look like. First of all, the workspace for the CommonLibrary build should not include anything from the dependent applications. This means that we must dynamically include the Libs folders into the build workspace as part of the build, to be able to perform the merge. Also,we really don’t want the Deploy folder to be part of the workspace for the build. If it is, the changesets that are created by the build will show up as associated changesets for the build, which is really not relevant since they contain the outputs of the build. So, the workspace mapping for our build definition looks like this:

WorkspaceMapping

Implementing the Build
The steps that we need to implement in our team build is:

  1. Decloak the Deploy folder into the current workspace and peform a check out
  2. Copy the build output to the Deploy folder and check it back in
  3. Add the Libs folders to the current workspace
  4. Merge the Deploy folder to the Application1/2Libs and check everything in

All these steps uses the Team Foundation Source Control Command-Line tool (tf.exe) to perform operations on TFS source control.

We start off by defining some properties and items for the source and destination folders:

<PropertyGroup>
  <TF>&quot;$(TeamBuildRefPath)..tf.exe&quot;</TF>
  <ReplicateSourceFolder>$(SolutionRoot)Deploy</ReplicateSourceFolder>
</PropertyGroup>
 
<ItemGroup>
  <ReplicateDestinationFolder Include="$(BuildProjectFolderPath)/../../Application1/Libs">
    <LocalMapping>$(SolutionRoot)Destination1</LocalMapping>
  </ReplicateDestinationFolder>
  <ReplicateDestinationFolder Include="$(BuildProjectFolderPath)/../../Application2/Libs">
    <LocalMapping>$(SolutionRoot)Destination2</LocalMapping>
  </ReplicateDestinationFolder>
</ItemGroup>


Note the LocalMapping metadata that we define for each ReplicateDestinationFolder item. This will be used later on when modifying the workspace.

Step 1:

<Target Name="AfterEndToEndIteration">
 
  <!-- Get and checkout deploy folder-->
  <MakeDir Directories="$(ReplicateSourceFolder)"/>
  <Exec Command="$(TF) workfold /decloak ." WorkingDirectory="$(ReplicateSourceFolder)" />
  <Exec Command="$(TF) get &quot;$(ReplicateSourceFolder)&quot; /recursive"/>
  <Exec Command="$(TF) checkout &quot;$(ReplicateSourceFolder)&quot; /recursive" />


We put the logic in the AfterEndToEndIteration target, which is executed when

Step 2:

<!-- Copy build output to deploy folder and check in -->
   <Copy SourceFiles="@(CompilationOutputs)" DestinationFolder="$(ReplicateSourceFolder)"/>
   <Exec Command="$(TF) checkin /comment:&quot;Checking in file from build&quot; &quot;$(ReplicateSourceFolder)&quot; /recursive"/>

We use the nice CompilationOutputs item group that was added in TFS 2008, which contains all output from every configuration that is built. Note that this won’t give you the *.pdb though.

Step 3:

<!-- Add destination folders to current workspace -->
    <Exec Command="$(TF) workfold /workspace:$(WorkspaceName) &quot;%(ReplicateDestinationFolder.Identity)&quot; &quot;%(ReplicateDestinationFolder.LocalMapping)&quot;"/>

Here we use MSBuild batching to add a workspace mapping for each destination folder into the current workspace. We pass the %(ReplicationDestinationFolder.Identity) as the source parameter to the merge command, and we send the %(ReplicationDestinationFolder.LocalMapping) as the destination parameter, which we defined previously´

Step 4:

<!-- Merge to destinations and check in-->
<Exec Command="$(TF) merge &quot;$(ReplicateSourceFolder)&quot; &quot;%(ReplicateDestinationFolder.LocalMapping)&quot; /recursive"/>
<Exec Command="$(TF) checkin /comment:&amp;quot;Checking in merged files from build&amp;quot; @(ReplicateDestinationFolder->'&quot;%(LocalMapping)&quot;', ' ') /recursive"/>


So, every build will result in two checkins, first the check-in of the file(s) to the Deploy folder, and the a check-in for all merged binaries.

Note: I haven’t added any error handling. Typically you would add a OnError to the target that performs a tf.exe undo /recursive to undo any checkouts.

Writing a Code Coverage Checkin Policy

The source code for this policy is available here : http://www.codeplex.com/TFSCCCheckinPolicy

Checkin policies is a great tool in TFS for keeping your code base clean and adhering to your companhy standards and policies.  The checkin policies that are included are very useful, but don’t stop there! Implementing your own custom checkin policy is pretty straight-forward and can soon pay off by stopping people from doing silly things (on purpose or not…).

At our company (Osiris Data) we have developed several small checkin policies that both stop people from breaking our standards, but also helping them to do the right thing. We all make mistakes from time to time, and if a tool can help us not doing them, then that’s pretty good… 🙂

For example we have a checkin policy that stop people from checking in binaries into TFS. Of course there are occasions when people are allowed to do this (3rd party dll:s, binary references), so then we check that the binaries are placed in folders that are named according to our naming policies, thereby enforcing standards across the team projects.

I recently saw a post in one of the MSDN forums asking for a checkin policy that would check coverage as part of a check-in. That is, if the latest test run either does not have code coverage at all, or the total code coverage percentage is below a certain treshold, the policy would stop the check-in. I couldn’t find any such checkin policy on the net, so I decided that it would be fun to write one.

 
The following things must be solved:

1) Locating the latest test run and code coverage information
2) Analyzing the code coverage information

The first part was simple to implement, unfortunately there does not seem to be anything in the VS.NET extensibility API that allows you to locate the test runs or code coverage information, so I basically had to run through the folder structure beneath the current solution to locate the folder with the latest test run. Simple and rather boring, so I won’t mention that code here.

The second part was a bit worse, since the API for running and analysing code coverage is totally undocumented and, frankly, not supported by MS. However, the following blog post by Joe contained the information I needed in order to load and analyse the code coverage information. As always with unsupported stuff, there is no guarantee that the code will work with new versions of VSTS or even service packs. This code has been tested on VSTS 2008 SP1.

The code coverage result is stored in a proprietary binary format, and is located beneath the test run result. the local folder structure looks like this:

 
Solution
    —–  TestResults
                   —- TestRun1
                              —–  In
                                       —— data.coverage
                             —— Out
                                       —— Binaries from the instrumented assemblies

To programmatically access and analyse the code coverage results, we need a reference to the Microsoft.VisualStudio.Coverage.Analysis assembly, which is located in the private assemblies folder of VSTS. In this assembly, we use the CoverageInfoManager class to load the coverage file. In addition this class contains a method that returns a typed dataset (method is appropriately called BuildDataSet). This method returns an instance of the CoverageInfo class from which we can easily read the information.

The code snippet for loading the coverage file calculating the total code coverage in percent looks like this:

CoverageInfoManager.ExePath = binariesFolder;
CoverageInfoManager.SymPath = binariesFolder;
 
CoverageInfo ci = CoverageInfoManager.CreateInfoFromFile(codeCoverageFile);
CoverageDS data = ci.BuildDataSet(null);
 
uint blocksCovered = 0;
uint blocksNotCovered = 0;
foreach (CoverageDS.ModuleRow m in data.Module)
{
    blocksCovered += m.BlocksCovered;
    blocksNotCovered += m.BlocksNotCovered;
}
 
return GetPercentCoverage(blocksCovered, blocksNotCovered);

Note that we must set the ExePath and the SymPath properties to the folder where the instrumented assemblies is located. If not, the BuildDataSet method will throw a CoverageException.

 
So all we have to do then is to implement the PolicyBase.Evaluate method and compare the totalCodeCoverage with the configurable treshold. This treshold is configured by implementing the CanEdit and the Edit methods. See the source code for how this is done, it is all standard checkin policy stuff.

Hopefully this checkin policy will be useful for some people, let me know about any problems and I will try to fix them asap.