Currently, Microsoft is working hard on a complete rewrite of the TFS Build system. They announced this, among other things, at the Connect event back in November and did a short demo of it. It is not yet available, but as part of the MVP program, a few of us has now been fortunate enough to get access to an early preview of the new build system.
Note: This version is in pre-alpha state, meaning that a lot of things can and will change until the final version!
Microsoft will enable a beta version to a broader public on Visual Studio Online later on this year, and it will RTM in TFS 2015. I will write a series of blog posts about Build vNext as it evolves. In this first post I will take a quick look at how to create and customize build definitions and running them in the new Web UI.
Key Principals
The key principals of TFS Build vNext are:
- Customization should be dead simple. Users should not have to learn a new language (Windows Workflow anyone?) in order to just run some tool or script as part of the build process
- Provide a simple Web UI for creating and customizing build definitions. No need for Visual Studio to customize builds anymore.
- Support cross platform builds (Linux, MacOS…) As in most other areas right now, Microsoft is serious about supporting other platforms than Windows, and TFS Build won’t be an exception.
- Sharing build infrastructure. The concept of a build controller tied to a collection is gone, instead we will create agent pools at the deployment level and connect agents to those.
- Don’t mess with the build output and keep my logs clean. One of the most frustrating things about the current version of TFS Build is that by default it doesn’t preserve the output structure of the compiled projects, but instead places them beneath a common Binaries directory. This causes all sort of problems, such as post build events that are dependent on relative path etc.
CI build == Dev build !
- Work side by side with the existing build system. All your existing XAML build definitions will continue to work just like before, and you will be able to create new ones. But don’t expect anything to be added in terms of functionality to the XAML builds
Creating a build definition in vNext
In this post, I will show how easy it is to create a new build definition in Build vNext, and customize it to update the version info in all the assembly files using a PowerShell task with a custom script.
Note: There will probably be a versioning task out of the box in the final release, but currently there isn’t.
Let’s get started:
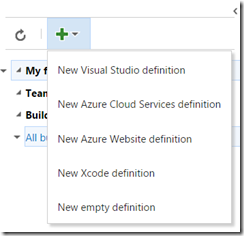
- From the dropdown, you can select from a list of build definition templates. These templates are created by saving an existing build definition as a template. Currently, they are scoped to the team project level:
Here I’m going to select the Visual Studio definition template.
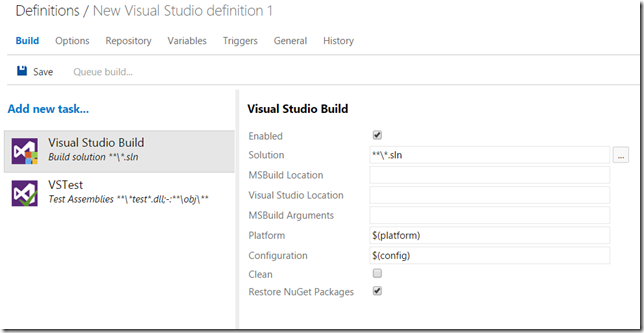
- This results in a build definition with two tasks, one that compiles the solution and one that runs all the unit tests using the Visual Studio test runner task
- Selecting a task shows the properties of that task to the right, the properties of the Visual Studio Build task is shown above. Some of these properties are typed, meaning that for example the Solution property let’s you browse the current repository to select a solution. By default, it will locate all solution files and compile them (using the ***.sln pattern)
You can also see that the Platform and the Configuration property uses the variables $(platform) and $(config). We will come back to them shortly.
- The first thing we want to do typically is specifying which repository that the build will download the source from. To do this, select the Repository tab:
Looking at the Repository type field, since this is a Git team project it will let me choose either Git (which means a git repo in the current team project) or GitHub, which actually lets me choose any Git repo. In that case I will need to enter credentials as well. When selecting the Git repo type, i can then select the repo (Visual Studio ALM in this case) from the current team project, and then I can select the default branch in a drop down.
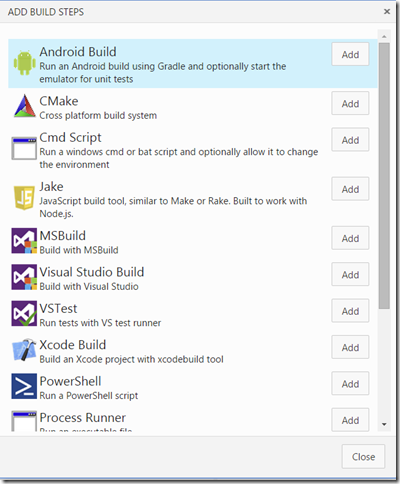
- If you want to add more tasks to the definition, go back to the Build tab and click on the Add new task link. This will display a list of all available tasks, shown below:
The list of tasks here are of course not complete, but as you can see there are a lot of cross platform tasks there already. To add a task to the build definition, select it and press Add.
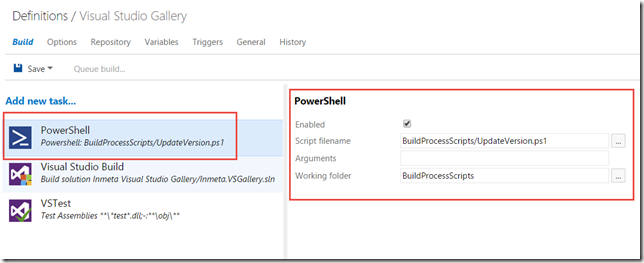
Here, I will select the PowerShell task that I will use to version all my assemblies:When adding a new task it will end up at bottom of the task list, but you can easily reorder the tasks by using drag and drop. Since I must stamp the version information before i compile my solution, I have dragged the PowerShell task to the top. This task then requires me to select a PowerShell file to execute, and I also specified a working folder since the script I am using assumes this. All paths here are relative to the repository.
Note: Although currently not possible, it will be possible to rename the build tasks
- On the Triggers tab, the only option available right now is to trigger the build on every check-in (or push in the case of Git). I can also select to batch the changes, which is the same thing as the Rolling build trigger in the existing version of TFS build.
This means that all changes that are checked in during a running build will be batched up and processed in the next build as soon as the current build has completed.In addition we can specify one or more branches that should trigger this build.
Tip: The filter strings can include * as a filter, which lets me for example specify refs/heads/feature* as a filter that will trigger on any change on any branch that starts with the string feature.
- On the Variables tab, we can specify and add new variables for this build definition. Here you can see the config and platform variables that were referenced in the Build tab:
- Last, let’s take a look at the Options tab. The MultiConfiguration option enables us to build the selected solution(s) multiple times, each time for every combination of the variables that are specified here. By default, it will list the config and platform variables here. So, this means that the build will first build my solution using Debug | Any CPU, and the it will compile it using Release | Any CPU.
If I check the Parallel checkbox, it will run these combinations in parallel, if there are multiple agents available of course.
Also, we can enable copy to Staging and Drop location here. The build agent will copy everything that matches the Search pattern and place it in the staging folder
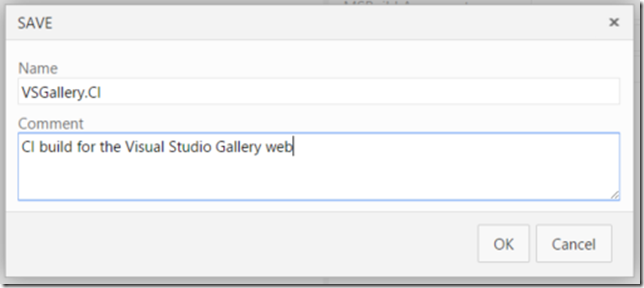
- Finally, let’s save the new build definition. Note that you can also add a comment every time you save a build definition:
These comments are visible on the History tab, where you can view the history of all the changes to the build definition and view the changes between any of the changes. Nice!
Running a Build
The build definition is complete, let’s kick off a build. Click on the Queue build.. button at the top to do this. This will show the live output of the build, both in a console output window and in an aggregated view where the status of each task is shown:
Here you can note several nice features of build vNext:
- The console output shoes the exact output from each task, just like it would if you ran the same command on your local machine
- The aggregated view to the left shows the status and progress of every task which makes it very clear how far in the process the build is
- This view also show parallel builds, in this case I have enabled the MultiConfiguration option and have two build agents configured, meaning that both Debug|AnyCPU and Release|AnyCPU are being processed in parallel on separate agents.
- If you select one of the tasks to the left, you will see the build output for this particular task
When the build completes, you will see a build summary and you can also view a timeline of the build where the duration of each task is shown:
