Talking Visual Studio ALM Extensibility at DevSum16

Last year I had a great time speaking at the DevSum conference, the biggest .NET developer conference in Sweden. Back then, I talked about moving your development to the cloud using Visual Studio Team Services. Active Solution, where I work, was a gold partner for this event and in addition to me my colleagues Alan Smith and Peter Örneholm also spoke at the conference. We had a lot of fun in our booth showing the Lego robots running on Raspberry PIs, connected to Azure for movement control and result collection.

This year I had the fortune to be selected again to speak at DevSum16, and this time I will talk about the different options around integration and extensibility of the Visual Studio ALM platform. This means that I will talk about things like Service Hooks, OAuth, REST API and UI extensibility among other things.


Here is the session description (http://www.devsum.se/speaker/jakob-ehn/), hope to see you there!

Don’t be locked in – Integrate and Extend the Visual Studio ALM Platform

The days when you used one tool chain for all your development are long gone. Developing modern applications today often requires a variety of tools, both 3rd party tools and services

but also homegrown systems are often used as part of the process. In the new era of Microsoft the term “Open ALM” is key, focusing on trying to build best in breed tools for software development companies, but at the same time make sure that it is open and extensible.


In this session we will look at the different options for integrating and extending Visual Studio TFS and Team Services. We will look at:

  • Using Service Hooks to automate workflows with other services such as Trello, GitHub and Jenkins.
  • Utilizing the REST API to automate processes in TFS
  • Extending the Web UI itself with custom extensions, from simple context menus to full-fledged custom pages and hubs. We will also look at how we can publish these extensions
    to the new Visual Studio Marketplace

Publish a GitHub Release from Visual Studio Team Services

The new build system in Team Foundation Server 2015 and Visual Studio Team Services has from the start made it very easy to integrate with GitHub. This integration allows you to create a build in TFS/VSTS that fetches the source code from a GitHub repository. I have blogged about this integration before, at http://blog.ehn.nu/2015/06/building-github-repositories-in-tfs-build-vnext/.


Publisinh a GitHubRelease from VSTS

This integration allows you to use GitHub for source code, but use the powerful build system in TFS/VSTS to run your automated builds. But, when maintaining the project at GitHub you often want to publish your releases there as well, with the output from your build.

To make this easy, I have developed a custom build task lets you publish your build artifacts into a release at GitHub.

The task is available over at the new Visual Studio Marketplace, you can find the extension here:
https://marketplace.visualstudio.com/items?itemName=jakobehn.jakobehn-vsts-github-tasks


image

To use it, just press the Install button and select the VSTS account where you want to install it. After this, the Publish GitHub Release build task will be available in your build task catalog, in the Deploy category.

image


From Team Foundation Server 2015 Update 2, it is possible to install the extensions from the VS Marketplace on premise. To do so, use the Download button and follow the instructions.


After adding the build task to a build definition, you need to configure a few parameters:

image

These parameters are:

  • Application Name
    You can use any name here, this is what is sent to the GitHub API in the request header.
  • Token
    Your GitHub Personal Access Token (PAT). For more information about GitHub tokens, please see https://help.github.com/articles/creating-an-access-token-for-command-line-use/

    Repository Name
    The name of the repository where the release should be created

  • Owner
    The GitHub account of the owner of the release
  • Tag Name
  • A unique tag for the release. Often it makes sense to include the build number here
  • Release Name
    The name of the release. Also, including the build number here can make sense
  • Draft
    Enable this to create a draft release
  • Prerelease
    Enable this to create a prerelease

    Assets to upload
    Specified which files that should be included in the GitHub release


Hope that you will find this extension useful, if you find bugs or have feature suggestions, please report them on the GitHub site at https://github.com/jakobehn/VSTSGitHubTasks

Introducing GitFlow for Visual Studio

Update: The exension is now also available for Visual Studio 2015 Preview: https://visualstudiogallery.msdn.microsoft.com/f5ae0a1d-005f-4a09-a19c-3f46ff30400a


GitFlow is a popular workflow that provides a consistent naming convention to your branches as well as clear guidance on how your code should flow through these branches.
GitFlow was introduced by Vincent Driessen in this post back in 2010, and quickly caught a lot of attention in the community. Since GitFlow by nature is very prescriptive it made a lot of
sense to implement tooling support for the workflow, which Vincent added shortly after. His repo is available at https://github.com/nvie/gitflow, although it hasn’t been updated since 2012.
However, several forks has been made, one of the most active is being developed by Peter van der Does at https://github.com/petervanderdoes/gitflow

To make GitFlow more approachable I decided to integrate the GitFlow toolset into Visual Studio, by extending Team Explorer. This makes it very easy to access the commands and lowers the learning
curve a bit by making it available as a UI. Note that the extension includes the GitFlow scripts from Peter van der Does fork of GitFlow and uses them for every command, so it provides the exact same
functionality as the GitFlow scripts does.


Installation

Note: The extension requires Visual Studio 2013 Update 3 or higher

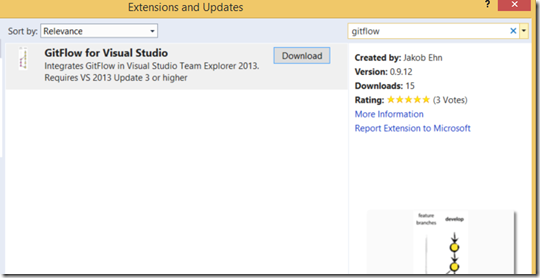
You’ll find the extension over at the Visual Studio Gallery, just search for GitFlow in the Extension and Updates Window.
Or, download it from https://visualstudiogallery.msdn.microsoft.com/27f6d087-9b6f-46b0-b236-d72907b54683:

image

Install it and restart Visual Studio, as usual.


Using the extension

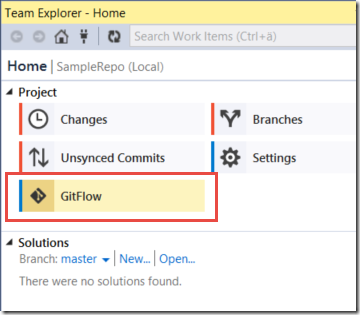
When you connect to a Git repo in Visual Studio (either local or remote), you will see a new icon show up on the home page in Team Explorer:

image

 
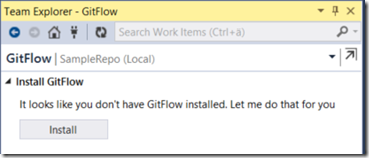
Now, if GitFlow is not installed on your machine you will be presented with the following message:

image

By clicking Install, the extension will copy the necessary files into the Git for Windows directory, and run the install script for GitFlow.
You can check the installation details for GitFlow here https://github.com/nvie/gitflow/wiki/Windows

(Note: Since copying files into the %ProgramFiles(x86)%Gitbin directory requires elevated priveledges, this is done by running this as a elevated Powershell script.
You will see this flash by during the installation
)


Initialize

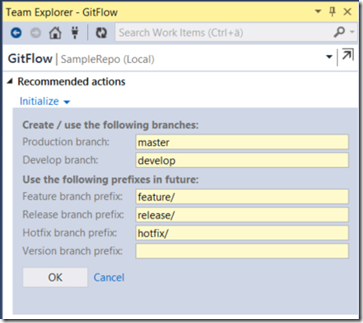
Now, you are ready to start use the extension! The first thing you will have to do is to initialize the repo for GitFlow. What this means is that you
should create your permanent development and master branches, and set the naming conventions for future feature, release and hotfix branches:


image

You can also set the Tag prefix, which will be used when you tag a release or hotfix branch as part of finishing up those branches.

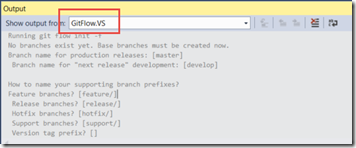
Note that all output from all GitFlow operations are sent to a separate output window pane in Visual Studio, which is activated when the command start.
Here you can which gitflow command that were used and the output from it:


image


Working with features

From now on, the extension will show the recommended actions based on which branch you are currently in. After initializing the repo, you will be in the develop
branch, so from here you would typically either start a new feature, release or hotfix branch.


image

Clicking Start Feature will let you define a name for the branch. GitFlow will add the feature branch prefix for you so don’t include that.

Here I have created a feature branch called SingleSignOn:

image


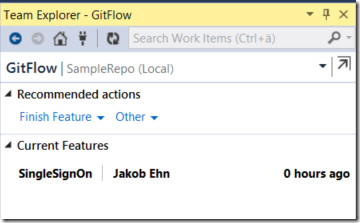
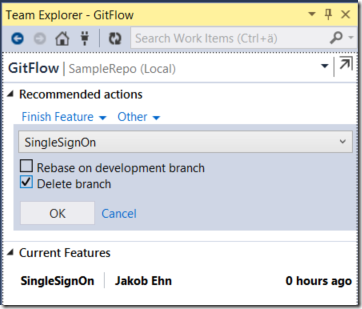
As you can see, the extension will now suggest Finish Feature as the recommended action:

image

Note that all other actions are still available from the Other menu.


In the GitFlow world, you are allowed to have multiple feature branches but only one release and hotfix branch at any single time.
In fact, if you try to create multiple release branches, you will get an error.

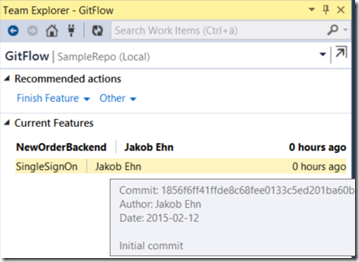
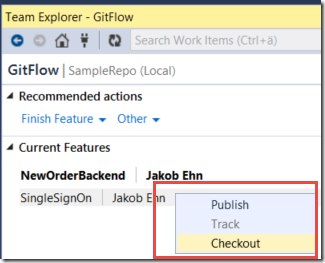
Keeping track of multiple feature branches can be cumbersome, so the extension lists all active feature branches is a separate section:

image       image

As you can see, if you hover over a feature will get some more details on it, and if you right-click on it you can (depending on the state), checkout, track or publish the feature branch.
I will be looking at adding more functionality here in the future to make is even easier to use this workflow.


I hope you will find this extension useful. Please report any bugs or feedback over at the GitHub site for this extenstion, over at  https://github.com/jakobehn/GitFlow.VS

Trigger Visual Studio Release Management vNext from TeamCity

The last couple of updates to Visual Studio has included a lot of new functionality for Visual Studio Release Management. The biggest one is the introduction of so called vNext releases, that leverages Powershell DSC for carrying out the provisioning and deployments of environments and applications.

Also included in Visual Studio 2013 Update 3 was the introduction of a REST API that allows us to both trigger new releases and read back information about them. This API is only available for vNext release templates, and will probably not be implemented for the “old” agentbased deployments.

This REST API opens up a lot of integration possibilities, for example we don’t have to use TFS Build to automatically trigger a release. In this post, I will show how we can use the popular TeamCity build server from JetBrains to trigger a release as part of the build.

 
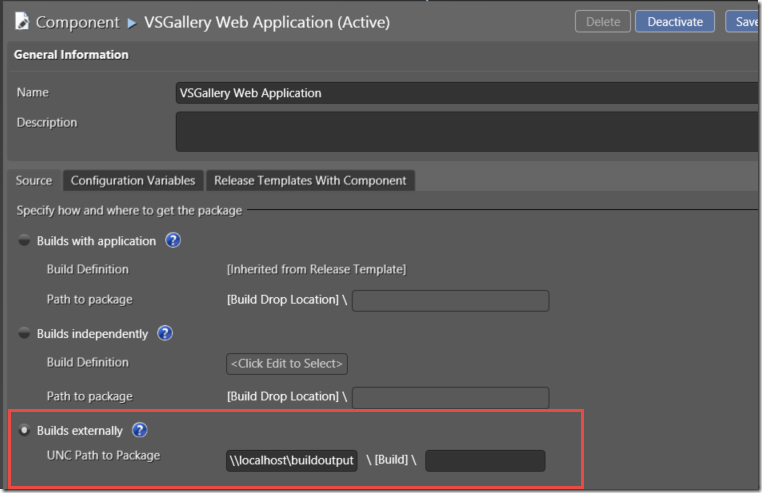
First of all, we need to setup a release template in Visual Studio Release Management. I won’t go through all the details here, the most important once is that the components that we define must use the UNC Path as the source parameter:

image

Here I have specified a shared folder, \localhostbuildoutput. Beneath this path, VSRM will look for a folder that typically correspond to a build number that we will pass in using the API, as you will see later on.

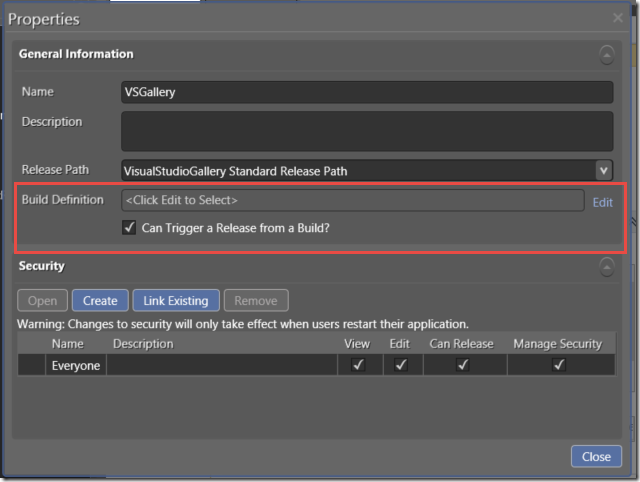
Next, we create our release template. To be able to trigger a build using the API, make sure that you tick the “Can trigger a release from a Build?” checkbox:

 image


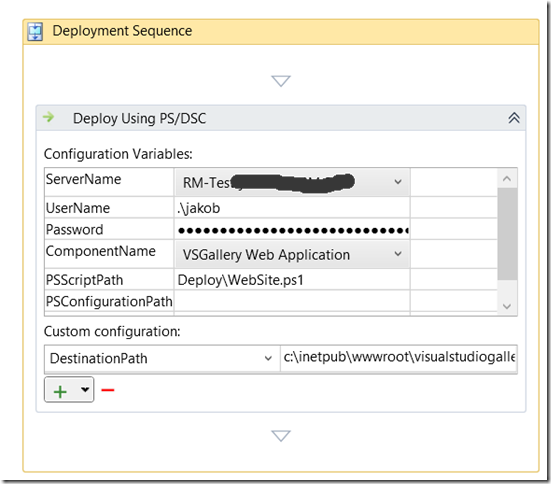
Then we define our deployment sequence, in this case I just have one action for deploying my web site using a PowerShell script:

SNAGHTML5c6e9ead

There is nothing really nothing special here, I refere to the DeployWebSite.ps1 which is a PowerShell DSC script that installs my web site. I have also a DestinationPath variable that is referenced in the DSC script and specifies where the web site should be installed on the server.


Now, to trigger a release of this release template we are going to use a PowerShell script, that we can execute using TeamCity. I have used a sample from Microsoft and modified it to use parameters.

Here is the full script:


param( [string]$rmServer, [string]$rmUser, [string]$rmPassword, [string]$rmDomain, [string]$releaseDefinition, [string]$deploymentPropertyBag ) $deploymentPropertyBag = $propertyBag = [System.Uri]::EscapeDataString($deploymentPropertyBag) $exitCode = 0 trap { $e = $error[0].Exception $e.Message $e.StackTrace if ($exitCode -eq 0) { $exitCode = 1 } } $scriptName = $MyInvocation.MyCommand.Name $scriptPath = Split-Path -Parent (Get-Variable MyInvocation -Scope Script).Value.MyCommand.Path Push-Location $scriptPath $orchestratorService = "http://$rmServer/account/releaseManagementService/_apis/releaseManagement/OrchestratorService" $status = @{ "2" = "InProgress"; "3" = "Released"; "4" = "Stopped"; "5" = "Rejected"; "6" = "Abandoned"; } #For Update3 use api-version=2.0 for Update4 use api-version=3.0. $uri = "$orchestratorService/InitiateRelease?releaseTemplateName=" + $releaseDefinition + "&deploymentPropertyBag=" + $propertyBag + "&api-version=3.0" $wc = New-Object System.Net.WebClient #$wc.UseDefaultCredentials = $true # rmuser should be part rm users list and he should have permission to trigger the release. $wc.Credentials = new-object System.Net.NetworkCredential("$rmUser", "$rmPassword", "$rmDomain") try { $releaseId = $wc.UploadString($uri,"") $url = "$orchestratorService/ReleaseStatus?releaseId=$releaseId" $releaseStatus = $wc.DownloadString($url) Write-Host -NoNewline "`nReleasing ..." while($status[$releaseStatus] -eq "InProgress") { Start-Sleep -s 5 $releaseStatus = $wc.DownloadString($url) Write-Host -NoNewline "." } " done.`n`nRelease completed with {0} status." -f $status[$releaseStatus] } catch [System.Exception] { if ($exitCode -eq 0) { $exitCode = 1 } Write-Host "`n$_`n" -ForegroundColor Red } if ($exitCode -eq 0) { "`nThe script completed successfully.`n" } else { $err = "Exiting with error: " + $exitCode + "`n" Write-Host $err -ForegroundColor Red } Pop-Location exit $exitCode

Basically, this script calls the following REST API endpoint:

http://RMSERVER/account/releaseManagementService/_apis/releaseManagement/OrchestratorService/InitiateRelease?releaseTemplateName=RELEASEDEFINITION&deploymentPropertyBag=PROPERTYBAG&api-version=3.0 


This REST endpoint returns a release id, which we can use to read the status of the release. The script loops until the status is not “In Progress” and the quits and returns an exit code depending on how the release went.


The parameters of the above endpoint are:

  • RMSERVER

    The URL including port to the release management server, typically somthing like contoso.com:1000 

  • RELEASEDEFINITION

    The name of the release template that we want to trigger.

  • PROPERTYBAG

    Now this one is a bit special. This is an array of key/value which is not yet documented but it typically looks like this:

  • { "Component1:Build" : "Component1Build_20140814.1", "Component2:Build" : "Component2Build_20140815.1", "ReleaseName" : "$releaseName" }

    The first two lines references two different components in RM. Here I have just called them Component1 and Component2. The :Build is a keyword and must be there. The value part is the build number, which RM will append to the UNC path that we defined earlier. Note that we can use different build numbers per component here if we want to.

    The last line is a predefined keyword that allows us to specify the name of the release, something that we actually can’t do using the RM client or the standard RM TFS Build release template so this is a nice feature.


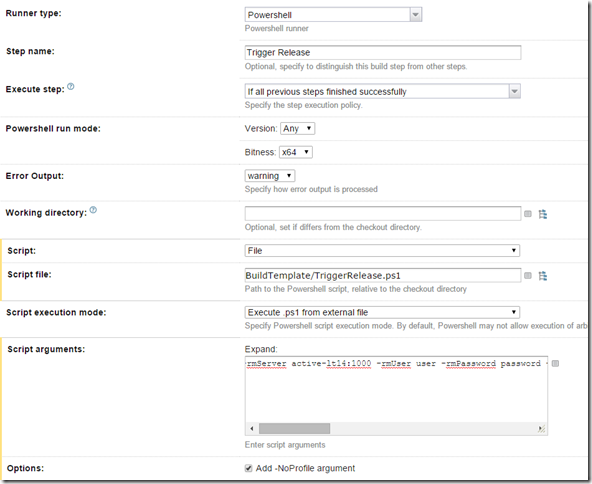
So, to execute this script in TeamCity, add the above script to repository and then add a PowerShell build step at the end of your build in TeamCity that looks something like this:

image 


The Script Arguments property is the tricky part, since we have to escape the quotes for the propertyBag parameter, and we will also use the %env:BUILD_NUMBER% variable from TeamCity for the build number. Here is the full string as an example:

-rmServer SERVER:1000 -rmUser USER -rmPassword PASSWORD -rmDomain DOMAIN -releaseDefinition VSGallery -deploymentPropertyBag “{“VSGallery Web Application:Build” : “%env.BUILD_NUMBER%”,”ReleaseName” : “%env.BUILD_NUMBER%”}”


Running this build in TeamCity will now trigger a release in Release Management:

image

Copy TFS Build Definitions between Projects and Collections

The last couple of years it has become apparent that using multiple team projects in TFS is generally a bad idea. There are of course exceptions to this, but there are a lot ot things that becomes much easier to do when you put all of your projects and team in the same team project.

Fellow ALM MVP Martin Hinshelwood has blogged about this several times, as well as other people in the community. In particular, using the backlog and portfolio management tools makes much more sense when everything is located in the same team project.

Consolidating multiple team projects into one is not that easy unfortunately, it involves migrating source code, work items, reports etc.  Another thing that also need to be migrated is build definitions. It is possible to clone build definitions within the same team project using the TFS power tools.

The Community TFS Build Manager also lets you clone build definitions to other team projects. But there is no tool that allows you to clone/copy a build definition to another collection. So, I whipped up a simple console application that let you do this.

The tool can be downloaded from

https://onedrive.live.com/redir?resid=EE034C9F620CD58D!8162&authkey=!ACTr56v1QVowzuE&ithint=file%2c.zip


Using CopyTFSBuildDefinitions

You use the tool like this:

CopyTFSBuildDefinitions  SourceCollectionUrl  SourceTeamProject  BuildDefinitionName  DestinationCollectionUrl  DestinationTeamProject [NewDefinitionName]


Arguments

  • SourceCollectionUrl
    The URL to the TFS collection that contains the team project with the build definition that you want to copy
  • SourceTeamProject
    The name of the team project that contains the build definition
  • BuildDefinitionName
    Name of the build definition
  • DestinationCollectionUrl
    The URL to the TFS collection that contains the team project that you want to copy your build definition to
  • DestinationTeamProject
    The name of the team project in the destination collection
  • NewDefinitionName (Optional)
    Use this to override the name of the new build definition. If you don’t specify this, the name will the same as the original one
  • Example:

    CopyTFSBuildDefinitions  https://jakob.visualstudio.com DemoProject  WebApplication.CI https://anotheraccount.visualstudio.com


    Notes

    • Since we are (potentially) create a build definition in a new collection, there is no guarantee that the various paths that are defined in the build definition exist in the new collection. For example, a build definition refers to server paths in TFVC or repos + branches in TFGit. It also refers to build controllers that definitely don’t exist in the new collection. So there will be some cleanup to do after you copy your build definitions. You can fix some of these using the Community TFS Build Manager, for example it is very easy to apply the correct build controller to a set of build definitions

    • The problem stated above also applies to build process templates. However, the tool tries to find a build process template in the new team project with the same file name as the one that existed in the old team project. If it finds one, it will be used for the new build definition. Otherwise is will use the default build template

    • If you want to run the tool for many build definitions, you can use this SQL scripts, compliments of Mr. Scrum/ALM MVP Richard Hundhausen to generate the necessary commands:

      USE Tfs_Collection

      GO

      SELECT ‘CopyTFSBuildDefinitions.exe http://SERVER:8080/tfs/collection “‘ + P.ProjectName + ‘” “‘ + REPLACE(BD.DefinitionName,”,”) + ‘” http://NEWSERVER:8080/tfs/COLLECTION TEAMPROJECT’

        FROM tbl_Project P

             INNER JOIN tbl_BuildGroup BG on BG.TeamProject = P.ProjectUri

             INNER JOIN tbl_BuildDefinition BD on BD.GroupId = BG.GroupId

        ORDER BY P.ProjectName, BD.DefinitionName


    Hope that helps, let me know if you have any problems with the tool or if you find it useful

Creating a Build Definition using the TFS 2013 API

Almost four years ago I wrote a post on how to create a build definition programmatically using the TFS 2010 API. The code is partyl still valid, but since a lot of the information in a build definition is dependent on the build process template, the code in the blog
does not work properly for the TFS 2013 default build templates. In addition, since the introduction of Git in TFS 2013, there are some other differences in how you create a build definition for a Git team project compared to a TFVC team project.

So, in this post I will show an updated version of the code for creating a build defintion. I will actually show two samples, one for the GitTemplate.12.xaml and one for the TfvcTemplate.xaml which are the default template used in TFS 2013.


Creating a Git Build definition (GitTemplate.12.xaml)

Here is the code for creating a build definition using the GitTemplate.12.xaml build process template
//Create build definition and give it a name and desription
IBuildDefinition buildDef = buildServer.CreateBuildDefinition(tp);
buildDef.Name = "ATestBuild";
buildDef.Description = "A description for this build defintion";
buildDef.ContinuousIntegrationType = ContinuousIntegrationType.Individual; //CI

//Controller and default build process template
buildDef.BuildController = buildServer.GetBuildController("Hosted Build Controller");
var defaultTemplate = buildServer.QueryProcessTemplates(tp).First(p => p.TemplateType == ProcessTemplateType.Default);
buildDef.Process = defaultTemplate;

//Drop location
buildDef.DefaultDropLocation = "#/";    //set to server drop

//Source Settings
var provider = buildDef.CreateInitialSourceProvider("TFGIT");
provider.Fields["RepositoryName"] = "Git";
provider.Fields["DefaultBranch"] = "refs/heads/master";
provider.Fields["CIBranches"] = "refs/heads/master";
provider.Fields["RepositoryUrl"] = url + "/_git/Git";
buildDef.SetSourceProvider(provider);

//Process params
var process = WorkflowHelpers.DeserializeProcessParameters(buildDef.ProcessParameters);

//What to build
process.Add("ProjectsToBuild", new[]{"Test.sln"});
process.Add("ConfigurationsToBuild", new[]{"Mixed Platforms|Debug"});

//Advanced build settings
var buildParams = new Dictionary<string, string>();
buildParams.Add("PreActionScriptPath", "/prebuild.ps1");
buildParams.Add("PostActionScriptPath", "/postbuild.ps1");
var param = new BuildParameter(buildParams);
process.Add("AdvancedBuildSettings", param);

//test settings
var testParams = new Dictionary<string, object>
                                 {
                                     { "AssemblyFileSpec", "*.exe" },
                                     { "HasRunSettingsFile", true },
                                     { "ExecutionPlatform", "X86" },
                                     { "FailBuildOnFailure", true },
                                     { "RunName", "MyTestRunName" },
                                     { "HasTestCaseFilter", false },
                                     { "TestCaseFilter", null }
                                 };

var runSettingsForTestRun = new Dictionary<string, object>
                                            {
                                                { "HasRunSettingsFile", true },
                                                { "ServerRunSettingsFile", "" },
                                                { "TypeRunSettings", "CodeCoverageEnabled" }
                                            };
testParams.Add("RunSettingsForTestRun", runSettingsForTestRun);

process.Add("AutomatedTests", new[]{ new BuildParameter(testParams)});
            
//Symbol settings
process.Add("SymbolStorePath", @"\serversymbolssomepath");

buildDef.ProcessParameters = WorkflowHelpers.SerializeProcessParameters(process);

//Retention policy
buildDef.RetentionPolicyList.Clear();
buildDef.AddRetentionPolicy(BuildReason.Triggered, BuildStatus.Succeeded, 10, DeleteOptions.All);
buildDef.AddRetentionPolicy(BuildReason.Triggered, BuildStatus.Failed, 10, DeleteOptions.All);
buildDef.AddRetentionPolicy(BuildReason.Triggered, BuildStatus.Stopped, 1, DeleteOptions.All);
buildDef.AddRetentionPolicy(BuildReason.Triggered, BuildStatus.PartiallySucceeded, 10, DeleteOptions.All);

//Lets save it
buildDef.Save();


Some things to note here:

  • The IBuildDefinitionSourceProvider interface is new in TFS 2013, and the reason for it is of course to abstract the differences between TFVC and Git source control. As you can see, we use the “TFGIT”

    to select the correct provider, and then we use the Fields property to populate it with information

  • The process parameters are created by using dictionaires, with the corresponding key and values. If you are familiar with the GitTemplate.12.xaml, you will recognize the name of these parameters.
  • As for drop locations, in TFS 2013 you can select between no drop location, a drop folder (share) or a server drop, which means the output is stored inside TFS and accessible from the web access.

    In the sample above, we specify #/ which (not that obvious) means a server drop. If you want to use a share drop location, just specify the server path for the DefaultDropLocation


Creating a TFVC Build definition (TfvcTemplate.12.xaml)

AS it turns out, creating a TFVC build definition using the TfvcTemplate.12.xaml is almost identical, since the build team went to great effort and abstracted away most differences. The only difference in fact, at least when it comes to the most common settings is how you define the workspace mappings. And this code is the same as it was in TFS 2010/2012. In addition, you don’t need to create a source provider, because there is nothing that needs to be configured other than the workspace.


Here is the full sample for TFVC:

//Create build definition and give it a name and desription
IBuildDefinition buildDef = buildServer.CreateBuildDefinition(tp);
buildDef.Name = "ATestBuild";
buildDef.Description = "A description for this build defintion";
buildDef.ContinuousIntegrationType = ContinuousIntegrationType.Individual; //CI

//Controller and default build process template
buildDef.BuildController = buildServer.GetBuildController("Hosted Build Controller");
var defaultTemplate = buildServer.QueryProcessTemplates(tp).First(p => p.TemplateType == ProcessTemplateType.Default);
buildDef.Process = defaultTemplate;

//Drop location
buildDef.DefaultDropLocation = "#/";    //set to server drop

//Source Settings
buildDef.Workspace.AddMapping("$/Path/project.sln", "$(SourceDir)", WorkspaceMappingType.Map);
buildDef.Workspace.AddMapping("$/OtherPath/", "", WorkspaceMappingType.Cloak); 

//Process params
var process = WorkflowHelpers.DeserializeProcessParameters(buildDef.ProcessParameters);

//What to build
process.Add("ProjectsToBuild", new[]{"Test.sln"});
process.Add("ConfigurationsToBuild", new[]{"Mixed Platforms|Debug"});

//Advanced build settings
var buildParams = new Dictionary<string, string>();
buildParams.Add("PreActionScriptPath", "/prebuild.ps1");
buildParams.Add("PostActionScriptPath", "/postbuild.ps1");
var param = new BuildParameter(buildParams);
process.Add("AdvancedBuildSettings", param);

//test settings
var testParams = new Dictionary<string, object>
                                 {
                                     { "AssemblyFileSpec", "*.exe" },
                                     { "HasRunSettingsFile", true },
                                     { "ExecutionPlatform", "X86" },
                                     { "FailBuildOnFailure", true },
                                     { "RunName", "MyTestRunName" },
                                     { "HasTestCaseFilter", false },
                                     { "TestCaseFilter", null }
                                 };

var runSettingsForTestRun = new Dictionary<string, object>
                                            {
                                                { "HasRunSettingsFile", true },
                                                { "ServerRunSettingsFile", "" },
                                                { "TypeRunSettings", "CodeCoverageEnabled" }
                                            };
testParams.Add("RunSettingsForTestRun", runSettingsForTestRun);

process.Add("AutomatedTests", new[]{ new BuildParameter(testParams)});
            
//Symbol settings
process.Add("SymbolStorePath", @"\serversymbolssomepath");

buildDef.ProcessParameters = WorkflowHelpers.SerializeProcessParameters(process);

//Retention policy
buildDef.RetentionPolicyList.Clear();
buildDef.AddRetentionPolicy(BuildReason.Triggered, BuildStatus.Succeeded, 10, DeleteOptions.All);
buildDef.AddRetentionPolicy(BuildReason.Triggered, BuildStatus.Failed, 10, DeleteOptions.All);
buildDef.AddRetentionPolicy(BuildReason.Triggered, BuildStatus.Stopped, 1, DeleteOptions.All);
buildDef.AddRetentionPolicy(BuildReason.Triggered, BuildStatus.PartiallySucceeded, 10, DeleteOptions.All);

//Lets save it
buildDef.Save();


Hope you find this useful!

Adding Fake Build Information in TFS 2010

We have been using TFS 2010 build for distributing a build in parallel on several agents, but where the actual compilation is done by a bunch of external tools and compilers, e.g. no MSBuild involved. We are using the ParallelTemplate.xaml template that Jim Lamb blogged about previously, which distributes each configuration to a different agent. We developed custom activities for running these external compilers and collecting the information and errors by reading standard out/error and pushing it back to the build log.

But since we aren’t using MSBuild we don’t the get nice configuration summary section on the build summary page that we are used to. We would like to show the result of each configuration with any errors/warnings as usual, together with a link to the log file.

TFS 2010 API to the rescue! What we need to do is adding information to the InformationNode structure that is associated with every TFS build. The log that you normally see in the Log view is built up as a tree structure of IBuildInformationNode objects. This structure can we accessed by using the InformationNodeConverters class. This class also contain some helper methods for creating BuildProjectNode, which contain the information about each project that was build, for example which configuration, number of errors and warnings and link to the log file.

Here is a code snippet that first creates a “fake” build from scratch and the add two BuildProjectNodes, one for Debug|x86 and one for Release|x86 with some release information:


TfsTeamProjectCollection collection = TfsTeamProjectCollectionFactory.GetTeamProjectCollection(new Uri("http://lt-jakob2010:8080/tfs")); IBuildServer buildServer = collection.GetService<IBuildServer>(); var buildDef = buildServer.GetBuildDefinition("TeamProject", "BuildDefinition"); //Create fake build with random build number var detail = buildDef.CreateManualBuild(new Random().Next().ToString()); // Create Debug|x86 project summary IBuildProjectNode buildProjectNode = detail.Information.AddBuildProjectNode(DateTime.Now, "Debug", "MySolution.sln", "x86", "$/project/MySolution.sln", DateTime.Now, "Default"); buildProjectNode.CompilationErrors = 1; buildProjectNode.CompilationWarnings = 1; buildProjectNode.Node.Children.AddBuildError("Compilation", "File1.cs", 12, 5, "", "Syntax error", DateTime.Now); buildProjectNode.Node.Children.AddBuildWarning("File2.cs", 3, 1, "", "Some warning", DateTime.Now, "Compilation"); buildProjectNode.Node.Children.AddExternalLink("Log File", new Uri(@"\serversharelogfiledebug.txt")); buildProjectNode.Save(); // Create Releaes|x86 project summary buildProjectNode = detail.Information.AddBuildProjectNode(DateTime.Now, "Release", "MySolution.sln", "x86", "$/project/MySolution.sln", DateTime.Now, "Default"); buildProjectNode.CompilationErrors = 0; buildProjectNode.CompilationWarnings = 0; buildProjectNode.Node.Children.AddExternalLink("Log File", new Uri(@"\serversharelogfilerelease.txt")); buildProjectNode.Save(); detail.Information.Save(); detail.FinalizeStatus(BuildStatus.Failed);

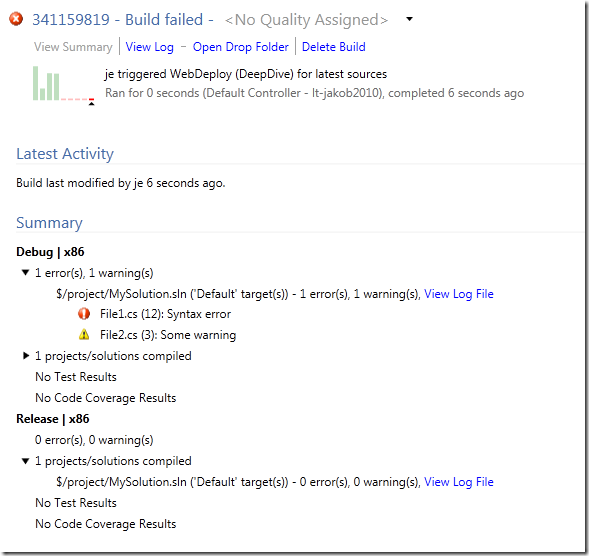
When running this code, it will a create a build that looks like this:

image


As you can see, it created two configurations with error and warning information and a link to a log file. Just like a regular MSBuild would have done.

This is very useful when using TFS 2010 Build in heterogeneous environments. It would also be possible to do this when running compilations completely outside TFS build, but then push the results of the into TFS for easy access. You can push all information, including the compilation summary, drop location, test results etc using the API.

Managing Build Templates with Community TFS Build Manager

A year ago I blogged about how to manage your build process templates using the TFS API. The main reason for doing this is that you can (and should!) store your “golden” build process templates in a common location in your TFS project collection, and then add them to each team project that requires those templates. This way, you can fix a bug or add a new feature in one place and have the change affect all build definitions.

However, by having the build process templates in a single location, the users must know where the build process templates are located and browse to that path and add it to the team project, before it will show up in the list of build process templates:

image

Unfortunately, you can’t manage the build process templates this way using Team Explorer, you have to resort to the TFS API to do these things.

Until now! Ler In the latest release of the Community TFS Build Manager I have added support for managing build process templates.

The templates are accessible by selecting “Build Process Templates” in the “Show” dropdown:

image

This will show all registered build process templates, either in the selected team project or in all team projects, depending on your current filter:

image

All build process templates in the XDemo team project. The grid is of course sortable as the rest of the application. This lets you easily see where the template is registered.

Note that several of the build process templates in the list above is stored in the Inmeta team project, which is our team project for storing all artifacts related to our software factory, including the build process templates and custom activities.

Now, we can right click on a build process template and perform any of the following actions:

image


  • Set As Default
    This will set the selected build process template as the default build process template in the corresponding team project. There can only be one default build process template per team project, so the tool will automatically scan for any other default build process templates and set them back to “Custom”. 
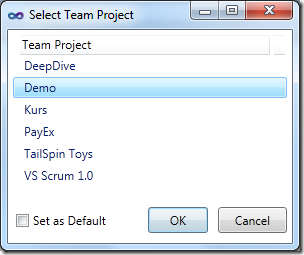
  • Add to Team Project(s)
    This will let you select one or more team projects where you want to add this build process template to:

    image

    In the list you can select one or more team projects. You can also specify that the template(s) should be set as default by using the checkbox “Set as Default”.

  • Remove from Team Project(s)
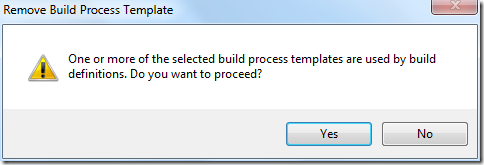
    This does the opposite from the previous operation, it removes the selected build process template(s) from one or more team project. After this operation, the template will not be visible in the “Build Process file” dropdown when editing a build process template.

    Note: When removing a build process template, there might be build definitions using this template. If this is the case, the build manager will prompt you with a dialog before you proceed with the remove:

    image

Hope that you find the new functionality useful. Please report bugs and feature requests to the Community TFS Build Extensions CodePlex site

Avoiding TF237124 when Creating Work Items in New Areas

At my company we write a lot of tools and extensions that uses the TFS API to automate various things for us. A very common thing to automate is the creation of work items and the areas and iterations structure.

Creating a work item using the TFS API is simple, just connect to TFS, get the WorkItemStore service object and create a new work item and set any fields that you want to:


Creating a work item

//Connect to TFS and get the WorkItemStore object var tfs = new TfsTeamProjectCollection(new Uri("http://localhost:8080/tfs")); var wis = tfs.GetService(typeof(WorkItemStore)) as WorkItemStore; //Get team project var teamProject = wis.Projects["Demo"]; //Get the Bug Work Item Type var wit = teamProject.WorkItemTypes["Bug"]; //Create a new Bug work item and set the title field WorkItem wi = new WorkItem(wit); wi.Title = "New Bug In New Area"; wi.Save();


Creating an area or iteration is equally simple:


Creating an area

//Connect to TFS and get the ICommonStructureService object var tfs = new TfsTeamProjectCollection(new Uri("http://localhost:8080/tfs")); var css = tfs.GetService(typeof(ICommonStructureService)) as ICommonStructureService; //Get the root path of the new area string rootNodePath = "\Demo\Area"; var pathRoot = css.GetNodeFromPath(rootNodePath); //Create the new area, in this case it will be a new root area css.CreateNode("NewRootArea", pathRoot.Uri);


BUT (yes there is a but, you could sense it coming), when you combine these two fellows into one task, e.g. create a new area (or iteration) and then create a new work item in that area, chances are high that you will receive the following exception:

Microsoft.TeamFoundation.WorkItemTracking.Client.ValidationException: TF237124: Work Item is not ready to save

   at Microsoft.TeamFoundation.WorkItemTracking.Client.WorkItem.Save(SaveFlags saveFlags)

   at Microsoft.TeamFoundation.WorkItemTracking.Client.WorkItem.Save()


The meaning of the error is not obvious, but if you would call the Validate() method before calling Save() (which you should, of course) you would see that it returns the Area field indicating that this field is the problem.

The underlying problem here is that in the TFS Data Store, work items and areas/iterations are persisted in two different stores. And these stores need to be synchronized before you can reference any new items that you added. You’ll notice the same issue in Visual Studio as well, when you create a new area or iteration in Team Explorer, you need to refresh Team Explorer in order to use the new nodes for work items.

But how do we do this programmatically? There actually two things that needs to be done:

  1. Request that the work item store is synchronized with the Common Structure store
  2. Refresh the local cache

Which is translated into the following code


Synchronize External Stores

//Synchronize the work item store with external stores (e.g. CSS) private static void SyncExternalStructures(TfsTeamProjectCollection tfs, WorkItemStore wis, ICommonStructureService css, string teamProject) { //Get work item server proxy object WorkItemServer witProxy = (WorkItemServer)tfs.GetService(typeof(WorkItemServer)); //Get the team project ProjectInfo projInfo = css.GetProjectFromName(teamProject); //Sync External Store witProxy.SyncExternalStructures(WorkItemServer.NewRequestId(), projInfo.Uri); //Refresh local cache wis.RefreshCache(); }


Call this method after creating the area/iterations and before creating the new work item and it will work as expected

Introducing: Community TFS Build Manager

The latest release of the Community TFS Build Extensions include a brand new tool called Community TFS Build Manager and has been created for two reasons:

  1. An implementation of the Team Foundation Build API which is referenced by the Rangers Build Customization Guidance V2 (available H1 2012)
  2. Provide a solution to a real problem. The Community TFS Build Manager is intended to ease the management of builds in medium to large Team Foundation Server environments, though it does provide a few features which all users may find useful.

The first version of the tool has been implemented by myself and Mike Fourie. You can download the extension from the Visual Studio Gallery here:
http://visualstudiogallery.msdn.microsoft.com/16bafc63-0f20-4cc3-8b67-4e25d150102c


Note 1:
The full source is available at the Community TFS Build Extension site

Note 2: The tool is still considered alpha, so you should be a bit careful when running commands that modify or delete information in live environments, e.g. try it out first in a non-critical environment.

Note 3: The tool is also available as a stand alone WPF application. To use it, you need to download the source from the CodePlex site and build it.


Getting Started

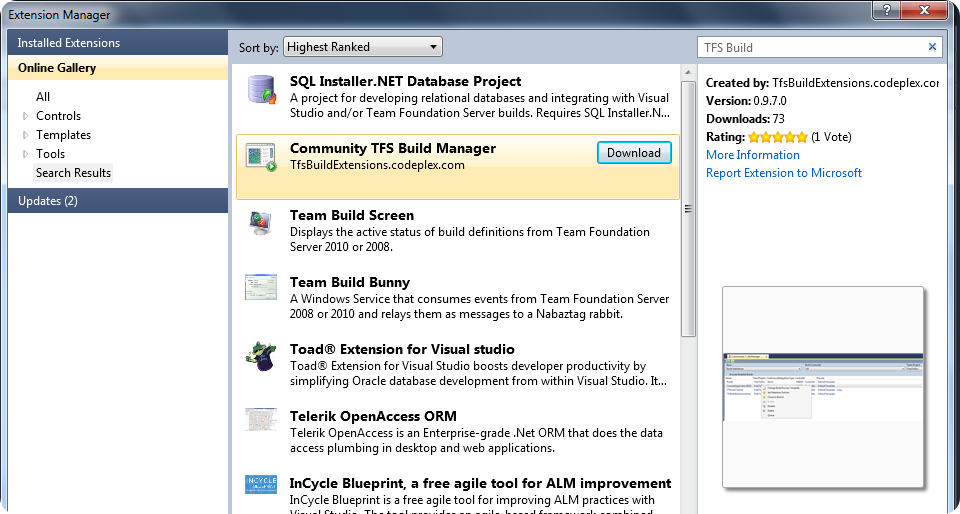
You can either install the extension from the above link, or just open the Visual Studio Extension Manager and go to the Online gallery and search for TFS Build:
image


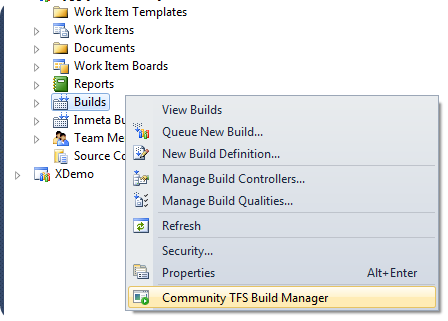
After installing the build manager, you can start it either from the Tools menu or from the Team Explorer by right-clicking on the Builds node on any team project:
 

image

This will bring up a new tool window that will by default show all build definition in the currently selected team project.


View and sort Builds and Build Definitions across multiple Build Controllers and Team Projects
This has always been a major limitation when working with builds in Team Explorer, they are always scoped to a team project. It is particularly annoying when viewing queued builds and you
have no idea what other builds are running on the same controller. In the TFS Build Manager, you can filter on one/all build controllers and one/all team projects:

image


The same filters apply when you switch between Build Definitions and Builds. In the following screen shot, you can see that three builds from three different team projects are running on the same controller:

image

You can easily filter on specific team projects and/or build controllers. Note that all columns are sortable, just click on the header column to sort it ascending or descending.
This makes it easy to for example locate all build definitions that use a particular build process template, or group builds by team project etc.


Bulk operations on Build Definitions

The main functionality that this tool brings in addition to what Team Explorer already offers, is the ability to perform bulk operations on multiple build definitions/builds. Often you need to modify or
delete several build definitions in TFS and there is no way to do this in Team Explorer.


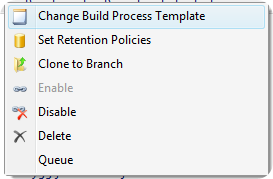
In the TFS Build Manager, just select one or more builds or build definitions in the grid and right-click. The following context menu will be shown for build definitions:
image


Change Build Process Templates

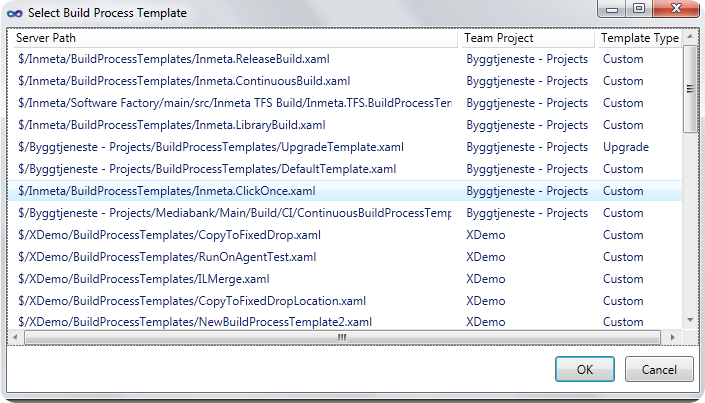
This command lets you change the build process template for one or more build definitions. It will show a dialog with all existing build process templates in the corresponding team projects:
image


Queue

This will queue a “default” build for the the selected build definitions. This means that they will be queued with the default parameters.


Enable/Disable

Enables or disables the selected build definitions. Note that disabled build definitions are by default now shown. To view disabled build definitions, check the Include Disabled Builds checkbox:


image


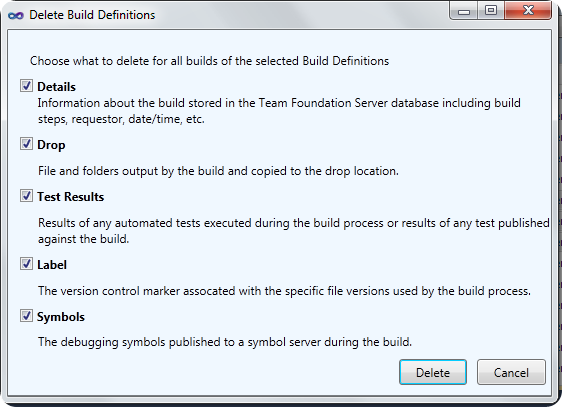
Delete

This lets you delete one ore more build definitions in a single click. In Team Explorer this is not possible, you must first delete all builds and then delete the build definition. Annoying! Ler

TFS Build Manager will prompt you with the same delete options as in Team Explorer, so no functionality is lost:
image


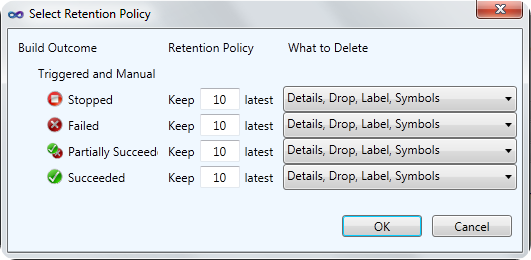
Set Retention Policies

Allows you to set retentions policies to several build definitions in one go. Note that only retention policies for Triggered and Manual build definitions can be updated, not private builds. 
This feature also gives you the same options as in Team Explorer:
image


Clone to Branch

My favorite feature Ler Often the reason for cloning a build definition is that you have created a new source code branch and now you want to setup a matching set of builds for the new branch. When using the Clone build definition feature of the TFS Power Tools, you must update several of the parameters of the build definition after, including:

  • Name
  • Workspace mappings
  • Source control path to Items to builds (solutions and/or projects)
  • Source control path to test settings file
  • Drop location
  • Source control path to TFSBuild.proj for UpgradeTemplate builds

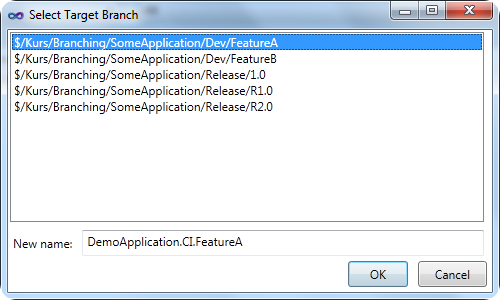
All this is done automagically when using the Clone to Branch feature! When you select this command, the build manager will look at the Items to build path (e.g. solution/projects) and find all child branches to this path and display them in a dialog:
image

When select one of the target branches, the new name will default to the source build definition with the target branch name appended. Of course you can modify the name in the dialog. After pressing OK, a new build definition will be created and all the parameters listed above will be modified accordingly to the new branch.


Bulk operations on Builds

You can also perform several actions on builds, and more will be added shortly. In the first release, the following features are available:


Delete

This will delete all artifacts of the build (details, drops, test results etc..). It should show the same dialog as the Delete Build Definition command, but currently it will delete everything.

Open Drop Folders

Allows you to open the drop folder for one or more builds


Retain Indefinitely

Set one or more builds to be retained indefinitely.


Bonus Feature – Generate DGML for your build environment

This feature was outside spec, but since I was playing around with generating DGML it was easy to implement this feature and it is actually rather useful. It quickly gives you an overview of your build resources, e.g. which build controllers and build agents that exist for the current project collection, and on what hosts they are running. The command is available in the small toolbar at the top, next to the refresh button:
image

Here is an example from our lab environment:

image

The dark green boxes are the host machine names and the controller and agents are contained within them.

Note: Currently the only way to view DGML files are with Visual Studio 2010 Premium and Ultimate.


I hope that many of you will find this tool useful, please report issues/feature requests to the Community TFS Build Extensions CodePlex site!