First stable release of the Community TFS 2010 Build Extensions

Today the first stable release of the Community TFS 2010 Build Extensions shipped on the CodePlex site. Visual Studio ALM MVP Mike Fourie (aka Mr MSBuild Extension Pack) has been the leader of this project and has done a tremendous job, both in contributing functionality as well as coordinating the work for the first release. Great work Mike! I (as well as several others) have contributed a small part of the activities, I plan to be working on the upcoming releases as well.

The build extensions contain approximately 100 custom activities that covers several different areas, such as IIS7, Hyper-V, StyleCop, NUnit, Powershell etc, as well as some core functionality (Assembly versionig, file management, compression, email etc etc). In addition to more activities in upcoming releases, the plan is to include build process templates for different scenarios.

Please download the release and try it out, and give us feedback!

To give you a hint of the content, here is a class diagram that shows the content of the “Core” activities project (there are several other projects included as well):

image

Automatically Merging Work Items in TFS 2013

** Source available at http://mergeworkitems.codeplex.com/ **

Half a year ago I wrote about about Merging Work Items with a custom check-in policy. The policy evaluated the pending changes and for all pending merges, it traversed the merge history to find the associated work items and let the user add them to the current changeset.

I promised to post the source to the check-in policy (and I’ve got a lot of requests for it), but I never did. This was primary for two reasons:

  1. The technical solution turned out to be a bit complicated. The problem was/is that it is not possible to modify the list of associated work items in the current pending changes using the API. This was a show stopper and the only way around it was to add another component that was executed on the server after the check-in that did the actual association. The information about the selected work items was temporarily stored in the comments of the changeset. This worked, but complicated the deployment.
  2. The feedback internally at Inmeta was that why should the developer be allowed to select which work items that should be associated? If a work item was associated with a changeset in a Main branch, it should always be associated with the merge changeset when merging to a Release branch. So the association should be done automatically.

For these reasons I changed the implementation and converted the check-in policy to a TFS server side event handler instead (for more info on work with these event handlers, check out my post about them here: Server Side Event Handlers in TFS 2010)

By having the association done server side, the process is very smooth for the developer. When a changeset that contains merges is checked in, the event handler evaluates all merges and associates the work items. If a work item has already been associated by the developer, it is of course not associated again. Since it is implemented with a server side event handler, it runs instantly without the user ever really noticing it.

Let’s look at how this works. Lets say that we have the following branch hierarchy:

image

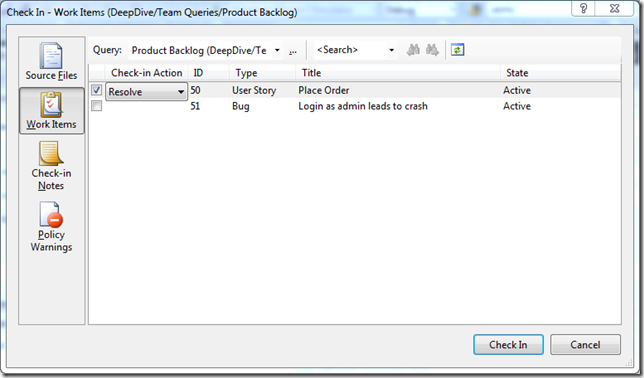
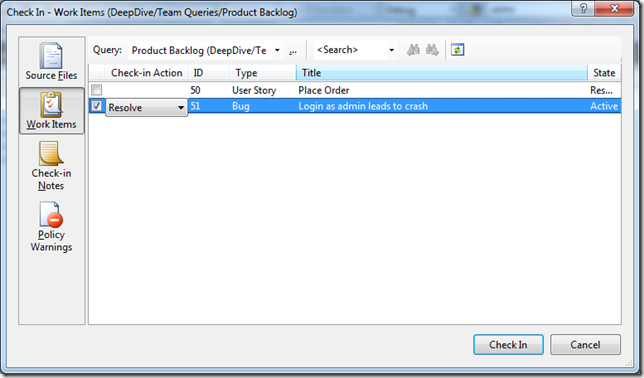
Now, one of our finest developers have both fixed a bug and added a new user story in the Main branch. That was two changesets, each changeset was associated with a corresponding work item:

imageimage

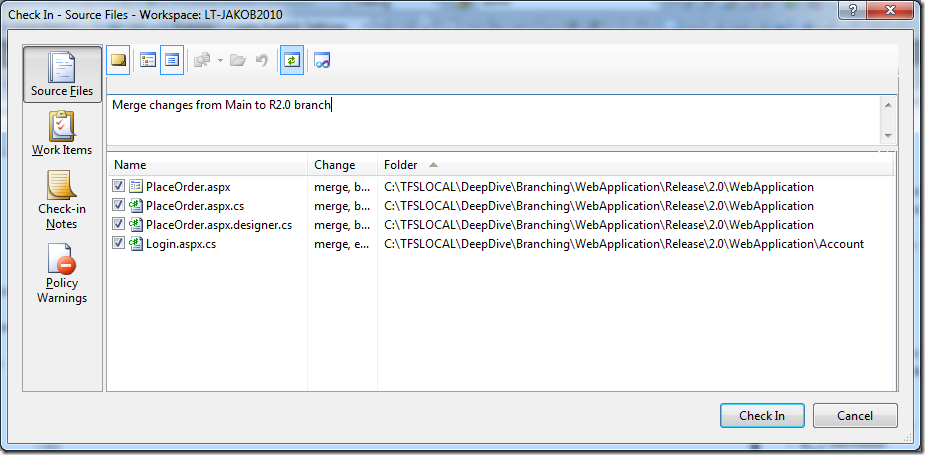
Now, we want to push these changes to the 2.0 Release branch. So the developer performs a merge from Main to the 2.0 branch.

image

At this point, instead of manually adding the work items, the developer just checks in the changes. After this, lets take a look at the source history

image

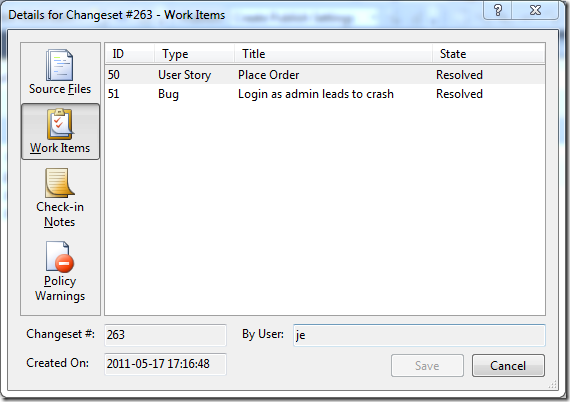
Double-clicking on the latest changeset, we can see the following information on the work items tab:

image

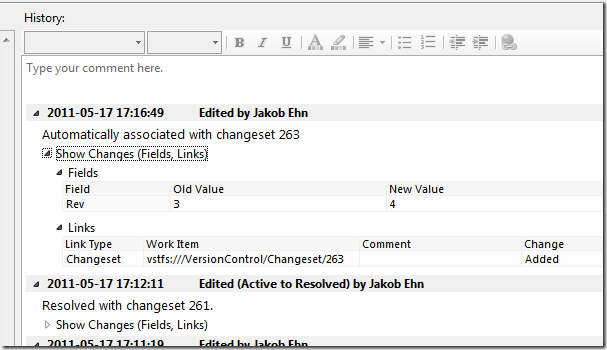
The work items associated with the original changesets that was merged to the R2.0 branch, have been associated with the new changeset. Also, double-clicking on one of the work items, we can see that the server event handler has added a link to the changeset for this work item:

image

Note the following:

  • The changeset has been linked in the same way as when you associate a work item manually.
  • The change was done by the developer account (myself in this sample), and not the TFS service account. This is because the event handler uses the new TFS Impersonation API to impersonate the user who committed the check-in.
  • The history comment is a bit different than the usual (“Associated with changeset XXX”), just to highlight the reason for the change.
  • If the changeset would contain both merges and other types of pending changes, the merges would still be traversed, the other changes are just ignored.


Deployment
Deploying the server side event handler couldn’t be easier, just drop the Inmeta.TFS.MergeWorkItemsEventHandler.dll assembly into the plugin directory of the TFS AT server. This path is usually %PROGRAMFILES%Microsoft Team Foundation Server 12.0Application TierWeb ServicesbinPlugins. Note: This will cause TFS to recycle to load the new assembly, so in production you might want to schedule this to minimize problems for your users.
See my post more details on this.

image

Implementation
I have uploaded the source code to CodePlex at: http://mergeworkitems.codeplex.com/ so you can check out the details there. One thing that is worth mentioning is that I had to resort to the TFS Client API to access and modify the associated work items. The TFS Server Side object model is not very documented, and according to Grant Holiday (in this post) the server object mode for work item tracking is not very useful. So instead of going down that road, I used the client object model to do the work Not as efficient, but it gets the job done.

Note that the event handler hooks into the Notification decision point, which is executed asynchronously after the check-in has been done, and therefor it doesn’t have a negative impact on the overall check-in process.

Hope that you find the event handler useful, contact me either through this blog or via the CodePlex site if you have any questions and/or feature requests.

Dependency Replication with TFS 2010 Build

Some time ago, I wrote a post about how to implement dependency replication using TFS 2008 Build. We use this for Library builds, where we set up a build definition for a common library, and have the build check the resulting assemblies back into source control. The folder is then branched to the applications that need to reference the common library. See the above post for more details.

Of course, we have reimplemented this feature in TFS 2010 Build, which results in a much nicer experience for the developer who wants to setup a new library build. Here is how it looks:

There is a separate build process template for library builds registered in all team projects

image

The following properties are used to configure the library build:

image

Deploy Folder in Source Control is the server path where the assemblies should be checked in
DeploymentFiles is a list of files and/or extensions to what files to check in. Default here is *.dll;*.pdb which means that all assemblies and debug symbols will be checked in. We can also type for example CommonLibrary.*;SomeOtherAssembly.dll in order to exclude other assemblies

You can also see that we are versioning the assemblies as part of the build. This is important, since the resulting assemblies will be deployed together with the referencing application.


When the build executes, it will see of the matching assemblies exist in source control, if not, it will add the files automatically:


image

After the build has finished, we can see in the history of the TestDeploy folder that the build service account has in fact checked in a new version:

image

Nice! Ler


The implementation of the library build process template is not very complicated, it is a combination of customization of the build process template and some custom activities.
We use the generic TFActivity (http://geekswithblogs.net/jakob/archive/2010/11/03/performing-checkins-in-tfs-2010-build.aspx) to check in and out files, but for the part that checks if a file exists
and adds it to source control, it was easier to do this in a custom activity:


public sealed class AddFilesToSourceControl : BaseCodeActivity { // Files to add to source control [RequiredArgument] public InArgument<IEnumerable<string>> Files { get; set; } [RequiredArgument] public InArgument<Workspace> Workspace { get; set; } // If your activity returns a value, derive from CodeActivity<TResult> // and return the value from the Execute method. protected override void Execute(CodeActivityContext context) { foreach (var file in Files.Get(context)) { if (!File.Exists(file)) { throw new ApplicationException("Could not locate " + file); } var ws = this.Workspace.Get(context); string serverPath = ws.TryGetServerItemForLocalItem(file); if( !String.IsNullOrEmpty(serverPath)) { if (!ws.VersionControlServer.ServerItemExists(serverPath, ItemType.File)) { TrackMessage(context, "Adding file " + file); ws.PendAdd(file); } else { TrackMessage(context, "File " + file + " already exists in source control"); } } else { TrackMessage(context, "No server path for " + file); } } } }

This build template is a very nice tool that makes it easy to do dependency replication with TFS 2010. Next, I will add funtionality for automatically merging the assemblies (using ILMerge) as part of the build, we do this to keep the number of references to a minimum.

Managing Build Process Templates in TFS 2010 Build

One of the great new features in TFS 2010 Build was the ability to define Build Process Templates that can be reused across build definitions. The Build Process Template file itself is a Windows Workflow 4.0 xaml file
and can be stored anywhere in source control. When a developer creates a new build definition in Team Explorer, he can choose from a list of Build Process Templates:

image

This list is populated with the following build process templates:

  • The ones that come out of the box (DefaultTemplate.xaml, UpgradetTemplate.xaml and LabDefaultTemplate.xaml). These are created for every new team project (this can be changed by modifying the process template)
  • Any build process templates that have previously been added for any other build definitions in the same team project.

The last bullet is a bit unintuitive, but it means that if a developer creates a new build definition in team project A, and adds a new build process template (for example by by selecting New and then browse to an existing .xaml file), this
build process template will be available in the process dropdown list for all other build definitions in team project A. It will not be available in team project B, but has to be added in the same way.

Managing Build Process Templates
So, how do you manage your build process templates? If you only have a couple of team projects, this night not be a big problem, but if you like us create a team project for every customer this becomes a problem!. We have created a set
of default build process templates (CI builds, release builds etc..) that we want to use across all team projects, but this requires developers to know where these .xaml files are located. We do not want to duplicate or branch them unless necessary
but instead we store inside a special, internal, team project where all of our software factory related stuff is located.

Fortunately, there is an API that lets you manage build process templates per team project. This API is described by Jason Pricket here http://blogs.msdn.com/b/jpricket/archive/2010/04/08/tfs-2010-managing-build-process-templates-what-are-those.aspx.
I have used the source from his blog post to create a custom activity that lets you deploy your build process templates across all team projects using TFS 2010 Build. This means that when you have added a new team project, or a new build process template,
you just run the build and it will automatically update all team projects with the build process templates.


Custom Activity
The custom activitiy is called DeployBuildProcessTemplates and has 3 parameters:

  • BuildProcessTemplates – The list with the source control paths to the build process templates that you want to deploy
  • ExcludeTeamProjects – A list that lets you exclude one or more team projects, in case you do not want to deploy the build process templates to all team projects
  • Workspace – This is the workspace property from the build process template, and is used to retrieve the list of team projects (using the VersionControlServer property)

(Note that the custom activity inherits from an internal base class that among other things contain the TrackBuildMessage method which is just a helper method for writing to the build output log)

[BuildActivity(HostEnvironmentOption.All)] public sealed class DeployBuildProcessTemplate : BaseCodeActivity { // Define an activity input argument of type string [BrowsableAttribute(true)] [RequiredArgument] public InArgument<StringList> BuildProcessTemplates { get; set; } // Define an activity input argument of type string [BrowsableAttribute(true)] public InArgument<StringList> ExcludeTeamProjects { get; set; } [RequiredArgument] [BrowsableAttribute(true)] // Define an activity input argument of type string public InArgument<Workspace> Workspace { get; set; } // If your activity returns a value, derive from CodeActivity<TResult> // and return the value from the Execute method. protected override void Execute(CodeActivityContext context) { IBuildDetail currentBuild = context.GetExtension<IBuildDetail>(); var vcs = this.Workspace.Get(context).VersionControlServer; foreach (var teamProject in vcs.GetAllTeamProjects(true)) { TeamProject project = teamProject; if( !ExcludeTeamProjects.Get(context).Any(tp => tp == project.Name)) { // Deploy templates to team project BuildProcessTemplateHelper helper = new BuildProcessTemplateHelper(currentBuild.BuildServer, project.Name); foreach (var processTemplate in BuildProcessTemplates.Get(context)) { if (helper.AddTemplate(processTemplate, ProcessTemplateType.Custom)) { TrackMessage(context, string.Format("Deployed build process template {0} to team project {1}", processTemplate, project.Name)); } } } } } }

The custom activity just loops through all team projects that are not part of the ExcludeTeamProjects list, and the calls AddTemplate on another class. This method looks like this:

public class BuildProcessTemplateHelper { private readonly IBuildServer buildServer; private readonly string teamProject; public BuildProcessTemplateHelper(IBuildServer buildServer, string teamProject) { this.buildServer = buildServer; this.teamProject = teamProject; } public bool AddTemplate(String serverPath) { bool templateAdded = false; var template = GetBuildProcessTemplate(serverPath); if (template == null) { template = buildServer.CreateProcessTemplate(teamProject, serverPath); template.Save(); templateAdded = true; } return templateAdded; } public IProcessTemplate GetBuildProcessTemplate(string serverPath) { IProcessTemplate[] templates = buildServer.QueryProcessTemplates(teamProject); return templates.FirstOrDefault(pt => pt.ServerPath.Equals(serverPath, StringComparison.OrdinalIgnoreCase)); } }

Build Process Template

To use the custom activity, just drop it somewhere inside the Run on Agent activity and define the list of build process templates that you want to deploy.


Note:
The build service account must have the Edit Build Definition permission in all team projects, otherwise it won’t be able to modify this information.


image

The AddTemplate method first checks to see if the build process template already exists, otherwise it adds the path to the list of build process templates for the team project.

Rather simple, thanks to Jason for the sample code in his blog post.


When running the build, we can see in the build log which team projects that have been updated:

image

Developing and debugging Server Side Event Handlers in TFS 2010


Update 2012-01-23: Added note about .NET framework

Martin Hinshelwood wrote an excellent post recently  http://nakedalm.com/team-foundation-server-2010-event-handling-with-subscribers/ ) about a new type of integration
available in TFS 2010, namely server side event handlers, that is executed within the TFS context. I wasn’t aware of this new feature and as Martin notes, there doesn’t seem to be any material/documentation of it at all.

Previously, when you wanted some custom action to be executed when some event occurs in TFS (check-in, build completed…) you wrote a web/WCF service with a predefined signature and subscribed to the event using bissubscribe.exe.
Usually you want to get more information from TFS than what is available in the event itself so you would have to use the TFS client object model to make new requests back to TFS to get that information.
The deployment of these web services is always a bit of a hassle, especially around security. Also there is no way to affect the event itself, e.g. to stop the event from finishing depending on some condition. This can be done using
server side events.

The deployment of a server side event handler couldn’t be simpler, just drop the assembly containing the event handlers into the Plugins folder of TFS, which is located at 
C:Program FilesMicrosoft Team Foundation Server 2010Application TierWeb ServicesbinPlugins. TFS monitors this directory from any change and will restart itself automatically, so the latest version will
always be executed.

In this first post on this subject, I will describe how to set up your development environment to make it easy to both deploy and debug your event handler. 

  1. Install TFS 2010
    I recommend that you install a local copy of TFS 2010 on your development machine. For this scenario, you only need the Basic version which is a breeze to install. It took me about 10-15 minutes to install and configure it the last time I did it.
    This will make your TFS development and customization much more efficient than using a share remote server, and you can pretty much assault it as much as you want since it is your private server! Ler
  2. Run Visual Studio 2010 as admin
    To be able to deploy your event handler automatically (see next step), you need to run Visual Studio in administration mode
  3. Create the Event Handler project
    To setup the project, create a standard C# class library.
    Note that the project must be .NET 3.5 (or lower), NOT .NET 4.0 since TFS is running on .NET 2.0 it can’t load a .NET 4.0 assembly in the same app domain.

    Martin has written about what you need to reference in his post. Since he was using VB.NET in his sample, I thought that I include a C# version of a minimal WorkItemChanged event handler:

    using System; using System.Diagnostics; using Microsoft.TeamFoundation.Common; using Microsoft.TeamFoundation.Framework.Server; using Microsoft.TeamFoundation.WorkItemTracking.Server; namespace TFSServerEventHandler { public class WorkItemChangedEventHandler : ISubscriber { public Type[] SubscribedTypes() { return new Type[1]{typeof(WorkItemChangedEvent)}; } public EventNotificationStatus ProcessEvent(TeamFoundationRequestContext requestContext, NotificationType notificationType, object notificationEventArgs, out int statusCode, out string statusMessage, out ExceptionPropertyCollection properties) { statusCode = 0; properties = null; statusMessage = String.Empty; try { if (notificationType == NotificationType.Notification && notificationEventArgs is WorkItemChangedEvent) { WorkItemChangedEvent ev = notificationEventArgs as WorkItemChangedEvent; EventLog.WriteEntry("WorkItemChangedEventHandler", "WorkItem " + ev.WorkItemTitle + " was modified"); } } catch (Exception) { } return EventNotificationStatus.ActionPermitted; } public string Name { get { return "WorkItemChangedEventHandler"; } } public SubscriberPriority Priority { get { return SubscriberPriority.Normal; } } } }

    This event handler doesn’t do enything interesting, but just logs information about the modified work item in the event log.

  4. Deploy your event handler

    Open the project properties and go to the Build tab. Modify the Output Path by browsing to the Plugins directory (see above). This will result in a new

    deployment of your event handler every time you build. Neat! 🙂

    If you look in the Event log after you compile your project, you will see entries from TFS Services that looks like this:

     image


    As you can see, TFS has noticed that a new version of the event handler has been dropped in the plugins folder and therefor it is performing a restart. You will notice that TFS becomes temporarily unavailable while this happens.

    Try modifying a work item and verify that information about it is written in the event log. (Note: You will need to create a event source called “WorkItemChangedEventHandler”, otherwise the EventLog.WriteEntry call will fail.

  5. Debug the event handler

    Since these types of events aren’t very well documented it’s useful to debug the event handlers just to find out how your handler is called and what the parameters contain.

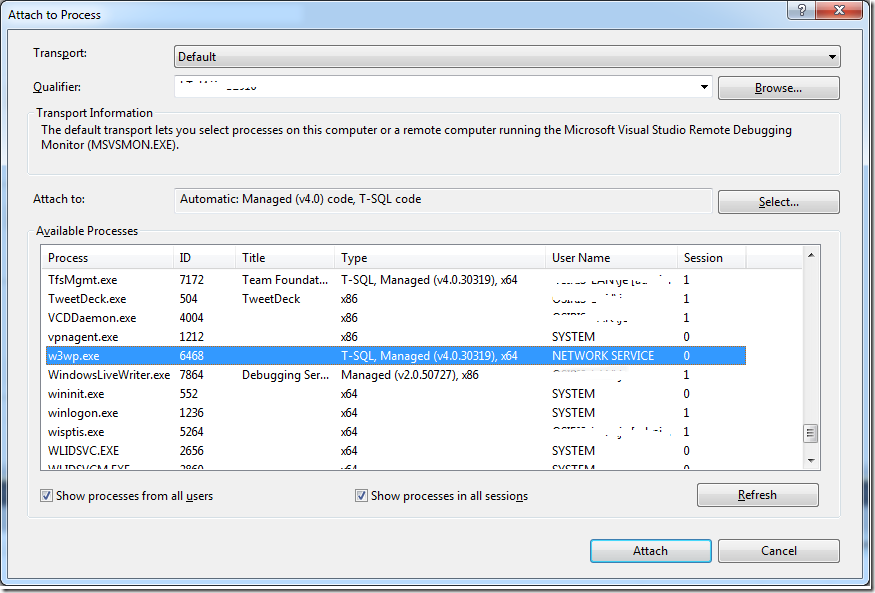
    To do this, to to the Debug menu och select Attach to Process. Check both Show processes from all users and Show processes in all sessions and locate the w3wp process that hosts TFS.

    image

    Select Attach to start the debugging session. Set a break point in the ProcessEvent method and then modify a work item in TFS. This should cause your event handler to be executed immediately:


    image

Creating a Build Definition using the TFS 2010 API

*** UPDATE 2010-08-17 ** Several people have asked me for a complete sample application, so I have put this together and it is available here:
http://cid-ee034c9f620cd58d.office.live.com/self.aspx/BlogSamples/CreateTFSBuildDefinition.zip

****

In this post I will show how to create a new build definition in TFS 2010 using the TFS API. When creating a build definition manually, using Team Explorer, the necessary steps are lined
out in the New Build Definition Wizard:
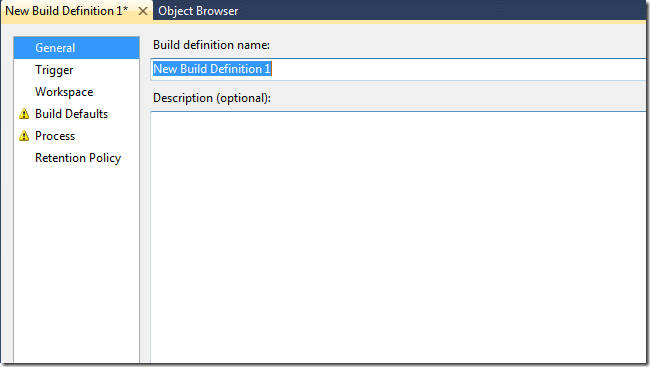
 

image


So, lets see how the code looks like, using the same order. To start off, we need to connect to TFS and get a reference to the IBuildServer object:

TfsTeamProjectCollection server = newTfsTeamProjectCollection(newUri(“http://<tfs>:<port>/tfs”));
server.EnsureAuthenticated();
IBuildServer buildServer = (IBuildServer) server.GetService(typeof (IBuildServer));

General
First we create a IBuildDefinition object for the team project and set a name and description for it:

var buildDefinition = buildServer.CreateBuildDefinition(teamProject);
buildDefinition.Name = “TestBuild”;
buildDefinition.Description = “description here…”;

Trigger
Next up, we set the trigger type. For this one, we set it to individual which corresponds to the Continuous Integration – Build each check-in trigger option

buildDefinition.ContinuousIntegrationType = ContinuousIntegrationType.Individual;

Workspace
For the workspace mappings, we create two mappings here, where one is a cloak. Note the user of $(SourceDir) variable, which is expanded by Team Build into the sources directory when running the build.

buildDefinition.Workspace.AddMapping(“$/Path/project.sln”, “$(SourceDir)”, WorkspaceMappingType.Map);
buildDefinition.Workspace.AddMapping(“$/OtherPath/”, “”, WorkspaceMappingType.Cloak);

Build Defaults
In the build defaults, we set the build controller and the drop location. To get a build controller, we can (for example) use the GetBuildController method to get an existing build controller by name:

buildDefinition.BuildController = buildServer.GetBuildController(buildController);
buildDefinition.DefaultDropLocation = @\SERVERDropTestBuild;

Process
So far, this wasy easy. Now we get to the tricky part. TFS 2010 Build is based on Windows Workflow 4.0. The build process is defined in a separate .XAML file called a Build Process Template. By default, every new team team project containtwo build process templates called DefaultTemplate and UpgradeTemplate. In this sample, we want to create a build definition using the default template. We use te QueryProcessTemplates method to get a reference to the default for the current team project

 
//Get default template
var defaultTemplate = buildServer.QueryProcessTemplates(teamProject).Where(p => p.TemplateType == ProcessTemplateType.Default).First();
buildDefinition.Process = defaultTemplate;


There are several build process templates that can be set for the default build process template. Only one of these are required, the ProjectsToBuild parameters which contains the solution(s) and configuration(s) that should be built. To set this info, we use the ProcessParameters property of thhe IBuildDefinition interface. The format of this property is actually just a serialized dictionary (IDictionary<string, object>) that maps a key (parameter name) to a value which can be any kind of object. This is rather messy, but fortunately, there is a helper class called WorkflowHelpers inthe Microsoft.TeamFoundation.Build.Workflow namespace, that simplifies working with this persistence format a bit. The following code shows how to set the BuildSettings information for a build definition:

//Set process parameters
varprocess = WorkflowHelpers.DeserializeProcessParameters(buildDefinition.ProcessParameters);

//Set BuildSettings properties
BuildSettings settings = newBuildSettings();
settings.ProjectsToBuild = newStringList(“$/pathToProject/project.sln”);
settings.PlatformConfigurations = newPlatformConfigurationList();
settings.PlatformConfigurations.Add(newPlatformConfiguration(“Any CPU”, “Debug”));
process.Add(“BuildSettings”, settings);

buildDefinition.ProcessParameters = WorkflowHelpers.SerializeProcessParameters(process);

The other build process parameters of a build definition can be set using the same approach


Retention  Policy
This one is easy, we just clear the default settings and set our own:

buildDefinition.RetentionPolicyList.Clear();
buildDefinition.AddRetentionPolicy(BuildReason.Triggered, BuildStatus.Succeeded, 10, DeleteOptions.All);
buildDefinition.AddRetentionPolicy(BuildReason.Triggered, BuildStatus.Failed, 10, DeleteOptions.All);
buildDefinition.AddRetentionPolicy(BuildReason.Triggered, BuildStatus.Stopped, 1, DeleteOptions.All);
buildDefinition.AddRetentionPolicy(BuildReason.Triggered, BuildStatus.PartiallySucceeded, 10, DeleteOptions.All);

Save It!
And we’re done, lets save the build definition:

buildDefinition.Save();

That’s it!


Implementing Release Notes in TFS Team Build 2010

In TFS Team Build (all versions), each build is associated with changesets and work items. To determine which changesets that should be associated with the current build, Team Build finds the label of the “Last Good Build” an then aggregates all changesets up unitl the label for the current build. Basically this means that if your build is failing, every changeset that is checked in will be accumulated in this list until the build is successful.

All well, but there uis a dimension missing here, regarding to releases. Often you can run several release builds until you actually deploy the result of the build to a test or production system. When you do this, wouldn’t it be nice to be able to send the customer a nice release note that contain all work items and changeset since the previously deployed version?

At our company, we have developed a Release Repository, which basically is a siple web site with a SQL database as storage. Every time we run a Release Build, the resulting installers, zip-files, sql scripts etc, gets pushed into the release repositor together with the relevant build information. This information contains things such as start time, who triggered the build etc. Also, it contains the associated changesets and work items.

When deploying the MSI’s for a new version, we mark the build as Deployed in the release repository. The depoyed status is stored in the release repository database, but it could also have been implemented by setting the Build Quality for that build to Deployed.

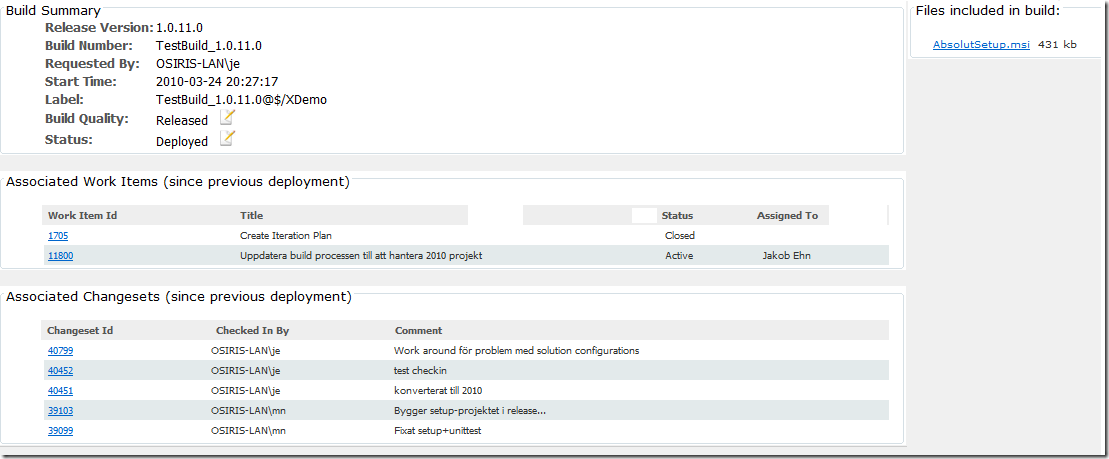
When generating the release notes, the web site simple runs through each release build back to the previous build that was marked as Deplyed, and aggregates the work items and changesets:

Here is a sample screenshot on how this looks for a sample build/application

image

The web site is available both for us and also for the customers and testers, which means that they can easily get the latest version of a particular application and at the same time see what changes are included in this version.
There is a lot going on in the Release Build Process that drives this in our TFS 2010 server, but in this post I will show how you can access and read the changeset and work item information in a custom activity.

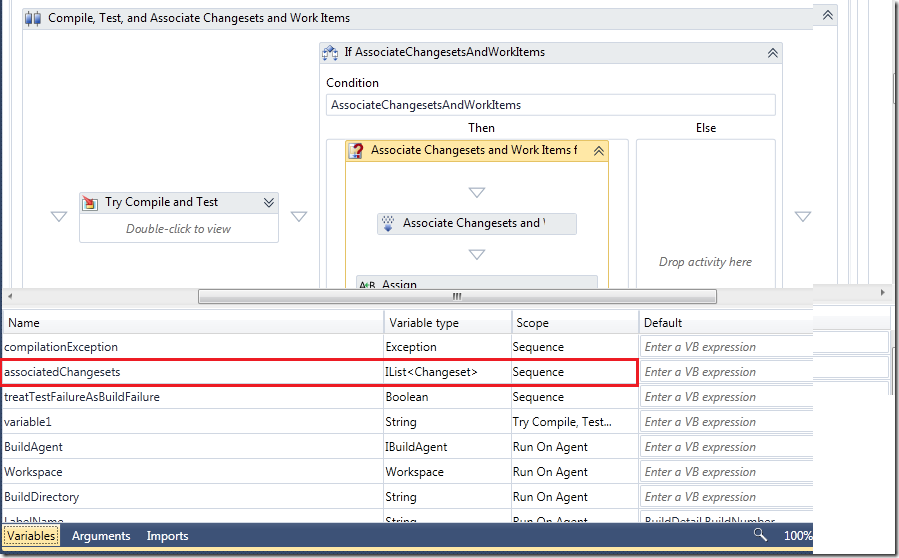
Since Team Build associates changesets and work items for each build, this information is (partially) available inside the build process template. The Associate Changesets and Work Items for non-Shelveset Builds activity (located inside the Try  Compile, Test, and Associate Changesets and Work Items activity) defines and populates a variable called associatedWorkItems


image

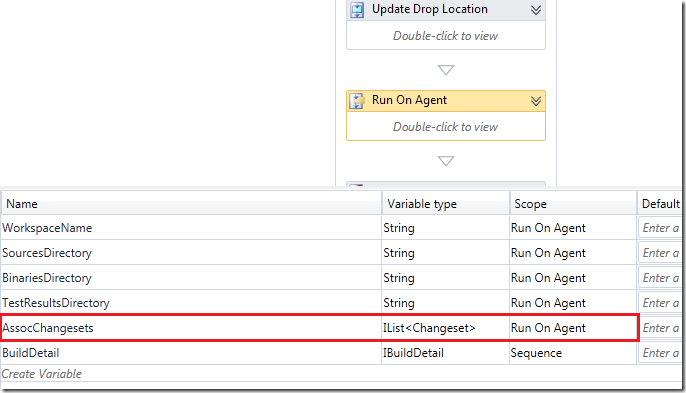
You can see that this variable is an IList containing instances of the Changeset class (from the Microsoft.TeamFoundation.VersionControl.Client namespace). Now, if you want to access this variable later on in the build process template, you need to declare a new variable in the corresponding scope and the assign the value to this variable. In this sample, I declared a variable called assocChangesets in the RunAgent sequence, which basically covers the whol compile, test and drop part of the build process:


image

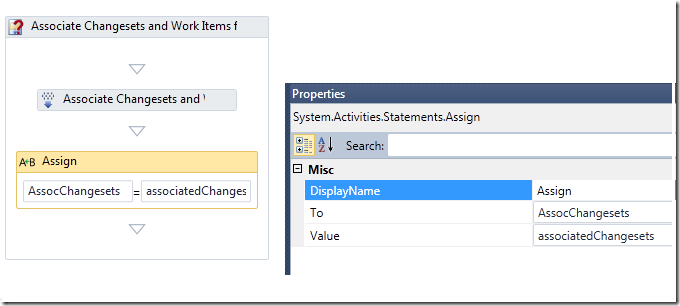
Now, you need to assign the value from the AssociatedChangesets to this variable. This is done using the Assign workflow activity:


image

Now you can add a custom activity any where inside the RunAgent sequence and use this variable. NB: Of course your activity must place somewhere after the variable has been poplated. To finish off, here is code snippet that shows how you can read the changeset and work item information from the variable.


First you add an InArgumet on your activity where you can pass i the variable that we defined.

        [RequiredArgument]
        public InArgument<IList<Changeset>> AssociatedChangesets { get; set; }

Then you can traverse all the changesets in the list, and for each changeset use the WorkItems property to get the work items that were associated in that changeset:

            foreach (Changeset ch in associatedChangesets)
            {
                // Add change
                theChangesets.Add(
                    new AssociatedChangeset(ch.ChangesetId,
                                            ch.ArtifactUri,
                                            ch.Committer,
                                            ch.Comment,
                                            ch.ChangesetId));

                foreach (var wi in ch.WorkItems)
                {
                        theWorkItems.Add(
                            new AssociatedWorkItem(wi["System.AssignedTo"].ToString(),
                                                   wi.Id,
                                                   wi["System.State"].ToString(),
                                                   wi.Title,
                                                   wi.Type.Name,
                                                   wi.Id,
                                                   wi.Uri));

                }
            }

NB: AssociatedChangeset and AssociatedWorkItem are custom classes that we use internally for storing this information that is eventually pushed to the release repository.

TFS 2010 – Managing Build Agents using the API

In previous versions of TFS, you installed TFS Team Build on the build server and you got one build service agent. It was/is possible to start several build agents on the same server, but it is a bit of a mess.
In addition, for each team project TFS 2008 build service can only execute one at a time (Note that builds from different team project can execute in parallell, a lot of people still don’t know this)

In TFS 2010, the concept of build controllers were introduced. A build controller belongs to one (1) project collection and is responsible of managing a set of build agents, thereby enabling a build agent pool which allows for builds to execute in parallel, even in the same team project.

The build controller also have features for selecting an appropriate build agent for a particular build. For example you can assign a set of tags to a build agent. A tag is just a string, and typically relate to some configuration/environment that is present on the machine of the build agent. For example you might have one build agent that builds BizTalk server projects, for which you need to install the appropriate tools on that machine. Then you tag the build definitions that build biztalk projects with the corresponding tag. This will cause the build controller to select the appropriate build agent.

You can of course have several buiuld agents with the same tag(s), thereby creating a build pool that will enable parallall builds for this type of projects as well.

By default, when installing/upgrading to TFS 2010 you will configure one 1 build controller and 1 build agent. As said before, the build agent no longer has any dependency to a team project. This means that if you have one build agent all builds for that project collection will be queued on the same build agent and the will not run in parallell. To enable parallell builds, open the TFS Administration Console in the build server and create one (or several) new build agent for the controller. By default, the controller will first try to find a build agent that is free and queue the build on that build agent. If all build agents are busy, the build will just be queued on the build agent with the smallest queue.

At our company, we have some builds (from TFS 2008) that actually have a problem with running in parallell with other builds. For example, some builds creates a SQL database during the build to be able to execute integration tests as part of the build. The same scripts are used by the developer to create a local sandbox environment on their development machines. The problem here we typically have several builds for the same project (CI, Nightly, Release) and all of these will create the same database as part of the build. If two of these builds would run in parallell, you can easily imagine some weird errors that would occur!

To resolve this, we can use the tag functionality, to map these build definitions to the same build agent. This will cause these builds to be executed in sequence. Since we have a lot of team project and a lot of build definitions, this require some extra management. Both to create new build agents for a new team project with the corresponding tag and to assign the same tag to the builds in the team project.

To show how this can be done using the API, I wrote a small application that runs through all team projects on a given TFS project collection. For each team project, it checks if there is a corresponding build agent with the same name. If not, the agent is created and a tag with the same name as the team project is assigned to the build agent.

Next, it runs through all build definitions for each team project and assign the corresponding tag to those builds. It is a command line tool, so we can run this on a scheduled basis to keep all build agents and build definitions in sync. You will see from the sample that using the TFS API is very simple and intuitive. The only exception here was to read and modify the Tags property for a build definition. This is stored instide the Agent Settings object which is stored as a serialized dictionary. There is rather ugly code to access this information, this could probably be done differently.

Here is the code, enjoy 🙂 


using System;
using System.Collections.Generic;
using System.Linq;
using System.Text;
using Microsoft.TeamFoundation.Server;
using Microsoft.TeamFoundation.Build.Client;
using Microsoft.TeamFoundation.VersionControl.Client;
using Microsoft.TeamFoundation.Client;
using System.Xml.Serialization;
using System.IO;
using System.Xml.Linq;

namespace TFSBuildAgentManager
{
    class TFSBuildAgentManager
    {
        private static string BuildAgentWorkingDirectory = @"D:Build$(BuildAgentId)$(BuildDefinitionPath)";

        static void Main(string[] args)
        {
            if (args.Length != 1 && args.Length != 2)
            {
                Console.WriteLine("Usage: TFSBuildAgentManager.exe tfsServerUrl [buildAgentWorkingDirectory]");
                return;
            }

            string tfsServer = args[0];
            if( args.Length == 2 )
                BuildAgentWorkingDirectory = args[1];

            TeamFoundationServer tfs = new TeamFoundationServer(tfsServer);
            tfs.EnsureAuthenticated();

            IBuildServer bs = (IBuildServer)tfs.GetService(typeof(IBuildServer));
            ICommonStructureService css = (ICommonStructureService)tfs.GetService(typeof(ICommonStructureService));

            ProjectInfo[] projectList = css.ListAllProjects();
            var controller = bs.QueryBuildControllers(true).First();

            foreach (var project in projectList)
            {
                string projectName = project.Name;
                if (bs.QueryBuildDefinitions(projectName).Count() != 0)
                {
                    var agents = controller.Agents.Where(a => a.Name == projectName);

                    if (agents.Count() == 0)
                    {
                        IBuildAgent agent = AddBuildAgent(controller, projectName);
                        agents = new List<IBuildAgent> { agent };
                    }
                    foreach (IBuildAgent a in agents)
                    {
                        if (!AgentHasTag(projectName, a))
                        {
                            AddTagToBuildAgent(projectName, a);
                        }
                    }

                    foreach (IBuildDefinition build in bs.QueryBuildDefinitions(projectName))
                    {
                        AddTagToBuildDefinition(projectName, build);
                    }
                }
            }
        }

        private static bool AgentHasTag(string projectName, IBuildAgent a)
        {
            return a.Tags.Where(t => t == projectName).Count() != 0;
        }

        private static IBuildAgent AddBuildAgent(IBuildController controller, string projectName)
        {
            IBuildAgent agent = controller.ServiceHost.CreateBuildAgent(projectName, BuildAgentWorkingDirectory);
            controller.AddBuildAgent(agent);
            agent.Save();
            return agent;
        }

        private static void AddTagToBuildDefinition(string tag, IBuildDefinition build)
        {
            const string AgentSettingsElement = "{clr-namespace:Microsoft.TeamFoundation.Build.Workflow.Activities;assembly=Microsoft.TeamFoundation.Build.Workflow}AgentSettings";

            XDocument doc = XDocument.Parse(build.ProcessParameters);
            var agentSettings = doc.Root.Descendants(AgentSettingsElement);
            if (agentSettings.Count() == 0)
            {
                doc.Root.Add(
                    new XElement(AgentSettingsElement,
                        new XAttribute("{http://schemas.microsoft.com/winfx/2006/xaml}Key", "AgentSettings"),
                        new XAttribute("Tags", tag)));
            }
            else
            {
                var tags = agentSettings.First().Attributes("Tags");
                tags.First().Value = tag;
            }
            build.ProcessParameters = doc.ToString();
            build.Save();
        }

        private static void AddTagToBuildAgent(string tag, IBuildAgent a)
        {
            a.Tags.Add(tag);
            a.Save();
        }
    }
}