TFS 2010 Build: Dealing with the API restriction error

Recently I’ve come across this error a couple of times when running builds that exeucte unit tests using Test containers:

API restriction: The assembly ‘file:///C:Builds<path>myassembly.dll’ has already loaded from a different location. It cannot be loaded from a new location within the same appdomain.

Every time I’ve got this error, the project has been a web application, and the path to the assembly points down to the _PublishedWebsites directory that is created beneath the Binaries folder during a team build.

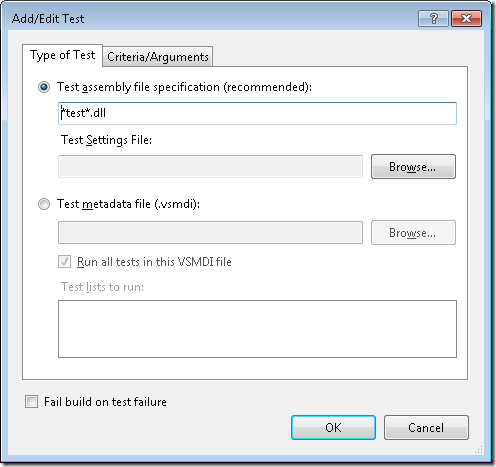
The error description really says it all (although slightly cryptic), when using test containers, MSTest needs to load all assemblies and see if they contain any unit tests. During this serach, it finds the ‘myassembly.dll’ in two different locations. First it is found directly beneth the Binaries folder, and then it is alos found beneath the _PublishedWebsitesProjectbin folder. The reason is that the default setting for test containers in a TFS 2010 build definition is ***test*.dll:

image


This pattern means that MSTest will search recursively for all assemblies beneath the Binaries folder, and during the search it will find the MyAssembly.dll twice.
The solution is simple, set the Test assembly file specification property to *test*.dll instead, this will disable the recursive search:

image

Building Visual Studio Setup Projects with TFS 2010 Team Build

UPDATE: 2010-09-15 – Added details about the use of the ExitCode variable


One of the most common complaints from people starting to use Team Build is that is doesn’t support building Microsoft’s own Setup and Deployment project (*.vdproj). When creating a default build definition that compiles a solution containing a setup project, you’ll get the following warning:

The project file “MyProject.vdproj” is not supported by MSBuild and cannot be built.


This is what the problem is all about. MSBuild, that is used for compiling your projects, does not understand the proprietary vdproj format defined by Microsoft quite some time ago. Unfortunately there is no sign that this will change in the near future, in fact the setup projects has barely changed at all since they were introduced. VS 2010 brings no new features or improvements hen it comes to the setup projects.

VS 2010 does include a limited version of InstallShield which promises to be more MSBuild friendly and with more or less the same features as VS setup projects. I hope to get a closer look at this installer project type soon.

But, how do we go about to build a Visual Studio setup project and produce an MSI as part of a Team Build process? Well, since only one application known to man understands the vdproj projects, we will have to installa copy of Visual Studio on the build server. Sad but true. After doing this, we use the Visual Studio command line interface (devenv) to perform the build.

In this post I will show how to do this by using the InvokeProcess activity directly in a build workflow template. You’ll want to run build your setup projects after you have successfully compiled the projects.
 

  1. Install Visual Studio 2010 on the build server(s)


  2. Open your build process template /remember to branch or copy the xaml file before modifying it!)


  3. Locate the Compile the Project activity


  4. Select the activity and open the Variables tab at the lower right
  5. Add a new variable called ExitCode of type Int32. This variable will contain the exit code from the devenv process and can be validated for errors.

    image

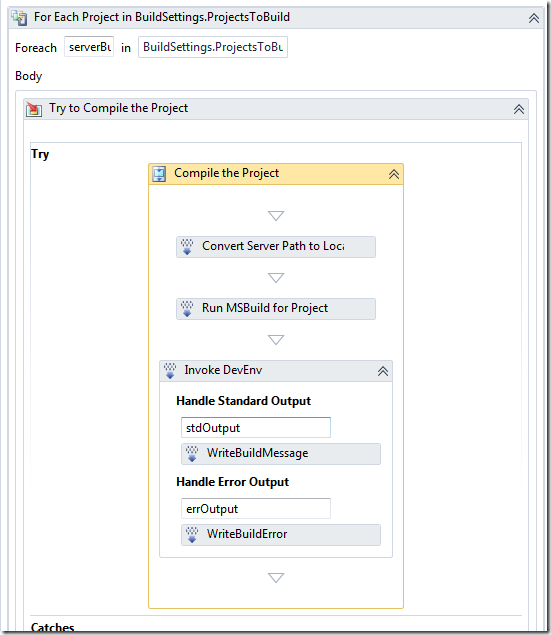
  6. Drop an instance of the InvokeProcess activity from the toolbox onto the designer, after the Run MSBuild for Project activity


  7. Drop an instance of the WriteBuildMessage activity inside the Handle Standard Output section.
    • Set the Importance property to Microsoft.TeamFoundation.Build.Client.BuildMessageImportance.High
      (NB: This is necessary if you want the output from devenv to show up in the build log when running the build with the default verbosity)
    • Set the Message property to stdOutput


  8. Drop an instance of the WriteBuildError activity to the Handle Error Output section
    • Set the Message property to errOutput


  9. Select the InvokeProcess activity and set the values of the parameters to:

    image 

    Note that the Result is piped to the ExitCode variable.

  10. The finished workflow should look like this:

    image 


  11. This will generate the MSI files, but they won’t be copied to the drop location. This is because we are using devenv and not MSBuild, so we have to do this explicitly


  12. Drop a Sequence activity somewhere after the Copy to Drop location activity.


  13. Create a variable in the Sequence activity of type IEnumerable<String> and call it GeneratedInstallers


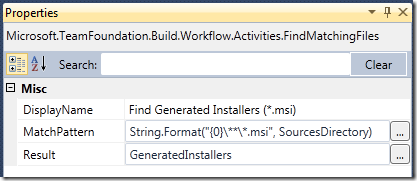
  14. Drop a FindMatchingFiles activity in the sequence activity and set the properties to:

    image 


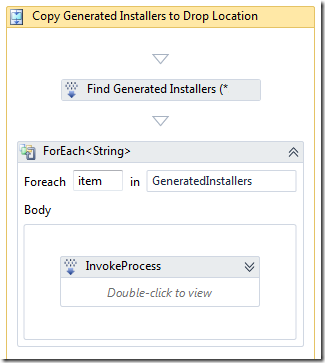
  15. Drop a ForEach<String> activity after the FindMatchingFiles activity. Set the Value property to GeneratedInstallers


  16. Drop an InvokeProcess activity inside the ForEach activity.
    •  FileName: “xcopy.exe”
    • Arguments: String.Format(“””{0}”” “”{1}”””, item, BuildDetail.DropLocation)

  17. The Sequence activity should look like this:

    image 


  18. Save the build process template and check it in.


  19. Run the build and verify that the MSI’s is built and copied to the drop location.


Note 1: One of the drawback of using devenv like this in a team build is that since all the output from the default compilations is placed in the Binaries folder, the outputs is not avaialable when devenv is invoked, which causes the whole solution to rebuild again. In TFS 2008, this was pretty simple to fix by using the CustomizableOutDir property. In TFS 2010, the same feature is not avaialble. Jim Lamb blogged about this recently, have a look at it if you have a problem with this: http://blogs.msdn.com/jimlamb/archive/2010/04/13/customizableoutdir-in-tfs-2010.aspx
 

Note 2: Although the above solution works, a better approach is to wrap this in a custom activity that you can use in your builds. I will come back to this in a future post.

Speed up loading of test results from builds in Visual Studio

I still see people complaining about the long time it takes to load test results from a TFS build in Visual Studio. And they make a valid point, it does take a very long time to load the test results, even for a small number of tests. The reason for this is that the test results is not just the result of the test run but also all the binaries that were part of the test run. This often also means that the debug symbols (*.pdb) will be downloaded to your local machine. This reason for this behaviour is that it letsyou re-run the tests locally.

However, most of the times this is not what the developer will do, they just want to know which tests failed and why. They can then fix the tests and rerun them locally. It turns out there is a way to load only the test results, which is much faster. The only tricky bit is to find the location of the .trx file that is generated during the build. Particularly in TFS 2010 where you often have multiple build agents, which of corse results in different paths to the trx file.

Note: To use this you must have read permission to the build folder on the build agent where the build was executed.

  1. Open the build result for the build
  2. Click View Log
  3. Locate the part where MSTest is invoked. When using test containers, it looks like this:

     image

    Note: You can actually search in the log window, press Ctrl+F and you will get a little search box at the bottom. Nice!

  4. On the MSTest command line call, locate the /resultsfileroot parameter, which points to the folder where the test results are stored
  5. Note that this path is local for the build server, so you need to replace the drive letter with the server name:

    D:BuildsProjectTestResults

    to

    ProjectTestResults”>\<BuildServer>ProjectTestResults

  6. Double-click on the .trx file and you will notice that it loads much faster compared to opening it from the build log window

Executing legacy MSBuild scripts in TFS 2010 Build

When upgrading from TFS 2008 to TFS 2010, all builds are “upgraded” in the sense that a build definition with the same name is created, and it uses the UpgradeTemplate  build process template to execute the build. This template basically just runs MSBuild on the existing TFSBuild.proj file. The build definition contains a property called ConfigurationFolderPath that points to the TFSBuild.proj file.

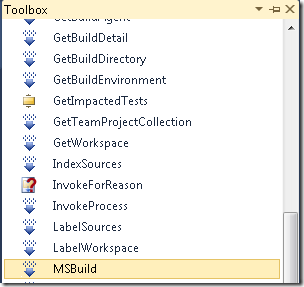
So, existing builds will run just fine after upgrade. But what if you want to use the new workflow functionality in TFS 2010 Build, but still have a lot of MSBuild scripts that maybe call custom MSBuild tasks that you don’t have the time to rewrite? Then one option is to keep these MSBuild scrips and call them from a TFS 2010 Build workflow. This can be done using the MSBuild workflow activity that is avaiable in the toolbox in the Team Foundation Build Activities section:

image

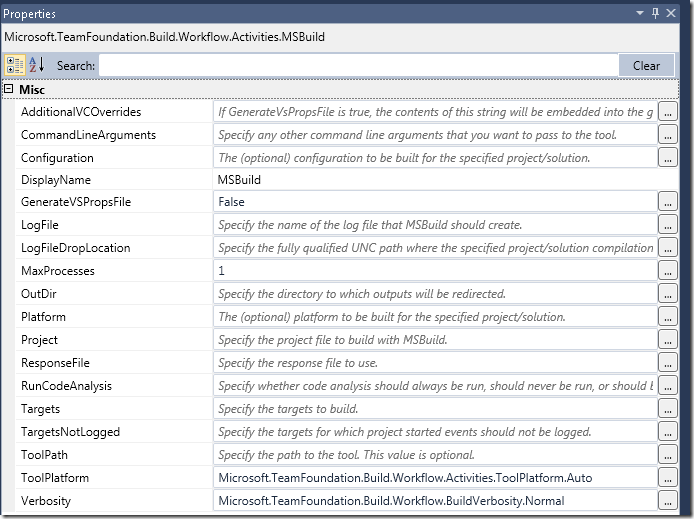
This activity wraps the call to MSBuild.exe and has the following parameters:

image

Most of these properties are only relevant when actually compiling projects, for example C# project files. When calling custom MSBuild project files, you should focus on these properties:

Property Meaning Example
CommandLineArguments Use this to send in/override MSBuild properties in your project “/p:MyProperty=SomeValue”

or

MSBuildArguments (this will let you define the arguments in the build definition or when queuing the build)

LogFile Name of the log file where MSbuild will log the output “MyBuild.log”
LogFileDropLocation Location of the log file BuildDetail.DropLocation + “log”
Project The project to execute SourcesDirectory + “BuildExtensions.targets”
ResponseFile The name of the MSBuild response file SourcesDirectory + “BuildExtensions.rsp”
Targets The target(s) to execute New String() {“Target1”, “Target2”}
Verbosity Logging verbosity Microsoft.TeamFoundation.Build.Workflow.BuildVerbosity.Normal

Integrating with Team Build  

If your MSBuild scripts tries to use Team Build tasks, they will most likely fail with the above approach. For example, the following MSBuild project file tries to add a build step using the BuildStep task:


<?xml version="1.0" encoding="utf-8"?>

<
Project ToolsVersion="4.0" xmlns="http://schemas.microsoft.com/developer/msbuild/2003"> <Import Project="$(MSBuildExtensionsPath)MicrosoftVisualStudioTeamBuildMicrosoft.TeamFoundation.Build.targets" /> <Target Name="MyTarget"> <BuildStep TeamFoundationServerUrl="$(TeamFoundationServerUrl)" BuildUri="$(BuildUri)" Name="MyBuildStep" Message="My build step executed" Status="Succeeded"></BuildStep> </Target> </Project>

When executing this file using the MSBuild activity, calling the MyTarget, it will fail with the following message:

The “Microsoft.TeamFoundation.Build.Tasks.BuildStep” task could not be loaded from the assembly PrivateAssembliesMicrosoft.TeamFoundation.Build.ProcessComponents.dll. Could not load file or assembly ‘file:///D:PrivateAssembliesMicrosoft.TeamFoundation.Build.ProcessComponents.dll’ or one of its dependencies. The system cannot find the file specified. Confirm that the <UsingTask> declaration is correct, that the assembly and all its dependencies are available, and that the task contains a public class that implements Microsoft.Build.Framework.ITask.

You can see that the path to the ProcessComponents.dll is incomplete. This is because in the Microsoft.TeamFoundation.Build.targets file the task is referenced using the $(TeamBuildRegPath) property. Also note that the task needs the TeamFounationServerUrl and BuildUri properties. One solution here is to pass these properties in using the Command Line Arguments parameter:


image

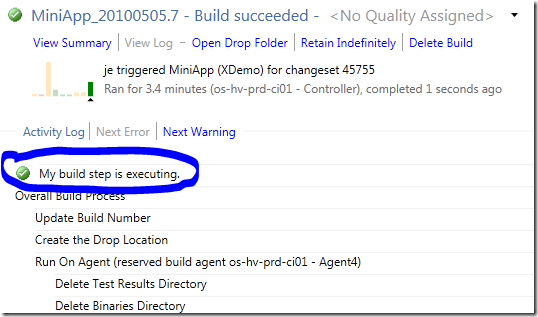
Here we pass in the parameters with the corresponding values from the curent build. The build log shows that the build step has in fact been inserted:


image

The problem as you probably spted is that the build step is insert at the top of the build log, instead of next to the MSBuild activity call. This is because we are using a legacy team build task (BuildStep), and that is how these are handled in TFS 2010.

You can see the same behaviour when running builds that are using the UpgradeTemplate, that cutom build steps shows up at the top of the build log.

Modify Build Failure Work Item in TFS 2010 Build

The default behaviour in TFS Team Build (all versions) is to create a bug work item when a build fails. This main benefit of this is that you get a work item for something that needs to be done, namely to fix the build!. When the developer responsible for the build failure has fixed the problem, he/she can associated that check-in with the work item that was created from the previous build failure.

In TFS 2005/2008 you could modify the information in the created work item by changing some predefined properties in the TFSBuild.proj file:


    <!--  WorkItemType
     The type of the work item created on a build failure. 
     -->
    <WorkItemType>Bug</WorkItemType>

    <!--  WorkItemFieldValues
     Fields and values of the work item created on a build failure.
     
     Note: Use reference names for fields if you want the build to be resistant to field name 
     changes. Reference names are language independent while friendly names are changed depending 
     on the installed language. For example, "System.Reason" is the reference name for the "Reason" 
     field.
     -->
    <WorkItemFieldValues>System.Reason=Build Failure;System.Description=Start the build using Team Build</WorkItemFieldValues>

    <!--  WorkItemTitle
     Title of the work item created on build failure.
     -->
    <WorkItemTitle>Build failure in build:</WorkItemTitle>

    <!--  DescriptionText
     History comment of the work item created on a build failure. 
     -->
    <DescriptionText>This work item was created by Team Build on a build failure.</DescriptionText>

    <!--  BuildLogText
     Additional comment text for the work item created on a build failure.
     -->
    <BuildlogText>The build log file is at:</BuildlogText>

    <!--  ErrorWarningLogText
     Additional comment text for the work item created on a build failure. 
     This text will only be added if there were errors or warnings.
     -->
    <ErrorWarningLogText>The errors/warnings log file is at:</ErrorWarningLogText>


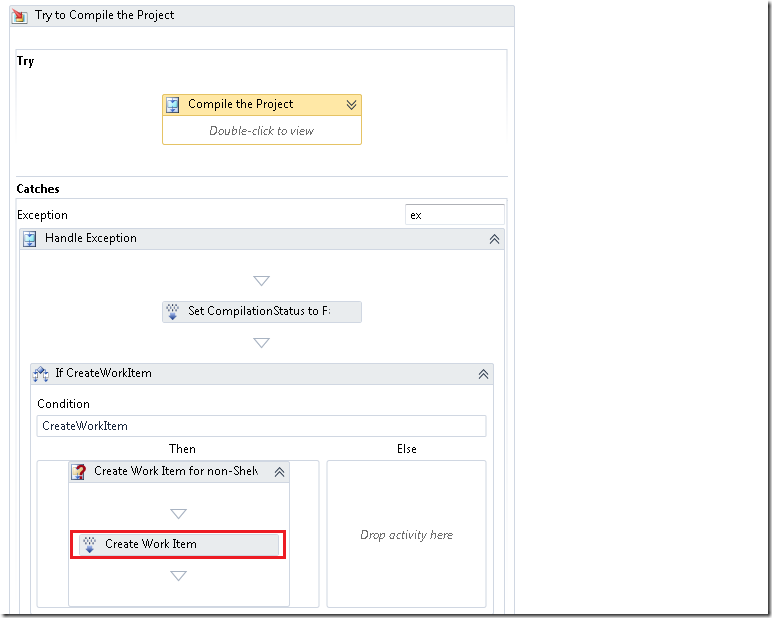
In TFS 2010, with Windows Workflow, you change this by modifying the properties on the OpenWorkItem activity. The hardest part of this is to actually find where this activity is located in the build process workflow. If you open the build definition in XAML you can just search for OpenWorkItem. If you use the designer you need to click your way down to the Catch section of the Try to Compile the Project sequence:

image

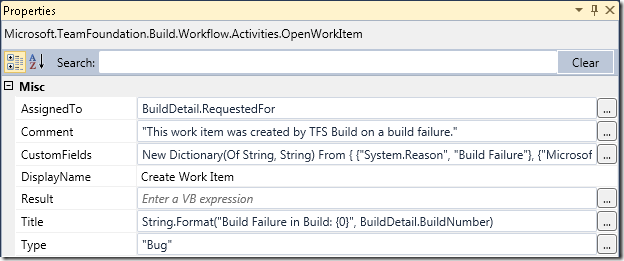
To change the default values of the created work item, select the Created Work Item activity and look at the Properties window:

image

Note the CustomFields property which is a dictionary with key (work item field name) and value. If you add custom fields to your work item you can add a value for it here by adding a new entry in the dictionary.

Creating a Build Definition using the TFS 2010 API

*** UPDATE 2010-08-17 ** Several people have asked me for a complete sample application, so I have put this together and it is available here:
http://cid-ee034c9f620cd58d.office.live.com/self.aspx/BlogSamples/CreateTFSBuildDefinition.zip

****

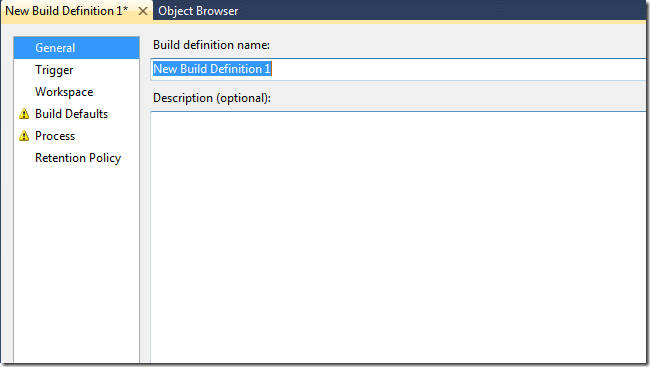
In this post I will show how to create a new build definition in TFS 2010 using the TFS API. When creating a build definition manually, using Team Explorer, the necessary steps are lined
out in the New Build Definition Wizard:
 

image


So, lets see how the code looks like, using the same order. To start off, we need to connect to TFS and get a reference to the IBuildServer object:

TfsTeamProjectCollection server = newTfsTeamProjectCollection(newUri(“http://<tfs>:<port>/tfs”));
server.EnsureAuthenticated();
IBuildServer buildServer = (IBuildServer) server.GetService(typeof (IBuildServer));

General
First we create a IBuildDefinition object for the team project and set a name and description for it:

var buildDefinition = buildServer.CreateBuildDefinition(teamProject);
buildDefinition.Name = “TestBuild”;
buildDefinition.Description = “description here…”;

Trigger
Next up, we set the trigger type. For this one, we set it to individual which corresponds to the Continuous Integration – Build each check-in trigger option

buildDefinition.ContinuousIntegrationType = ContinuousIntegrationType.Individual;

Workspace
For the workspace mappings, we create two mappings here, where one is a cloak. Note the user of $(SourceDir) variable, which is expanded by Team Build into the sources directory when running the build.

buildDefinition.Workspace.AddMapping(“$/Path/project.sln”, “$(SourceDir)”, WorkspaceMappingType.Map);
buildDefinition.Workspace.AddMapping(“$/OtherPath/”, “”, WorkspaceMappingType.Cloak);

Build Defaults
In the build defaults, we set the build controller and the drop location. To get a build controller, we can (for example) use the GetBuildController method to get an existing build controller by name:

buildDefinition.BuildController = buildServer.GetBuildController(buildController);
buildDefinition.DefaultDropLocation = @\SERVERDropTestBuild;

Process
So far, this wasy easy. Now we get to the tricky part. TFS 2010 Build is based on Windows Workflow 4.0. The build process is defined in a separate .XAML file called a Build Process Template. By default, every new team team project containtwo build process templates called DefaultTemplate and UpgradeTemplate. In this sample, we want to create a build definition using the default template. We use te QueryProcessTemplates method to get a reference to the default for the current team project

 
//Get default template
var defaultTemplate = buildServer.QueryProcessTemplates(teamProject).Where(p => p.TemplateType == ProcessTemplateType.Default).First();
buildDefinition.Process = defaultTemplate;


There are several build process templates that can be set for the default build process template. Only one of these are required, the ProjectsToBuild parameters which contains the solution(s) and configuration(s) that should be built. To set this info, we use the ProcessParameters property of thhe IBuildDefinition interface. The format of this property is actually just a serialized dictionary (IDictionary<string, object>) that maps a key (parameter name) to a value which can be any kind of object. This is rather messy, but fortunately, there is a helper class called WorkflowHelpers inthe Microsoft.TeamFoundation.Build.Workflow namespace, that simplifies working with this persistence format a bit. The following code shows how to set the BuildSettings information for a build definition:

//Set process parameters
varprocess = WorkflowHelpers.DeserializeProcessParameters(buildDefinition.ProcessParameters);

//Set BuildSettings properties
BuildSettings settings = newBuildSettings();
settings.ProjectsToBuild = newStringList(“$/pathToProject/project.sln”);
settings.PlatformConfigurations = newPlatformConfigurationList();
settings.PlatformConfigurations.Add(newPlatformConfiguration(“Any CPU”, “Debug”));
process.Add(“BuildSettings”, settings);

buildDefinition.ProcessParameters = WorkflowHelpers.SerializeProcessParameters(process);

The other build process parameters of a build definition can be set using the same approach


Retention  Policy
This one is easy, we just clear the default settings and set our own:

buildDefinition.RetentionPolicyList.Clear();
buildDefinition.AddRetentionPolicy(BuildReason.Triggered, BuildStatus.Succeeded, 10, DeleteOptions.All);
buildDefinition.AddRetentionPolicy(BuildReason.Triggered, BuildStatus.Failed, 10, DeleteOptions.All);
buildDefinition.AddRetentionPolicy(BuildReason.Triggered, BuildStatus.Stopped, 1, DeleteOptions.All);
buildDefinition.AddRetentionPolicy(BuildReason.Triggered, BuildStatus.PartiallySucceeded, 10, DeleteOptions.All);

Save It!
And we’re done, lets save the build definition:

buildDefinition.Save();

That’s it!


Getting TF215097 error after modifying a build process template in TFS Team Build 2010

When embracing Team Build 2010, you typically want to define several different build process templates for different scenarios. Common examples here are CI builds, QA builds and release builds. For example, in a contiuous build you often have no interest in publishing to the symbol store, you might or might not want to associate changesets and work items etc. The build server is often heavily occupied as it is, so you don’t want to have it doing more that necessary. Try to define a set of build process templates that are used across your company. In previous versions of TFS Team Build, there was no easy way to do this. But in TFS 2010 it is very easy so there is no excuse to not do it! 🙂


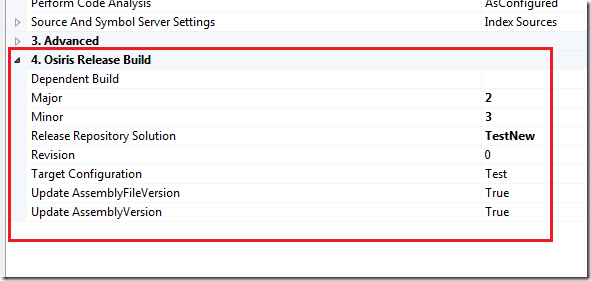
I ran into a scenario today where I had an existing build definition that was based on our release build process template. In this template, we have defined several different build process parameters that control the release build. These are placed into its own sectionin the Build Process Parameters editor. This is done using the ProcessParameterMetadataCollection element, I will explain how this works in a future post.


image

I won’t go into details on these parametes, the issue for this blog post is what happens when you modify a build process template so that it is no longer compatible with the build definition, i.e. a breaking change. In this case, I removed a parameter that was no longer necessary. After merging the new build process template to one of the projects and queued a new release build, I got this error:


TF215097: An error occurred while initializing a build for build definition <Build Definition Name>:
The values provided for the root activity’s arguments did not satisfy the root activity’s requirements: ‘DynamicActivity’:
The following keys from the input dictionary do not map to arguments and must be removed: <Parameter Name>. 
Please note that argument names are case sensitive. Parameter name: rootArgumentValues

<Parameter Name> was the parameter that I removed so it was pretty easy to understand why the error had occurred. However, it is not entirely obvious how to fix the problem. When open the build definition everything looks OK, the removed build process parameter is not there, and I can open the build process template without any validation warnings.

The problem here is that all settings specific to a particular build definition is stored in the TFS database. In TFS 2005, everything that was related to a build was stored in TFS source control in files (TFSBuild.proj, WorkspaceMapping.xml..). In TFS 2008, many of these settings were moved into the database. Still, lots of things were stored in TFSBuild.proj, such as the solution and configuration to build, wether to execute tests or not. In TFS 2010, all settings for a build definition is stored in the database. If we look inside the database we can see what this looks like. The table tbl_BuildDefinition contains all information for a build definition. One of the columns is called ProcessParameters and contains a serialized representation of a Dictionary that is the underlying object where these settings are stoded. Here is an example:


<Dictionary x:TypeArguments="x:String, x:Object" xmlns="clr-namespace:System.Collections.Generic;assembly=mscorlib" xmlns:mtbwa="clr-namespace:Microsoft.TeamFoundation.Build.Workflow.Activities;assembly=Microsoft.TeamFoundation.Build.Workflow" xmlns:x="http://schemas.microsoft.com/winfx/2006/xaml">   

<mtbwa:BuildSettings x:Key="BuildSettings" ProjectsToBuild="$/PathToProject.sln">     
    <mtbwa:BuildSettings.PlatformConfigurations>       
        <mtbwa:PlatformConfigurationList Capacity="4">         
        <mtbwa:PlatformConfiguration Configuration="Release" Platform="Any CPU" />       
        </mtbwa:PlatformConfigurationList>     
    </mtbwa:BuildSettings.PlatformConfigurations>   
</mtbwa:BuildSettings>   
<mtbwa:AgentSettings x:Key="AgentSettings" Tags="Agent1" />   
<x:Boolean x:Key="DisableTests">True</x:Boolean>   
<x:String x:Key="ReleaseRepositorySolution">ERP</x:String>   
<x:Int32 x:Key="Major">2</x:Int32>   
<x:Int32 x:Key="Minor">3</x:Int32> 
</Dictionary>

Here we can see that it is really only the non-default values that are persisted into the databasen. So, the problem in my case was that I removed one of the parameteres from the build process template, but the parameter and its value still existed in the build definition database. The solution to the problem is to refresh the build definition and save it. In the process tab, there is a Refresh button that will reload the build definition and the process template and synchronize them:


image

After refreshing the build definition and saving it, the build was running successfully again.

Implementing Release Notes in TFS Team Build 2010

In TFS Team Build (all versions), each build is associated with changesets and work items. To determine which changesets that should be associated with the current build, Team Build finds the label of the “Last Good Build” an then aggregates all changesets up unitl the label for the current build. Basically this means that if your build is failing, every changeset that is checked in will be accumulated in this list until the build is successful.

All well, but there uis a dimension missing here, regarding to releases. Often you can run several release builds until you actually deploy the result of the build to a test or production system. When you do this, wouldn’t it be nice to be able to send the customer a nice release note that contain all work items and changeset since the previously deployed version?

At our company, we have developed a Release Repository, which basically is a siple web site with a SQL database as storage. Every time we run a Release Build, the resulting installers, zip-files, sql scripts etc, gets pushed into the release repositor together with the relevant build information. This information contains things such as start time, who triggered the build etc. Also, it contains the associated changesets and work items.

When deploying the MSI’s for a new version, we mark the build as Deployed in the release repository. The depoyed status is stored in the release repository database, but it could also have been implemented by setting the Build Quality for that build to Deployed.

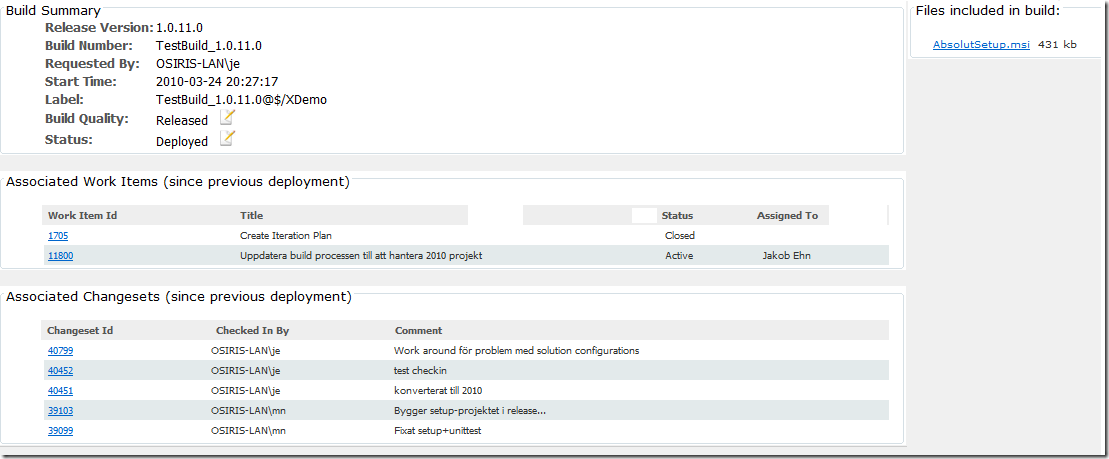
When generating the release notes, the web site simple runs through each release build back to the previous build that was marked as Deplyed, and aggregates the work items and changesets:

Here is a sample screenshot on how this looks for a sample build/application

image

The web site is available both for us and also for the customers and testers, which means that they can easily get the latest version of a particular application and at the same time see what changes are included in this version.
There is a lot going on in the Release Build Process that drives this in our TFS 2010 server, but in this post I will show how you can access and read the changeset and work item information in a custom activity.

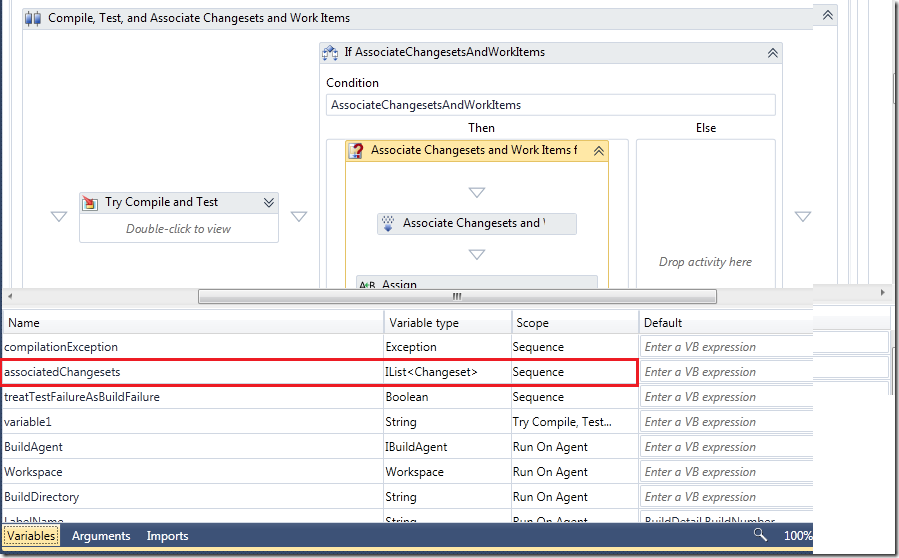
Since Team Build associates changesets and work items for each build, this information is (partially) available inside the build process template. The Associate Changesets and Work Items for non-Shelveset Builds activity (located inside the Try  Compile, Test, and Associate Changesets and Work Items activity) defines and populates a variable called associatedWorkItems


image

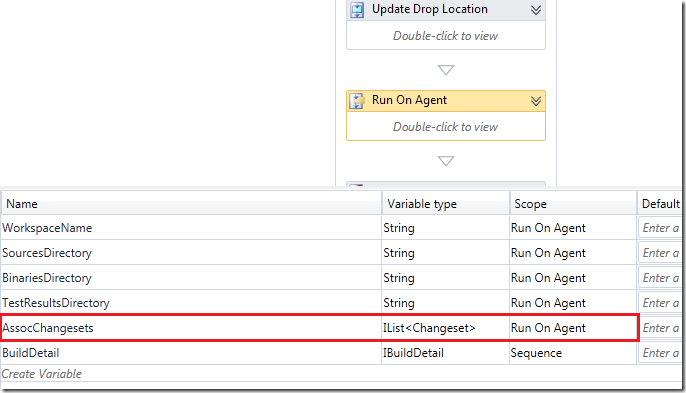
You can see that this variable is an IList containing instances of the Changeset class (from the Microsoft.TeamFoundation.VersionControl.Client namespace). Now, if you want to access this variable later on in the build process template, you need to declare a new variable in the corresponding scope and the assign the value to this variable. In this sample, I declared a variable called assocChangesets in the RunAgent sequence, which basically covers the whol compile, test and drop part of the build process:


image

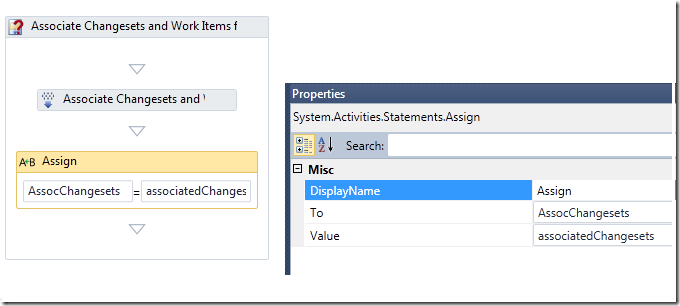
Now, you need to assign the value from the AssociatedChangesets to this variable. This is done using the Assign workflow activity:


image

Now you can add a custom activity any where inside the RunAgent sequence and use this variable. NB: Of course your activity must place somewhere after the variable has been poplated. To finish off, here is code snippet that shows how you can read the changeset and work item information from the variable.


First you add an InArgumet on your activity where you can pass i the variable that we defined.

        [RequiredArgument]
        public InArgument<IList<Changeset>> AssociatedChangesets { get; set; }

Then you can traverse all the changesets in the list, and for each changeset use the WorkItems property to get the work items that were associated in that changeset:

            foreach (Changeset ch in associatedChangesets)
            {
                // Add change
                theChangesets.Add(
                    new AssociatedChangeset(ch.ChangesetId,
                                            ch.ArtifactUri,
                                            ch.Committer,
                                            ch.Comment,
                                            ch.ChangesetId));

                foreach (var wi in ch.WorkItems)
                {
                        theWorkItems.Add(
                            new AssociatedWorkItem(wi["System.AssignedTo"].ToString(),
                                                   wi.Id,
                                                   wi["System.State"].ToString(),
                                                   wi.Title,
                                                   wi.Type.Name,
                                                   wi.Id,
                                                   wi.Uri));

                }
            }

NB: AssociatedChangeset and AssociatedWorkItem are custom classes that we use internally for storing this information that is eventually pushed to the release repository.

TFS 2010 – Managing Build Agents using the API

In previous versions of TFS, you installed TFS Team Build on the build server and you got one build service agent. It was/is possible to start several build agents on the same server, but it is a bit of a mess.
In addition, for each team project TFS 2008 build service can only execute one at a time (Note that builds from different team project can execute in parallell, a lot of people still don’t know this)

In TFS 2010, the concept of build controllers were introduced. A build controller belongs to one (1) project collection and is responsible of managing a set of build agents, thereby enabling a build agent pool which allows for builds to execute in parallel, even in the same team project.

The build controller also have features for selecting an appropriate build agent for a particular build. For example you can assign a set of tags to a build agent. A tag is just a string, and typically relate to some configuration/environment that is present on the machine of the build agent. For example you might have one build agent that builds BizTalk server projects, for which you need to install the appropriate tools on that machine. Then you tag the build definitions that build biztalk projects with the corresponding tag. This will cause the build controller to select the appropriate build agent.

You can of course have several buiuld agents with the same tag(s), thereby creating a build pool that will enable parallall builds for this type of projects as well.

By default, when installing/upgrading to TFS 2010 you will configure one 1 build controller and 1 build agent. As said before, the build agent no longer has any dependency to a team project. This means that if you have one build agent all builds for that project collection will be queued on the same build agent and the will not run in parallell. To enable parallell builds, open the TFS Administration Console in the build server and create one (or several) new build agent for the controller. By default, the controller will first try to find a build agent that is free and queue the build on that build agent. If all build agents are busy, the build will just be queued on the build agent with the smallest queue.

At our company, we have some builds (from TFS 2008) that actually have a problem with running in parallell with other builds. For example, some builds creates a SQL database during the build to be able to execute integration tests as part of the build. The same scripts are used by the developer to create a local sandbox environment on their development machines. The problem here we typically have several builds for the same project (CI, Nightly, Release) and all of these will create the same database as part of the build. If two of these builds would run in parallell, you can easily imagine some weird errors that would occur!

To resolve this, we can use the tag functionality, to map these build definitions to the same build agent. This will cause these builds to be executed in sequence. Since we have a lot of team project and a lot of build definitions, this require some extra management. Both to create new build agents for a new team project with the corresponding tag and to assign the same tag to the builds in the team project.

To show how this can be done using the API, I wrote a small application that runs through all team projects on a given TFS project collection. For each team project, it checks if there is a corresponding build agent with the same name. If not, the agent is created and a tag with the same name as the team project is assigned to the build agent.

Next, it runs through all build definitions for each team project and assign the corresponding tag to those builds. It is a command line tool, so we can run this on a scheduled basis to keep all build agents and build definitions in sync. You will see from the sample that using the TFS API is very simple and intuitive. The only exception here was to read and modify the Tags property for a build definition. This is stored instide the Agent Settings object which is stored as a serialized dictionary. There is rather ugly code to access this information, this could probably be done differently.

Here is the code, enjoy 🙂 


using System;
using System.Collections.Generic;
using System.Linq;
using System.Text;
using Microsoft.TeamFoundation.Server;
using Microsoft.TeamFoundation.Build.Client;
using Microsoft.TeamFoundation.VersionControl.Client;
using Microsoft.TeamFoundation.Client;
using System.Xml.Serialization;
using System.IO;
using System.Xml.Linq;

namespace TFSBuildAgentManager
{
    class TFSBuildAgentManager
    {
        private static string BuildAgentWorkingDirectory = @"D:Build$(BuildAgentId)$(BuildDefinitionPath)";

        static void Main(string[] args)
        {
            if (args.Length != 1 && args.Length != 2)
            {
                Console.WriteLine("Usage: TFSBuildAgentManager.exe tfsServerUrl [buildAgentWorkingDirectory]");
                return;
            }

            string tfsServer = args[0];
            if( args.Length == 2 )
                BuildAgentWorkingDirectory = args[1];

            TeamFoundationServer tfs = new TeamFoundationServer(tfsServer);
            tfs.EnsureAuthenticated();

            IBuildServer bs = (IBuildServer)tfs.GetService(typeof(IBuildServer));
            ICommonStructureService css = (ICommonStructureService)tfs.GetService(typeof(ICommonStructureService));

            ProjectInfo[] projectList = css.ListAllProjects();
            var controller = bs.QueryBuildControllers(true).First();

            foreach (var project in projectList)
            {
                string projectName = project.Name;
                if (bs.QueryBuildDefinitions(projectName).Count() != 0)
                {
                    var agents = controller.Agents.Where(a => a.Name == projectName);

                    if (agents.Count() == 0)
                    {
                        IBuildAgent agent = AddBuildAgent(controller, projectName);
                        agents = new List<IBuildAgent> { agent };
                    }
                    foreach (IBuildAgent a in agents)
                    {
                        if (!AgentHasTag(projectName, a))
                        {
                            AddTagToBuildAgent(projectName, a);
                        }
                    }

                    foreach (IBuildDefinition build in bs.QueryBuildDefinitions(projectName))
                    {
                        AddTagToBuildDefinition(projectName, build);
                    }
                }
            }
        }

        private static bool AgentHasTag(string projectName, IBuildAgent a)
        {
            return a.Tags.Where(t => t == projectName).Count() != 0;
        }

        private static IBuildAgent AddBuildAgent(IBuildController controller, string projectName)
        {
            IBuildAgent agent = controller.ServiceHost.CreateBuildAgent(projectName, BuildAgentWorkingDirectory);
            controller.AddBuildAgent(agent);
            agent.Save();
            return agent;
        }

        private static void AddTagToBuildDefinition(string tag, IBuildDefinition build)
        {
            const string AgentSettingsElement = "{clr-namespace:Microsoft.TeamFoundation.Build.Workflow.Activities;assembly=Microsoft.TeamFoundation.Build.Workflow}AgentSettings";

            XDocument doc = XDocument.Parse(build.ProcessParameters);
            var agentSettings = doc.Root.Descendants(AgentSettingsElement);
            if (agentSettings.Count() == 0)
            {
                doc.Root.Add(
                    new XElement(AgentSettingsElement,
                        new XAttribute("{http://schemas.microsoft.com/winfx/2006/xaml}Key", "AgentSettings"),
                        new XAttribute("Tags", tag)));
            }
            else
            {
                var tags = agentSettings.First().Attributes("Tags");
                tags.First().Value = tag;
            }
            build.ProcessParameters = doc.ToString();
            build.Save();
        }

        private static void AddTagToBuildAgent(string tag, IBuildAgent a)
        {
            a.Tags.Add(tag);
            a.Save();
        }
    }
}

TFS 2010 Beta 2 – Upgrading Builds from TFS 2008

We are in the process of upgrading the entire company to TFS 2010 Beta 2, and in preparing for that we have done some test upgrades to make sure that all things work as expected after the upgrade. As expected, most issues that turned up had to do with builds. This is one of the areas that has changed the most compared to TFS 2008. I thought that I would use this post to run through some of the issues that we found.

First of all, when upgrading a TFS 2008 to TFS 2010 Beta 2, all build definitions will be upgraded. They will all be redefined to use the UpgradeProcessTemplate build process template in the new Windows Workflow based build engine. Jim Lamb has a good post that describes this here http://blogs.msdn.com/jimlamb/archive/2009/11/03/upgrading-tfs-2008-build-definitions-to-tfs-2010.aspx

A nice feature is that you can still use Visual Studio 2008 to create new build definitions in a TFS 2010 server. Under the surface, this will create a build definition using the UpgradeBuildProcess template and it will check in the TFSBuild.proj/rsp files for you. So it will actually be easier to use VS2008 to do this rather than VS 2010, when creating builds targeting legacy MSBuild builds.

So, what issues did we run into after the upgrade?

Microsoft.TeamFoundation.Build.Client.BuildServerException: Updating build information is not supported from this client. Please use a client compatible with Team Foundation Build Codename Rosario and try again

When running our release builds, most of them failed after the upgrade with this error message. It happened in several different custom build tasks that we have developed inhouse. The thing they had in common was that they were trying to update the running build. For example when adding/updating build steps using the InformationNodeConverter.AddBuildStep method. Also when attaching custom build data using the IBuildInformationNode interface we got the same error.

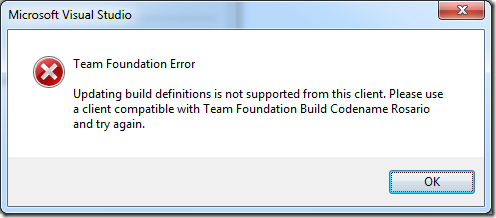
Actually this error message is the same that you get when trying to work against a TFS 2010 Beta 2 instance from a VS2008 client that does not have the VSTS 2008 SP1 Forward Compatibility Update installed. Even with the upgrade installed there are still things that can’t be done using VSTS 2008. For example you can create a new build definition from a VSTS 2008 client, but you can’t edit it. Try and you will get this dialog:

image

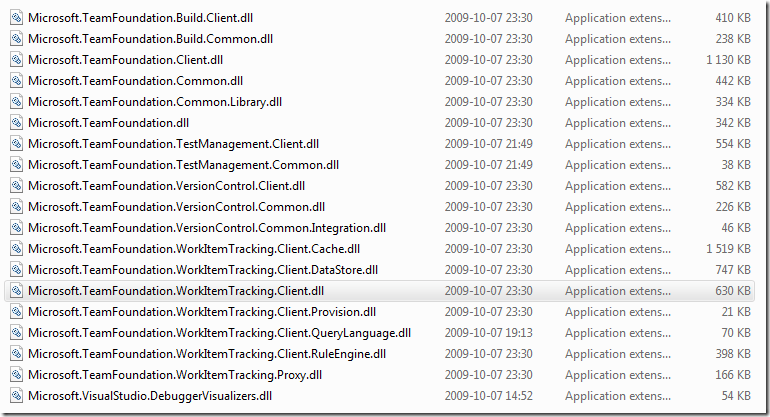
The problem for our build tasks are of course that they were still compiled against the old 9.0 version of the TFS API assemblies. You need to reference the 10.0 version of these assemblies, and the only place that I have been able to locate them at so far is at: %PROGRAMFILES%Microsoft Visual Studio 10.0Common7IDEReferenceAssembliesv2.0:

imageThe version of these assembies are 10.0.21006.1. I would assume that these assemblies was installed somewhere when installing the Forward Compatibility Upgrade but I haven’t found them anywhere so far.


The command “”….Common7IDEtf.exe” checkout /recursive xxxxxx exited with code 3
This was another problem that turned up after the upgrade. We use the tf.exe command line tool a lot during builds. For example we check out and in files, we create and modify workspaces etc. In our 2008 build definitions we define a property that contains the full path to tf.exe like this:

<TF>&quot;$(TeamBuildRefPath)..tf.exe&quot;</TF>

TeamBuildRefPath is a Team Build property that provides the path to Team Build binaries (the logger, tasks, etc.).  Typically %ProgramFiles%Microsoft Visual Studio 9.0Common7IDEPrivateAssemblies. But in TFS 2010 Beta 2 this property has been changed which of course breaks the builds using it like this. We can see where this change is done by looking at the file TFSBuild.rsp that is generated on the fly by Team Build and is located in the BuildType folder. This file contains all the properties that are used when running MSBuild on the TFSBuild.proj file and is a miz of generated properties and the ones that you can define in your own TFSBuild.rsp file in source control. Here is a sample of this file:


### Begin Team Build Generated Arguments ###

/dl:BuildLogger,”C:Program FilesMicrosoft Team Foundation Server 2010ToolsMicrosoft.TeamFoundation.Build.Server.Logger.dll”;”BuildUri=vstfs:///Build/Build/43;TFSUrl=http://tfsrtm08:8080/tfs/DefaultCollection;TFSProjectFile=C:Builds2projectxxxxBuildTypeTFSBuild.proj;InformationNodeId=2769;LogFilePerProject=False;”*BuildForwardingLogger,”C:Program FilesMicrosoft Team Foundation Server 2010ToolsMicrosoft.TeamFoundation.Build.Server.Logger.dll”;”BuildUri=vstfs:///Build/Build/43;TFSUrl=http://tfsrtm08:8080/tfs/DefaultCollection;TFSProjectFile=C:Builds2projectxxxBuildTypeTFSBuild.proj;InformationNodeId=2769;”
/fl /flp:”logfile=C:Builds2projectxxxxBuildTypeBuildLog.txt;encoding=Unicode;verbosity=normal;”
/p:ProjectFileVersion=”3″
/p:BuildDefinition=”xxxx”
/p:BuildDefinitionId=”5″
/p:DropLocation=”\TFSRTM08Drop”
/p:BuildProjectFolderPath=”%24/project/xxxxxx/Main/Build/Test”
/p:BuildUri=”vstfs:///Build/Build/43″
/p:TeamFoundationServerUrl=”
http://tfsrtm08:8080/tfs/DefaultCollection”
/p:TeamProject=”project”
/p:BuildAgentName=”TFSRTM08 – Agent1″
/p:MachineName=”TFSRTM08″
/p:BuildAgentUri=”vstfs:///Build/Agent/2″
/p:BuildDirectory=”C:Builds2projectxxxxx”
/p:BuildAgentId=”2″
/p:SourceGetVersion=”C10″
/p:LastGoodBuildLabel=”xxxxx”
/p:LastBuildNumber=”xxxxx_20091116.4″
/p:LastGoodBuildNumber=”xxxxx_20091110.4″
/p:NoCICheckInComment=”%2a%2a%2aNO_CI%2a%2a%2a”
/p:IsDesktopBuild=”False”
/p:TeamBuildRefPath=”C:Program FilesMicrosoft Team Foundation Server 2010Tools\”
/t:EndToEndIteration

### End Team Build Generated Arguments ###

### Begin Checked In TfsBuild.rsp Arguments ###

# This is a response file for MSBuild
# Add custom MSBuild command line options in this file

### End Checked In TfsBuild.rsp Arguments ###


So the TeamBuildRefPath now points to the Tools folder below the TFS 2010 install folder. But tf.exe is typically installed at C:Program FilesMicrosoft Visual Studio 10.0Common7IDE. At the moment, we have resorted to redefining our TF property by using the full path which of course is not a very good solution. But it works, until we find what other MSBuild property we can use to reference to the 10.0 path


Work Items are not associated with builds
When running builds, we noticed that sometimes the workitems that had been associated with the changesets for the build were not associated with build. When looking more closely on the build log, this warning were generated:

C:Program FilesMSBuildMicrosoftVisualStudioTeamBuildMicrosoft.TeamFoundation.Build.targets (1162): TF42093: The work item xxx could not be updated with build information. The field Microsoft.VSTS.Build.IntegrationBuild is not available on this work item.

This turned out to be a known bug in TFS Beta 2 and affects all work item types that do not have the Microsoft.VSTS.Build.IntegrationBuild field. At the moment there is no work around for this problem than to add this field to all your work item types.


Aside from these problems, the upgraded builds works fine in TFS 2010 Beta 2, which is reassuring because we can still use our investments in the TFS 2008 build process. WE are about to migrate our build process to 2010, using Windows Workflow instead of MSBuild, but this means that we don’t have to do this immediately.