Automatically Merging Work Items in TFS 2013

** Source available at http://mergeworkitems.codeplex.com/ **

Half a year ago I wrote about about Merging Work Items with a custom check-in policy. The policy evaluated the pending changes and for all pending merges, it traversed the merge history to find the associated work items and let the user add them to the current changeset.

I promised to post the source to the check-in policy (and I’ve got a lot of requests for it), but I never did. This was primary for two reasons:

  1. The technical solution turned out to be a bit complicated. The problem was/is that it is not possible to modify the list of associated work items in the current pending changes using the API. This was a show stopper and the only way around it was to add another component that was executed on the server after the check-in that did the actual association. The information about the selected work items was temporarily stored in the comments of the changeset. This worked, but complicated the deployment.
  2. The feedback internally at Inmeta was that why should the developer be allowed to select which work items that should be associated? If a work item was associated with a changeset in a Main branch, it should always be associated with the merge changeset when merging to a Release branch. So the association should be done automatically.

For these reasons I changed the implementation and converted the check-in policy to a TFS server side event handler instead (for more info on work with these event handlers, check out my post about them here: Server Side Event Handlers in TFS 2010)

By having the association done server side, the process is very smooth for the developer. When a changeset that contains merges is checked in, the event handler evaluates all merges and associates the work items. If a work item has already been associated by the developer, it is of course not associated again. Since it is implemented with a server side event handler, it runs instantly without the user ever really noticing it.

Let’s look at how this works. Lets say that we have the following branch hierarchy:

image

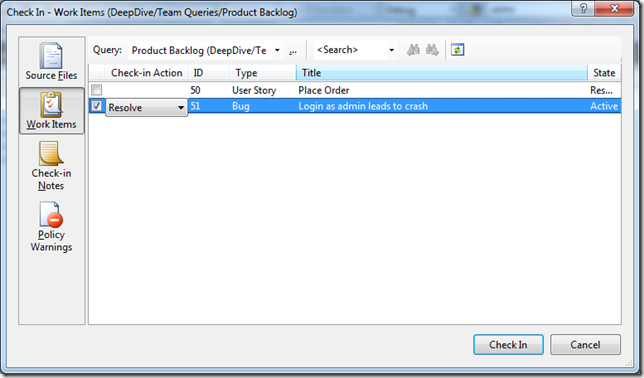
Now, one of our finest developers have both fixed a bug and added a new user story in the Main branch. That was two changesets, each changeset was associated with a corresponding work item:

imageimage

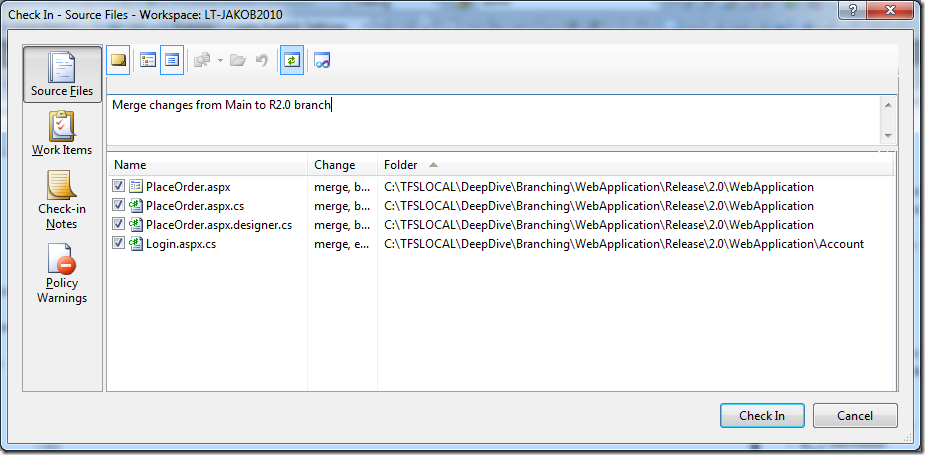
Now, we want to push these changes to the 2.0 Release branch. So the developer performs a merge from Main to the 2.0 branch.

image

At this point, instead of manually adding the work items, the developer just checks in the changes. After this, lets take a look at the source history

image

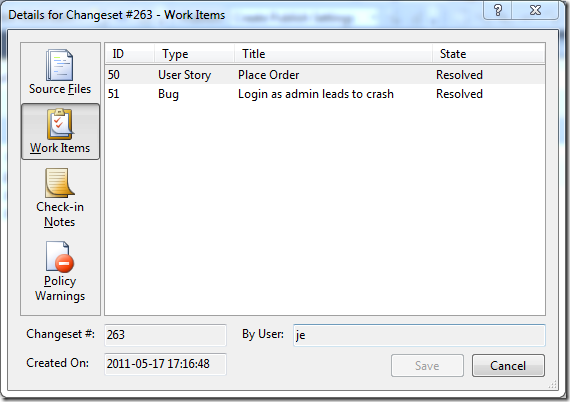
Double-clicking on the latest changeset, we can see the following information on the work items tab:

image

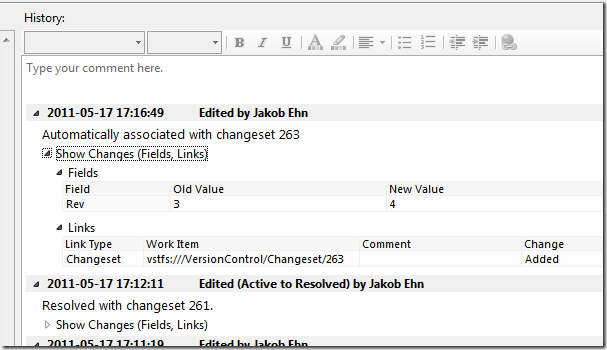
The work items associated with the original changesets that was merged to the R2.0 branch, have been associated with the new changeset. Also, double-clicking on one of the work items, we can see that the server event handler has added a link to the changeset for this work item:

image

Note the following:

  • The changeset has been linked in the same way as when you associate a work item manually.
  • The change was done by the developer account (myself in this sample), and not the TFS service account. This is because the event handler uses the new TFS Impersonation API to impersonate the user who committed the check-in.
  • The history comment is a bit different than the usual (“Associated with changeset XXX”), just to highlight the reason for the change.
  • If the changeset would contain both merges and other types of pending changes, the merges would still be traversed, the other changes are just ignored.


Deployment
Deploying the server side event handler couldn’t be easier, just drop the Inmeta.TFS.MergeWorkItemsEventHandler.dll assembly into the plugin directory of the TFS AT server. This path is usually %PROGRAMFILES%Microsoft Team Foundation Server 12.0Application TierWeb ServicesbinPlugins. Note: This will cause TFS to recycle to load the new assembly, so in production you might want to schedule this to minimize problems for your users.
See my post more details on this.

image

Implementation
I have uploaded the source code to CodePlex at: http://mergeworkitems.codeplex.com/ so you can check out the details there. One thing that is worth mentioning is that I had to resort to the TFS Client API to access and modify the associated work items. The TFS Server Side object model is not very documented, and according to Grant Holiday (in this post) the server object mode for work item tracking is not very useful. So instead of going down that road, I used the client object model to do the work Not as efficient, but it gets the job done.

Note that the event handler hooks into the Notification decision point, which is executed asynchronously after the check-in has been done, and therefor it doesn’t have a negative impact on the overall check-in process.

Hope that you find the event handler useful, contact me either through this blog or via the CodePlex site if you have any questions and/or feature requests.

TFS 2010 Inmeta Build Explorer

This weekend we at Inmeta release a free Visual Studio 2010 Team Explorer extensions that solves the problem with the Builds node in the Team Explorer not being hierarchic. For some reason, this part of the Team Explorer didn’t get the nice hierarchical folder structure that the Work items node got in 2010. The result is that, for a company that has several hundreds of builds in the same team project, it becomes very hard to navigate.

The solution that we implemented is very simple and uses a naming convention to group the build definitions in folders. The default separator is ‘.’ (dot) which is prabably the most common convention used anyway. As it turns out, Microsoft DevDiv uses this convention internally, as posted
by Brian Harry. And they have a _lot_ of build definitions…. Ler

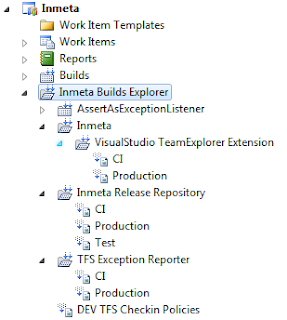
This is what the build explorer looks like:


As you can see, if you have a multi-part name, such as Inmeta.TFS Exception Reporter.Production, you get two folders in the hierarchy.

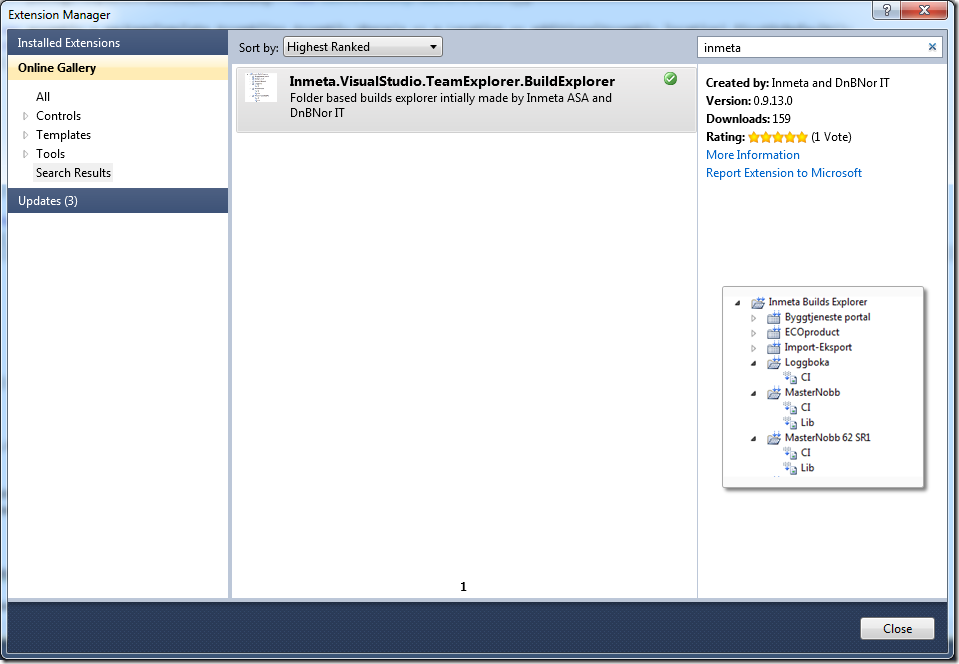
The Build Explorer is available in the Visual Studio Gallery, either download it from http://visualstudiogallery.msdn.microsoft.com/35daa606-4917-43c4-98ab-38632d9dbd45, or use the Visual Studio Extension Manager directly (search for Inmeta):

image


The extension was developed mostly by Lars Nilsson, with some smaller additions by myself and Terje Sandström.

The source code is available at http://tfsbuildfolders.codeplex.com. Let us know what you think and if you want to contribute, contact me or Terje at the Codeplex site.

Integrating Code Metrics in TFS 2010 Build

The build process template and custom activity described in this post is available here:
http://cid-ee034c9f620cd58d.office.live.com/self.aspx/BlogSamples/Inmeta%20TFS%20Build%20Sample.zip

Running code metrics has been available since VS 2008, but only from inside the IDE. Yesterday Microsoft finally released Visual Studio Code Metrics Power Tool 10.0, a command line tool that lets you run code metrics on your applications.  This means that it is now possible to perform code metrics analysis on the build server as part of your nightly/QA builds. In this post I will show how you can run the metrics command line tool from a build, and also a custom activity that reads the output and appends the results to the build log, and fails the build if the metric values exceeds certain (configurable) treshold values.

The code metrics tool analyzes all the methods in the assemblies, measuring cyclomatic complexity, class coupling, depth of inheritance and lines of code. Then it calculates a Maintainability Index from these values that is a measure of how maintanable this method is, between 0 (worst) and 100 (best). For information on how this value is calculated, see http://blogs.msdn.com/b/codeanalysis/archive/2007/11/20/maintainability-index-range-and-meaning.aspx. After this it aggregates the information and present it at the class, namespace and module level as well.


Running Metrics.exe in a build definition
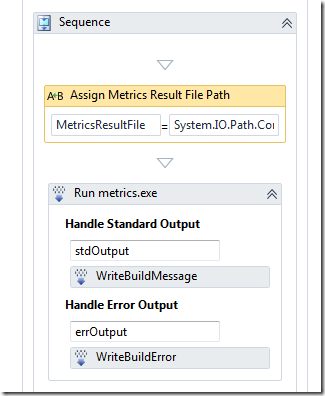
Running the actual tool is easy, just use a InvokeProcess activity last in the Compile the Project sequence, reference the metrics.exe file and pass the correct arguments and you will end up with a result XML file in the drop directory. Here is how it is done in the attached build process template:

image

In the above sequence I first assign the path to the code metrics result file ([BinariesDirectory]result.xml) to a variable called MetricsResultFile, which is then sent to the InvokeProcess activity in the Arguments property.
Here are the arguments for the InvokeProcess activity:

image

Note that we tell metrics.exe to analyze all assemblies located in the Binaries folder. You might want to do some more intelligent filtering here, you probably don’t want to analyze all 3rd party assemblies for example.
Note also the path to the metrics.exe, this is the default location when you install the Code Metrics power tool. You must of course install the power tool on all build servers.

Using the standard output logging (in the Handle Standard Output/Handle Error Output sections), we get the following output when running the build:

image

Integrating Code Metrics into the build
Having the results available next to the build result is nice, but we want to have results integrated in the build result itself, and also to affect the outcome of the build. The point of having QA builds that measure, for example, code metrics is to make it very clear how the code being built measures up to the standards of the project/company. Just having a XML file available in the drop location will not cause the developers to improve their code, but a (partially) failing build will! Ler

To do this, we need to write a custom activity that parses the metrics result file, logs it to the build log and fails the build if the values frfom the metrics is below/above some predefined treshold values.

The custom activity performs the following steps

  1. Parses the XML. I’m using Linq 2 XSD for this. Since the XML schema for the result file is available with the power tool, it is vey easy to generate code that lets you query the structure using standard Linq operators.
  2. Runs through the metric result hierarchy and logs the metrics for each level and also verifies maintainability index and the cyclomatic complexity against the treshold values. The treshold values are defined in the build process template and are sent in as arguments to the custom activity
  3. If the treshold limits are exceeded, the activity either fails or partially fails the current build.

For more information about the structure of the code metrics result file, read Cameron Skinner’s post about it. It is very simple and easy to understand. I won’t go through the code of the custom activity here, since there is nothing special about it and it is available for download so you can look at it and play with it yourself.

The treshold values for Maintainability Index and Cyclomatic Complexity is defined in the build process template, and can be modified per build definition:

image

I have chosen the default values for these settings based on a post from my colleague Terje SandströmCode Metrics – suggestions for approriate limits. When you think about it, this is quite an improvement compared to using code metrics inside the IDE, where the Red/Yellow/Green limits are fixed (and the default values are somewhat strange, see Terjes post for a discussion on this)

This is the first version of the code metrics integration with TFS 2010 Build, I will probably enhance the functionality and the logging (the “tree view” structure in the log becomes quite hard to read) soon.
I will also consider adding it to the Community TFS Build Extensions site when it becomes a bit more mature.

Another obvious improvement is to extend the data warehouse of TFS and push the metric results back to the warehouse and make it visible in the reports.

TFS 2010 Build Custom Activity for Merging Assemblies

*** The sample build process template discussed in this post is available for download from here: http://cid-ee034c9f620cd58d.office.live.com/self.aspx/BlogSamples/ILMerge.xaml ***


In my previous post I talked about library builds that we use to build and replicate dependencies between applications in TFS. This is typically used for common libraries and tools that several other application need to reference.

When the libraries grow in size over time, so does the number of assemblies. So all solutions that uses the common library must reference all the necessary assemblies that they need, and if we for example do a refactoring and extract some
code into a new assembly, all the clients must update their references to reflect these changes, otherwise it won’t compile.

To improve on this, we use a tool from Microsoft Research called ILMerge (Download from here). It can be used to merge several assemblies into one assembly that contains all types. If you haven’t used this tool before, you should check it out.

Previously I have implemented this in builds using a simple batch file that contains the full command, something like this:

“%ProgramFiles(x86)%microsoftilmergeilmerge.exe” /target:library /attr:ClassLibrary1.bl.dll /out:MyNewLibrary.dll ClassLibrary1.dll ClassLibrar2.dll ClassLibrary3.dll

This merges 3 assemblies (ClassLibrary1, 2 and 3) into a new assembly called MyNewLibrary.dll. It will copy the attributes (file version, product version etc..) from ClassLibrary1.dll, using the /attr switch. For more info on ILMerge command line tool, see the above link.

This approach works, but requires a little bit too much knowledge for the developers creating builds, therefor I have implemented a custom activity that wraps the use of ILMerge. This makes it much simpler to setup a new build definition and have the build automatically do the merging.
The usage of the activity is then implemented as part of the Library Build process template mentioned in the previous post. For this article I have just created a simple build process template that only performs the ILMerge operation.


Below is the code for the custom activity. To make it compile, you need to reference the ILMerge.exe assembly.

/// <summary> /// Activity for merging a list of assembies into one, using ILMerge /// </summary> public sealed class ILMergeActivity : BaseCodeActivity { /// <summary> /// A list of file paths to the assemblies that should be merged /// </summary> [RequiredArgument] public InArgument<IEnumerable<string>> InputAssemblies { get; set; } /// <summary> /// Full path to the generated assembly /// </summary> [RequiredArgument] public InArgument<string> OutputFile { get; set; } /// <summary> /// Which input assembly that the attibutes for the generated assembly should be copied from. /// Optional. If not specified, the first input assembly will be used /// </summary> public InArgument<string> AttributeFile { get; set; } /// <summary> /// Kind of assembly to generate, dll or exe /// </summary> public InArgument<TargetKindEnum> TargetKind { get; set; } // If your activity returns a value, derive from CodeActivity<TResult> // and return the value from the Execute method. protected override void Execute(CodeActivityContext context) { string message = InputAssemblies.Get(context).Aggregate("", (current, assembly) => current + (assembly + " ")); TrackMessage(context, "Merging " + message + " into " + OutputFile.Get(context)); ILMerge m = new ILMerge(); m.SetInputAssemblies(InputAssemblies.Get(context).ToArray()); m.TargetKind = TargetKind.Get(context) == TargetKindEnum.Dll ? ILMerge.Kind.Dll : ILMerge.Kind.Exe; m.OutputFile = OutputFile.Get(context); m.AttributeFile = !String.IsNullOrEmpty(AttributeFile.Get(context)) ? AttributeFile.Get(context) : InputAssemblies.Get(context).First(); m.SetTargetPlatform(RuntimeEnvironment.GetSystemVersion().Substring(0,2), RuntimeEnvironment.GetRuntimeDirectory()); m.Merge(); TrackMessage(context, "Generated " + m.OutputFile); } } [Browsable(true)] public enum TargetKindEnum { Dll, Exe }

NB: The activity inherits from a BaseCodeActivity class which is an internal helper class which contains some methods and properties useful for moste custom activities. In this case, it uses the TrackeMessage method for writing

to the build log. You either need to remove the TrackMessage method calls, or implement this yourself (which is not very hard… Ler)


The custom activity has the following input arguments:

InputAssemblies A list with the (full) paths to the assemblies to merge
OutputFile The name of the resulting merged assembly
AttributeFile Which assembly to use as the template for the attribute of the merged assembly. This argument is optional and if left blank, the first assembly in the input list is used
TargetKind Decides what type of assembly to create, can be either a dll or an exe

Of course, there are more switches to the ILMerge.exe, and these can be exposed as input arguments as well if you need it.


To show how the custom activity can be used, I have attached a build process template (see link at the top of this post) that merges the output of the projects being built (CommonLibrary.dll and CommonLibrary2.dll) into a merged assembly (NewLibrary.dll).

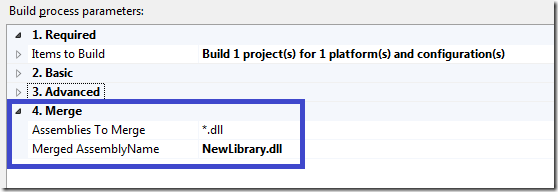
The build process template has the following custom process parameters:

image


The Assemblies To Merge argument is passed into a FindMatchingFiles activity to located all assemblies that are located in the BinariesDirectory folder after the compilation has been performed by Team Build.

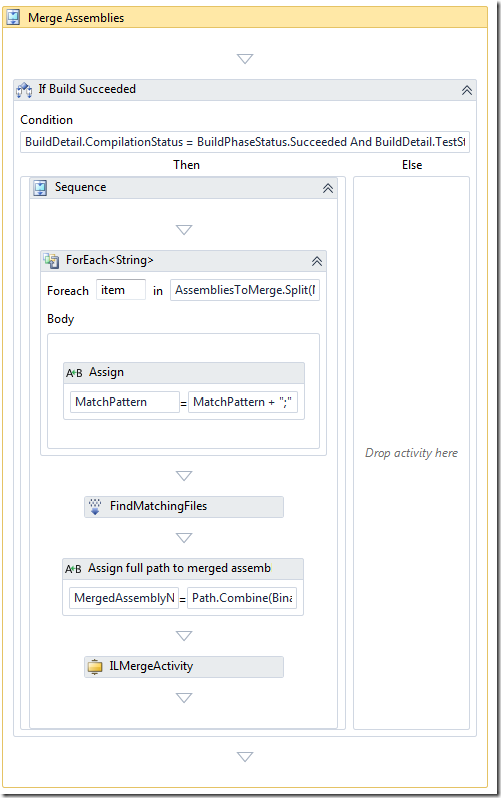
Here is the complete sequence of activities that performs the merge operation. It is located at the end of the Try, Compile, Test and Associate… sequence:

image

It splits the AssembliesToMerge parameter and appends the full path (using the BinariesDirectory variable) and then enumerates the matching files using the FindMatchingFiles activity.

When running the build, you can see that it merges two assemblies into a new one:


image


And the merged assembly (and associated pdb file) is copied to the drop location together with the rest of the assemblies:

image

Dependency Replication with TFS 2010 Build

Some time ago, I wrote a post about how to implement dependency replication using TFS 2008 Build. We use this for Library builds, where we set up a build definition for a common library, and have the build check the resulting assemblies back into source control. The folder is then branched to the applications that need to reference the common library. See the above post for more details.

Of course, we have reimplemented this feature in TFS 2010 Build, which results in a much nicer experience for the developer who wants to setup a new library build. Here is how it looks:

There is a separate build process template for library builds registered in all team projects

image

The following properties are used to configure the library build:

image

Deploy Folder in Source Control is the server path where the assemblies should be checked in
DeploymentFiles is a list of files and/or extensions to what files to check in. Default here is *.dll;*.pdb which means that all assemblies and debug symbols will be checked in. We can also type for example CommonLibrary.*;SomeOtherAssembly.dll in order to exclude other assemblies

You can also see that we are versioning the assemblies as part of the build. This is important, since the resulting assemblies will be deployed together with the referencing application.


When the build executes, it will see of the matching assemblies exist in source control, if not, it will add the files automatically:


image

After the build has finished, we can see in the history of the TestDeploy folder that the build service account has in fact checked in a new version:

image

Nice! Ler


The implementation of the library build process template is not very complicated, it is a combination of customization of the build process template and some custom activities.
We use the generic TFActivity (http://geekswithblogs.net/jakob/archive/2010/11/03/performing-checkins-in-tfs-2010-build.aspx) to check in and out files, but for the part that checks if a file exists
and adds it to source control, it was easier to do this in a custom activity:


public sealed class AddFilesToSourceControl : BaseCodeActivity { // Files to add to source control [RequiredArgument] public InArgument<IEnumerable<string>> Files { get; set; } [RequiredArgument] public InArgument<Workspace> Workspace { get; set; } // If your activity returns a value, derive from CodeActivity<TResult> // and return the value from the Execute method. protected override void Execute(CodeActivityContext context) { foreach (var file in Files.Get(context)) { if (!File.Exists(file)) { throw new ApplicationException("Could not locate " + file); } var ws = this.Workspace.Get(context); string serverPath = ws.TryGetServerItemForLocalItem(file); if( !String.IsNullOrEmpty(serverPath)) { if (!ws.VersionControlServer.ServerItemExists(serverPath, ItemType.File)) { TrackMessage(context, "Adding file " + file); ws.PendAdd(file); } else { TrackMessage(context, "File " + file + " already exists in source control"); } } else { TrackMessage(context, "No server path for " + file); } } } }

This build template is a very nice tool that makes it easy to do dependency replication with TFS 2010. Next, I will add funtionality for automatically merging the assemblies (using ILMerge) as part of the build, we do this to keep the number of references to a minimum.

Performing Checkins in TFS 2010 Build

Update 15.03.2014 – Fixed broken link to download

*** The custom activity is availabe for download here: https://onedrive.live.com/redir?resid=EE034C9F620CD58D%21168 ***


Often when creating different types of release builds (e.g. where you build something that should be installed or consumed by other applications) there is a need to check in the results of the build back
to source control. A common build type for us at Inmeta is Library Builds, which we use for common libraries that are shared among several applications. We have created a special build process template
for this scenario that handles versioning, copying of the resulting binaries to a pre-defined folder, optionally merges the assemblies using ILMerge, and finally checking that binaries back to TFS as part of the build.

When it comes to communicating with TFS source control during a build, I find that the most flexible appraoch is to wrap the command line tool tf.exe. This tool has all the functionality you need, and if you choose
to implement custom activities for the same functionality you would need to expose a lot of functionality that is very simple to call using tf.exe. There are two major drawbacks of this approach however:

  • You need tf.exe on the build server, e.g. you must install Team Explorer. Generally it is a very good principle to keep the build server as minimal as possible.
  • It is not that easy to invoke command line tools in TFS 2010 Build, it is hard to get the syntax and the paths correct.

If you can live with the first drawback, then we can at least reduce the problems of the other drawback by creating a simple custom activity that wraps some of the nitty gritty details of calling tf.exe.
This is a simple activity, but I have found it useful and hopefully some of you will too.


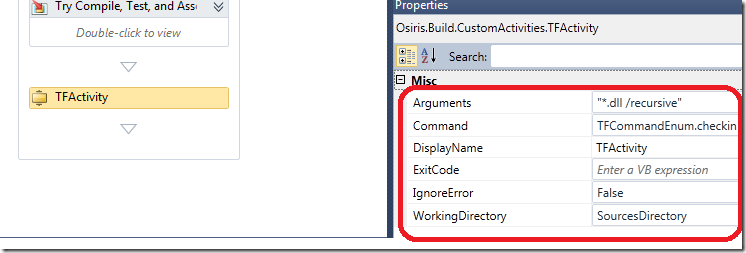
Here is an example of how it looks when it is used in a build process template:

image

Note:

  • The property Command is an enum type which just enumerates all possible commands to tf.exe. This makes it easy to select the correct command and stop you from getting syntax errors.
    The enum is available as well in the download packages
  • You don’t need to know about how tf.exe is called
  • There is an IgnoreError boolean property that will ignore any errors if true (default is false)
  • The Arguments property is the argument to the tf.exe command. In this case, the resulting command will be tf.exe checkin *.dll /recursive
  • WorkingDirectory is mapped to the InvokeProcess.WorkingDirectory. Generally when performing source control operations using tf.exe, you should point the working directory somewhere inside the workspace.
    By doing so, you don’t need to bother about spefcifying workspace or collection URL:s.

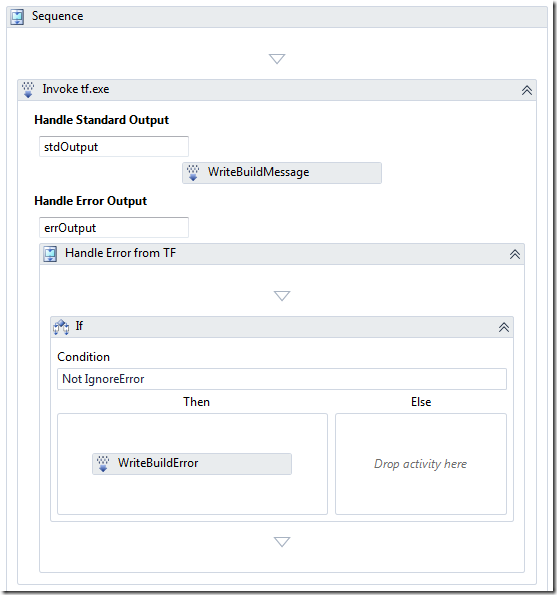
The custom activity itself is pretty simple, it just wraps the call to InvokeProcess, with the standard output/error logging and error checking:

image

This activity is very simple, and can definitely be exended. Let me know if you find it useful and if you have any suggestions for improvements.

Managing Build Process Templates in TFS 2010 Build

One of the great new features in TFS 2010 Build was the ability to define Build Process Templates that can be reused across build definitions. The Build Process Template file itself is a Windows Workflow 4.0 xaml file
and can be stored anywhere in source control. When a developer creates a new build definition in Team Explorer, he can choose from a list of Build Process Templates:

image

This list is populated with the following build process templates:

  • The ones that come out of the box (DefaultTemplate.xaml, UpgradetTemplate.xaml and LabDefaultTemplate.xaml). These are created for every new team project (this can be changed by modifying the process template)
  • Any build process templates that have previously been added for any other build definitions in the same team project.

The last bullet is a bit unintuitive, but it means that if a developer creates a new build definition in team project A, and adds a new build process template (for example by by selecting New and then browse to an existing .xaml file), this
build process template will be available in the process dropdown list for all other build definitions in team project A. It will not be available in team project B, but has to be added in the same way.

Managing Build Process Templates
So, how do you manage your build process templates? If you only have a couple of team projects, this night not be a big problem, but if you like us create a team project for every customer this becomes a problem!. We have created a set
of default build process templates (CI builds, release builds etc..) that we want to use across all team projects, but this requires developers to know where these .xaml files are located. We do not want to duplicate or branch them unless necessary
but instead we store inside a special, internal, team project where all of our software factory related stuff is located.

Fortunately, there is an API that lets you manage build process templates per team project. This API is described by Jason Pricket here http://blogs.msdn.com/b/jpricket/archive/2010/04/08/tfs-2010-managing-build-process-templates-what-are-those.aspx.
I have used the source from his blog post to create a custom activity that lets you deploy your build process templates across all team projects using TFS 2010 Build. This means that when you have added a new team project, or a new build process template,
you just run the build and it will automatically update all team projects with the build process templates.


Custom Activity
The custom activitiy is called DeployBuildProcessTemplates and has 3 parameters:

  • BuildProcessTemplates – The list with the source control paths to the build process templates that you want to deploy
  • ExcludeTeamProjects – A list that lets you exclude one or more team projects, in case you do not want to deploy the build process templates to all team projects
  • Workspace – This is the workspace property from the build process template, and is used to retrieve the list of team projects (using the VersionControlServer property)

(Note that the custom activity inherits from an internal base class that among other things contain the TrackBuildMessage method which is just a helper method for writing to the build output log)

[BuildActivity(HostEnvironmentOption.All)] public sealed class DeployBuildProcessTemplate : BaseCodeActivity { // Define an activity input argument of type string [BrowsableAttribute(true)] [RequiredArgument] public InArgument<StringList> BuildProcessTemplates { get; set; } // Define an activity input argument of type string [BrowsableAttribute(true)] public InArgument<StringList> ExcludeTeamProjects { get; set; } [RequiredArgument] [BrowsableAttribute(true)] // Define an activity input argument of type string public InArgument<Workspace> Workspace { get; set; } // If your activity returns a value, derive from CodeActivity<TResult> // and return the value from the Execute method. protected override void Execute(CodeActivityContext context) { IBuildDetail currentBuild = context.GetExtension<IBuildDetail>(); var vcs = this.Workspace.Get(context).VersionControlServer; foreach (var teamProject in vcs.GetAllTeamProjects(true)) { TeamProject project = teamProject; if( !ExcludeTeamProjects.Get(context).Any(tp => tp == project.Name)) { // Deploy templates to team project BuildProcessTemplateHelper helper = new BuildProcessTemplateHelper(currentBuild.BuildServer, project.Name); foreach (var processTemplate in BuildProcessTemplates.Get(context)) { if (helper.AddTemplate(processTemplate, ProcessTemplateType.Custom)) { TrackMessage(context, string.Format("Deployed build process template {0} to team project {1}", processTemplate, project.Name)); } } } } } }

The custom activity just loops through all team projects that are not part of the ExcludeTeamProjects list, and the calls AddTemplate on another class. This method looks like this:

public class BuildProcessTemplateHelper { private readonly IBuildServer buildServer; private readonly string teamProject; public BuildProcessTemplateHelper(IBuildServer buildServer, string teamProject) { this.buildServer = buildServer; this.teamProject = teamProject; } public bool AddTemplate(String serverPath) { bool templateAdded = false; var template = GetBuildProcessTemplate(serverPath); if (template == null) { template = buildServer.CreateProcessTemplate(teamProject, serverPath); template.Save(); templateAdded = true; } return templateAdded; } public IProcessTemplate GetBuildProcessTemplate(string serverPath) { IProcessTemplate[] templates = buildServer.QueryProcessTemplates(teamProject); return templates.FirstOrDefault(pt => pt.ServerPath.Equals(serverPath, StringComparison.OrdinalIgnoreCase)); } }

Build Process Template

To use the custom activity, just drop it somewhere inside the Run on Agent activity and define the list of build process templates that you want to deploy.


Note:
The build service account must have the Edit Build Definition permission in all team projects, otherwise it won’t be able to modify this information.


image

The AddTemplate method first checks to see if the build process template already exists, otherwise it adds the path to the list of build process templates for the team project.

Rather simple, thanks to Jason for the sample code in his blog post.


When running the build, we can see in the build log which team projects that have been updated:

image

Developing and debugging Server Side Event Handlers in TFS 2010


Update 2012-01-23: Added note about .NET framework

Martin Hinshelwood wrote an excellent post recently  http://nakedalm.com/team-foundation-server-2010-event-handling-with-subscribers/ ) about a new type of integration
available in TFS 2010, namely server side event handlers, that is executed within the TFS context. I wasn’t aware of this new feature and as Martin notes, there doesn’t seem to be any material/documentation of it at all.

Previously, when you wanted some custom action to be executed when some event occurs in TFS (check-in, build completed…) you wrote a web/WCF service with a predefined signature and subscribed to the event using bissubscribe.exe.
Usually you want to get more information from TFS than what is available in the event itself so you would have to use the TFS client object model to make new requests back to TFS to get that information.
The deployment of these web services is always a bit of a hassle, especially around security. Also there is no way to affect the event itself, e.g. to stop the event from finishing depending on some condition. This can be done using
server side events.

The deployment of a server side event handler couldn’t be simpler, just drop the assembly containing the event handlers into the Plugins folder of TFS, which is located at 
C:Program FilesMicrosoft Team Foundation Server 2010Application TierWeb ServicesbinPlugins. TFS monitors this directory from any change and will restart itself automatically, so the latest version will
always be executed.

In this first post on this subject, I will describe how to set up your development environment to make it easy to both deploy and debug your event handler. 

  1. Install TFS 2010
    I recommend that you install a local copy of TFS 2010 on your development machine. For this scenario, you only need the Basic version which is a breeze to install. It took me about 10-15 minutes to install and configure it the last time I did it.
    This will make your TFS development and customization much more efficient than using a share remote server, and you can pretty much assault it as much as you want since it is your private server! Ler
  2. Run Visual Studio 2010 as admin
    To be able to deploy your event handler automatically (see next step), you need to run Visual Studio in administration mode
  3. Create the Event Handler project
    To setup the project, create a standard C# class library.
    Note that the project must be .NET 3.5 (or lower), NOT .NET 4.0 since TFS is running on .NET 2.0 it can’t load a .NET 4.0 assembly in the same app domain.

    Martin has written about what you need to reference in his post. Since he was using VB.NET in his sample, I thought that I include a C# version of a minimal WorkItemChanged event handler:

    using System; using System.Diagnostics; using Microsoft.TeamFoundation.Common; using Microsoft.TeamFoundation.Framework.Server; using Microsoft.TeamFoundation.WorkItemTracking.Server; namespace TFSServerEventHandler { public class WorkItemChangedEventHandler : ISubscriber { public Type[] SubscribedTypes() { return new Type[1]{typeof(WorkItemChangedEvent)}; } public EventNotificationStatus ProcessEvent(TeamFoundationRequestContext requestContext, NotificationType notificationType, object notificationEventArgs, out int statusCode, out string statusMessage, out ExceptionPropertyCollection properties) { statusCode = 0; properties = null; statusMessage = String.Empty; try { if (notificationType == NotificationType.Notification && notificationEventArgs is WorkItemChangedEvent) { WorkItemChangedEvent ev = notificationEventArgs as WorkItemChangedEvent; EventLog.WriteEntry("WorkItemChangedEventHandler", "WorkItem " + ev.WorkItemTitle + " was modified"); } } catch (Exception) { } return EventNotificationStatus.ActionPermitted; } public string Name { get { return "WorkItemChangedEventHandler"; } } public SubscriberPriority Priority { get { return SubscriberPriority.Normal; } } } }

    This event handler doesn’t do enything interesting, but just logs information about the modified work item in the event log.

  4. Deploy your event handler

    Open the project properties and go to the Build tab. Modify the Output Path by browsing to the Plugins directory (see above). This will result in a new

    deployment of your event handler every time you build. Neat! 🙂

    If you look in the Event log after you compile your project, you will see entries from TFS Services that looks like this:

     image


    As you can see, TFS has noticed that a new version of the event handler has been dropped in the plugins folder and therefor it is performing a restart. You will notice that TFS becomes temporarily unavailable while this happens.

    Try modifying a work item and verify that information about it is written in the event log. (Note: You will need to create a event source called “WorkItemChangedEventHandler”, otherwise the EventLog.WriteEntry call will fail.

  5. Debug the event handler

    Since these types of events aren’t very well documented it’s useful to debug the event handlers just to find out how your handler is called and what the parameters contain.

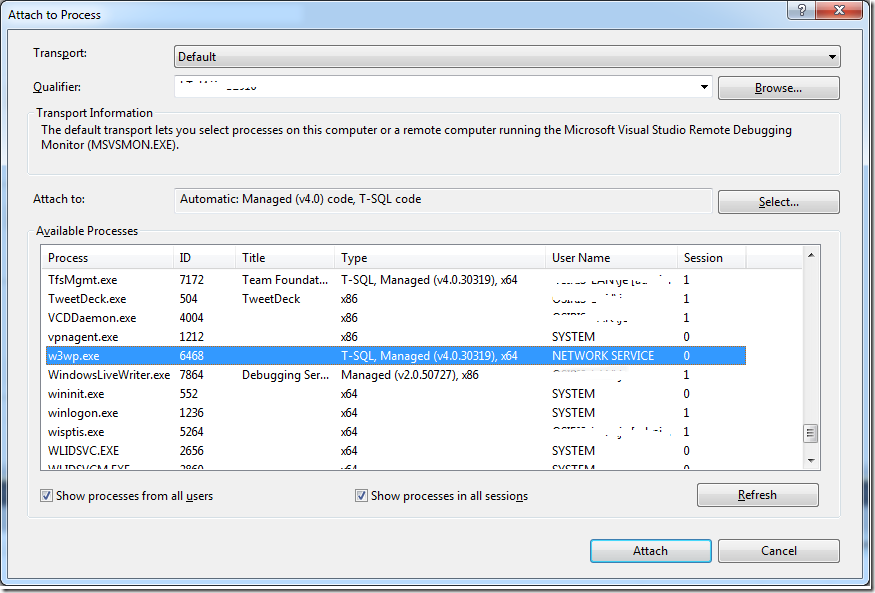
    To do this, to to the Debug menu och select Attach to Process. Check both Show processes from all users and Show processes in all sessions and locate the w3wp process that hosts TFS.

    image

    Select Attach to start the debugging session. Set a break point in the ProcessEvent method and then modify a work item in TFS. This should cause your event handler to be executed immediately:


    image

Merging Work Items in TFS 2010

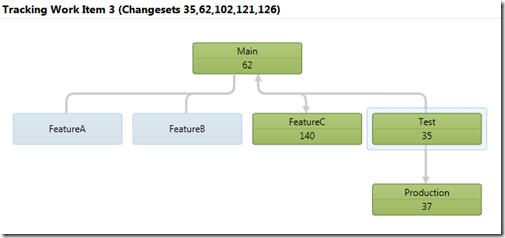
In TFS 2010, branching and merging have been greatly improved with support for branch visualization and tracking of changesets and work items across branches. A simple example of this looks like this:

image       image

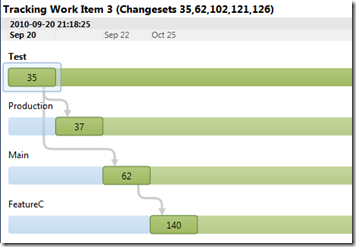
Here we track Work Item nr 3 which was originally resovled in the Test branch (with changeset 35). We can also see that the work item has been merged into the Production branch (as changeset 37), back to Main (62) and finally to FeatureC (140).
If we switch to the Timeline view, we get a nice view of the order of these merges, together with the dates.


Unfortunately, this does not solve one of the bigger problems when it comes to branches and work items. When you merge your changes into another branch, you must remember to asociated the corresponding work item again, otherwise that information is lost and the work item will not show up in the build report from the builds running off the target branches. A typical example is that we have 3 bugs in the Test branch, and we perform (at least) 3 changesets and each changeset is associated to the corresponding work item. When it is time to merge the bug fixes to the Production branch, we must manually associated the merge with the work item again. If we peform one merge operation that brings all changes from Test to Main, we must associate all 3 work items. There is really no support for “merging” work items across branches in TFS, only changesets can be merged.

What you really want is to have the tool automatically assign the work items that were associated with the changesets that you are merging. One way to implement this is with a checkin policy, which we have done at our company. The reason for choosing a checkin policy as the tool of choice is because it is executed on the client at the time of the checkin, and we can display the work items to the developers before they check in.

So, how does it work? Lets look at an example:

In my development branch, I have 3 bugs (Bug1, Bug2 and Bug3) that I need to fix. I fix each one in a changeset that gets checked in and associated with the corresponding work item. Then it is time to merge the fixes to the Main branch (trunk).
I perform a merge by just using the normal Merge operation from source control. This leaves me with the following pending merge:

clip_image002


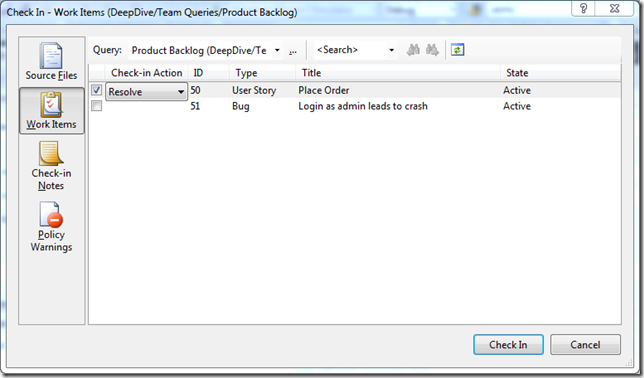
Now, I would normally go to the Work Items tab and link to the work items that I know were resolved by the changes that I am currently merging. But now I don’t need to do this but instead I just click on the Check In button. This will evaluate all checkin policies, and one of them is the Merge Work Items policy that pops up the following dialog:

clip_image002[5]

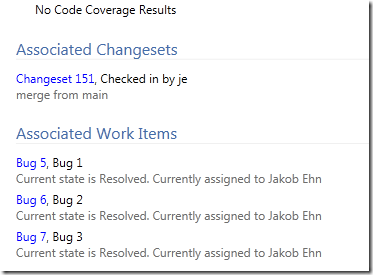
This dialog shows me a list of the work items that were associated with the changesets that I am currently merging in. The checkin policy uses the TFS Version Control API to locate the merge sources of each pending merge item and basically shows the union of these work items (several changesets can be associated with the same work item). If I check in now, the changeset will automatically be associated with these 3 work items! The beauty of this comes when running the builds off the Main branch, the build summary show me that these 3 work items have been resolved in this build:


image

In another post I will show the interesteing parts of the implementation

TFS 2010 DeepDive i Stockholm i oktober

Note: Swedish post

Efter att ha kört många seminarier, workshops och deep dive kurser på Visual Studio och TFS 2010 i Norge är det nu äntligen dags för oss att köra kurs i Sverige!

Första tillfället blir nu i oktober på Cornerstone 18-21 Oktober. Saxat från kursbeskrivningen:


T359 – Effektiv systemutveckling med Visual Studio och Team Foundation Server 2010

I denna utbildning lär vi dig hur du och din organisation kan effektivisera systemutvecklingsprocessen med hjälp av Visual Studio och Team Foundation Server. Målgruppen för denna kurs är främst utvecklare och arkitekter men den är lämplig även för testare och den som ansvarar för metoder och processer.

Du lär dig

Du lär dig att jobba effektivt med bland annat källkodshantering, branching, change tracking, work items, automatiska byggen, tester och mycket annat.

Ämnesområden

  • Introduktion/Arkitektur
  • “Lap around TFS”
  • Source Control
    Branching/Branch Visualization
    Branching scenarios och hur dessa implementeras i TFS
    Change tracking, hur man kan spåra vilka ändringar (work items) som har blivit mergade till olika branches
    Checkin Policies
    Deployment/Uppgradering
  • Work Items Introduktion
  • Genomgång av de vanligaste TFS process templates (MSF Agile/CMMI, MS Scrum, Scrum for Team System.)
  • Work Items Customization
  • TFS Process Templates och Process Guidance
  • Team Foundation Build Overview/Arkitektur
  • Build Controllers/Build Agenter
  • Windows Workflow 4.0
  • Uppgradering från TFS 2005/2008
  • Test Overview/Arkitektur
  • Test planer, Test Suites och Test Cases
  • Microsoft Test Manager (MTM)
  • Test Automation
  • TFS Customization/Extensibility
  • TFS Events
  • TFS API


Anmäl er här:

http://www.cornerstone.se/Web/Templates/CoursePage.aspx?id=2513&course=COUR2010083117182403594425&epslanguage=SV

Vi ses där! 🙂