Meet Azure DevOps – formerly known as VSTS

Today Microsoft announced Azure DevOps, which is partly a rebranding of the existing Visual Studio Team Services but also has some exciting news.

The gist of the rebranding is that Azure DevOps is now a suite of service, where each service cna be acquired and used separately from the other ones. If you only want to use source control (and use some other CI/CD system) that’s fine.

Do you have your code over at GitHub and want to use the CI/CD services in Azure DevOps? Works perfectly! By breaking the whole suite down into smaller services, it will make it easier for customers to find the best fit for their needs, without having to invest in the whole suite. Of course, you will still be able to easily get the whole suite when creating new accounts.

The new services as of today are (from the link above):

Azure Pipelines Azure Pipelines

CI/CD that works with any language, platform, and cloud. Connect to GitHub or any Git repository and deploy continuously.

NB: This also includes a very generous offering targeted towards Open Source projects, where you get unlimited build minutes and 10 parallell build jobs

Azure Boards Azure Boards

Powerful work tracking with Kanban boards, backlogs, team dashboards, and custom reporting.

Azure Artifacts Azure Artifacts

Maven, npm, and NuGet package feeds from public and private sources.

Azure Repos Azure Repos

Unlimited cloud-hosted private Git repos for your project. Collaborative pull requests, advanced file management, and more.

Azure Test Plans Azure Test Plans

All in one planned and exploratory testing solution.

A Deep Dive into continuous delivery and Microservices on Azure

In March, Mathias Olausson and I will run two fullday deep dive in continuous delivery and microservices on Azure.

During the day you will learn about microservice architecture and how to build and deploy these using container technology and cloud services in Microsoft Azure.

The agenda looks like this:

  • Microservices architecture
    • Design principles
    • Breaking up the monolith
  • Implementing trunk based development practices with Visual Studio Team Services
    • Feature flags
    • Pull requests
    • Branch/Build policies
  • Using container techonologies for packaging and delivering applications with zero downtime
    • Docker for Windows
    • Kubernetes
    • Azure Container registry
    • Azure Container Services (AKS)

  • Deployment pipelines with Visual Studio Team Services
    • Build automation
    • Release management

Read more about the course here, and sign up:

https://www.activesolution.se/event/a-deep-dive-into-continuous-delivery-and-microservices-on-azure/

Hope to see you either in Gothenburg or in Stockholm!

Deploying ARM Templates using Visual Studio Team Services

If you are running your applications in Azure, and in particular on PaaS, you need to take a look ARM templates as a way to manage your environments. ARM templates let’s you define and deploy your entire environment using JSON files that you store together with the rest of your source code. The deployment of ARM templates are idempotent, meaning that you can run them many times and it will always produce the same result.

Image result for azure ARM templates

In this post, I will how you how to deploy ARM templates together with your application using Visual Studio Team Services. As you will see, I will not use the out of the box task for doing this, since it has some limitations. Instead we will use a PowerShell script to eexecute the deployment of an ARM template.


The overall steps are:

  • Defining our ARM template for our environment.
  • Tokenize the ARM template parameters file
  • Create a PowerShell script that deploys the ARM template
  • Deploy everything from a VSTS release definition.

Let’s get started with the ARM template.

ARM Template

In this case, I will deploy an ARM template consisting of a Azure web app, a SQL Server + database and a Redis Cache. The web app and sql resources are easy to deploy, since we can supply all the input from my release definition.
With the Redis cache however, Azure Resource Manager will create some information (such as the primarykey) as part of the deployment, which means we need to read this information from the output of the ARM template deployment.

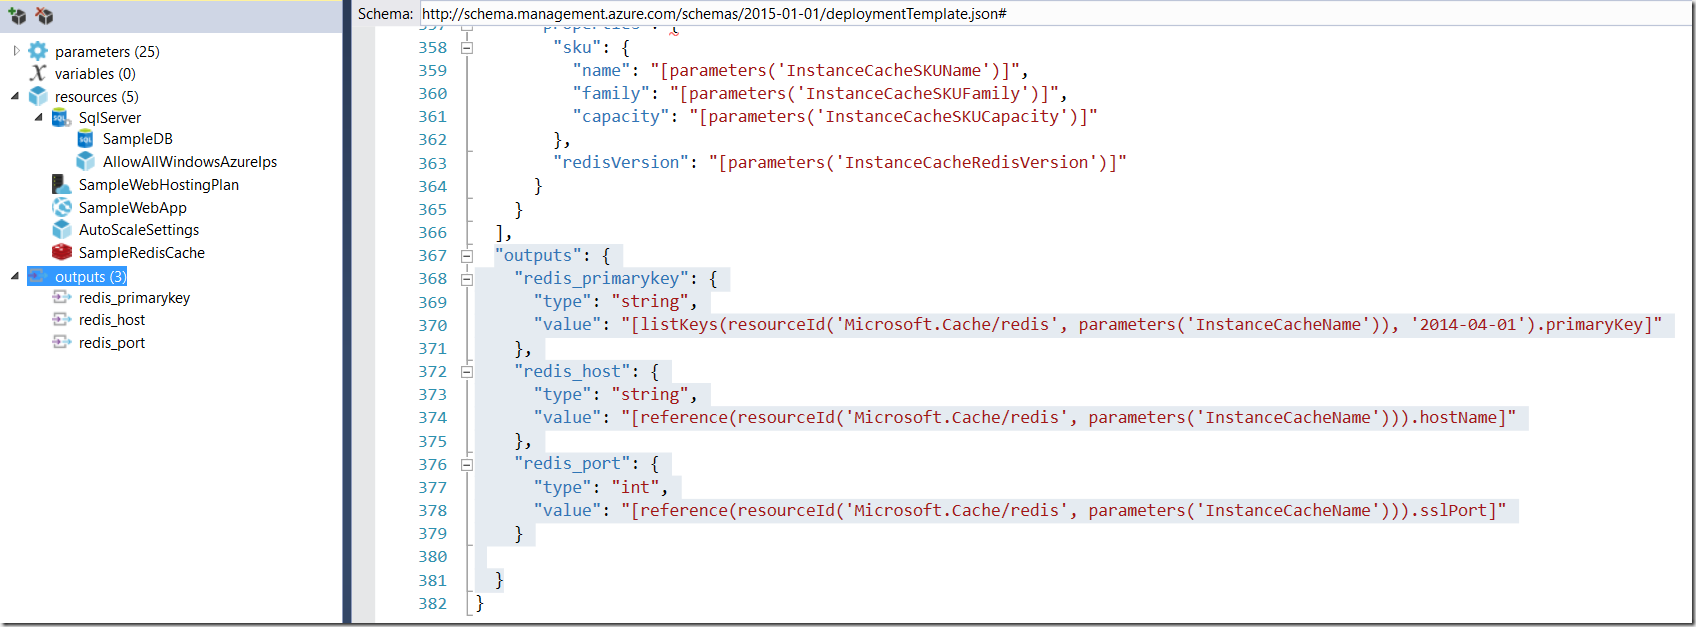
Here is the outline of our ARM template:
image


Note the outputs section that is selected above, here we define what output we want to capture once the reource group has been deployed. In this case, I have defined three output variables:

  • redis_host
    The fully qualified edish host name
  • redis_port
    The secure port that will be used to communicate with the cache
  • redis_primatykey
    The access key that we will use to authenticate

Since our web application will communicate with the Redis cache, we need to fetch this information from the ARM template deployment and store them in our web.cofig file. You will see later on how this can be done.
 

Learn more about authoring ARM templates here: https://docs.microsoft.com/en-us/azure/azure-resource-manager/resource-group-authoring-templates


ARM Template Tokenization

When deploying our template in different environments (dev, test, prod…) we need to supply the information specific to those environment. In VSTS Release Management, the information is stored using environment variables.
A common solution is to tokenize the files that is needed for deployment and then replace these tokens with the corresponding environment variable.

To do this, we add a separate parameters file for the template that contains all the parameters but all the values are replaces with tokens:


{
    “$schema”: “
http://schema.management.azure.com/schemas/2015-01-01/deploymentParameters.json#”,
    “contentVersion”: “1.0.0.0”,
  “parameters”: {
    “hostingPlanName”: {
      “value”: “__HOSTINGPLANNAME__”
    },
    “administratorLogin”: {
      “value”: “__ADMINISTRATORLOGIN__”
    },
    “administratorLoginPassword”: {
      “value”: “__ADMINISTRATORLOGINPASSWORD__”
    },
    “databaseName”: {
      “value”: “__DATABASENAME__”
    },
    “webSiteName”: {
      “value”: “__WEBAPPNAME__”
    },
    “sqlServerName”: {
      “value”: “__SQLSERVERNAME__”
    },
    “dictionaryName”: {
      “value”: “__DATABASENAMEDICTIONARY__”
    },
    “extranetName”: {
      “value”: “__DATABASENAMEEXTRANET__”
    },
    “instanceCacheName”: {
      “value”: “__INSTANCECACHENAME__”
    }

  }
}


We wil then replace these tokens just before the template is deployed.

PowerShell script

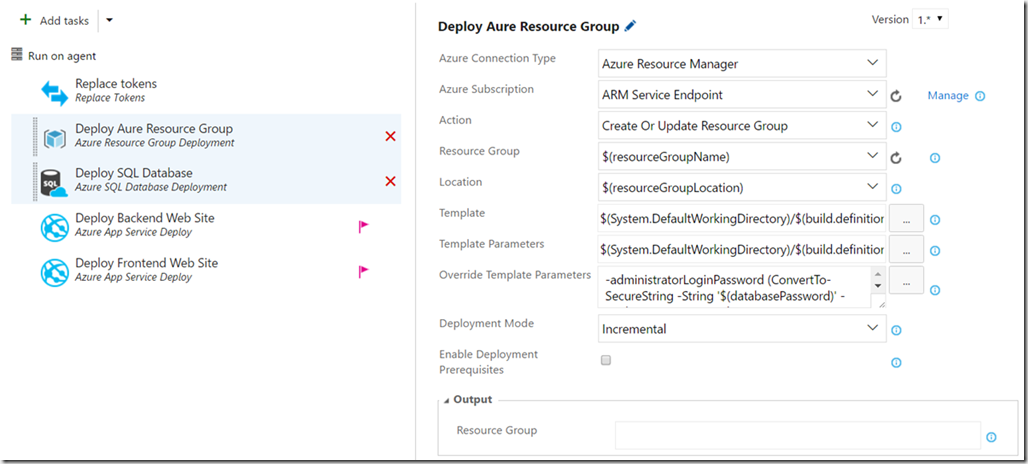
There is an existing task for creating and updating ARM templates, called Azure Resource Group Deployment. This task let’s us point to an existing ARM template and the corresponding parameter file.

Here is an example how how this task is typically used:
 

image


The problem with this task is that it has very limited support for output parameters. As you can see in the image above, you can map a variable to the output called Resource Group. Unfortunately there is an assumption that the resource group that you are creating contains virtual machines. If you execute this task with an ARM template containing for example an Azure Web App you will get the following error when trying to map the output to a variable:


2017-01-23T09:09:49.8436157Z ##[error]The ‘Get-AzureVM’ command was found in the module ‘Azure’, but the module could not be loaded. For more information, run ‘Import-Module Azure’.

So, to be able to read our output values we need to use PowerShell instead, which is arguably a better choice anyway since it allows you to run and test the deployment locally,  saving you a lot of time.

When we create an Azure Resource Group project in Visual Studio, we get a PowerShell script that we can use as a starting point.


image


Most part of this script handles the case where we need to upload artifacts as part of the resource group deployment. In this case we don’t need this, we deploy all our artifacts from RM after the resource group has been deployed.

Here is our PowerShell script that we will use to deploy the template:


#Requires -Version 3.0
#Requires -Module AzureRM.Resources
#Requires -Module Azure.Storage

Param(
    [string] [Parameter(Mandatory=$true)] $ResourceGroupLocation,
    [string] [Parameter(Mandatory=$true)] $ResourceGroupName,
    [string] [Parameter(Mandatory=$true)] $TemplateFile,
    [string] [Parameter(Mandatory=$true)] $TemplateParametersFile
)

Import-Module Azure -ErrorAction SilentlyContinue

try {
    [Microsoft.Azure.Common.Authentication.AzureSession]::ClientFactory.AddUserAgent(“VSAzureTools-$UI$($host.name)”.replace(” “,”_”), “2.9”)
} catch { }

Set-StrictMode -Version 3

$TemplateFile = [System.IO.Path]::GetFullPath([System.IO.Path]::Combine($PSScriptRoot, $TemplateFile))
$TemplateParametersFile = [System.IO.Path]::GetFullPath([System.IO.Path]::Combine($PSScriptRoot, $TemplateParametersFile))

# Create or update the resource group using the specified template file and template parameters file
New-AzureRmResourceGroup -Name $ResourceGroupName -Location $ResourceGroupLocation -Verbose -Force -ErrorAction Stop

$output = (New-AzureRmResourceGroupDeployment -Name ((Get-ChildItem $TemplateFile).BaseName + ‘-‘ + ((Get-Date).ToUniversalTime()).ToString(‘MMdd-HHmm’)) `
                                   -ResourceGroupName $ResourceGroupName `
                                   -TemplateFile $TemplateFile `
                                   -TemplateParameterFile $TemplateParametersFile -Force -Verbose)

Write-Output (“##vso[task.setvariable variable=REDISSERVER]” + $output.Outputs[‘redis_host’].Value)
Write-Output (“##vso[task.setvariable variable=REDISPORT]” + $output.Outputs[‘redis_port’].Value)
Write-Output (“##vso[task.setvariable variable=REDISPASSWORD;issecret=true]” + $output.Outputs[‘redis_primarykey’].Value)


The special part of this script is the last three lines. Here, we read the output variables that we defined in the ARM template and then we use one of the VSTS logging commands to map these into variables that we can use in our release definition.

The syntax of the SetVariable logging command is ##vso[task.setvariable variable=NAME]<VARIABLEVALUE>. 


Note: You can read more about these commands at https://github.com/Microsoft/vsts-tasks/blob/master/docs/authoring/commands.md


Release Definition

Finally we can put all of this together by creating a release definition that deploys the ARM template.


Note
: You will of course need to create a build definition that packages your scripts, ARM templates and deployment artifacts. I won’t show this here, but just reference the outputs from an existing build definition.


Here is what the release definition will look like:

image


Let’s walk through the steps:

  1. Replace tokens
    Here we replace the tokens in our parameters.json file that we definied earlier. There are several tasks in the marketplace for doing token replacement, I’m using the one from Guillaume Rouchon (https://github.com/qetza/vsts-replacetokens-task#readme)
  2. Deploy Azure environment
    Run the PowerShell scipt using the Azure PowerShell task. This task handles the connection to Azure, so we don’t have to think about that.

    image

    Here I reference the PowerShell script from the build output artifacts, and also I supply the necessary parameters to the PS script:

    Script Arguments
    -ResourceGroupLocation “$(resourceGroupLocation)” -ResourceGroupName $(resourceGroupName) -TemplateFile “$(System.DefaultWorkingDirectory)/SampleApp.CI/environment/templates/sampleapp.json” -TemplateParametersFile “$(System.DefaultWorkingDirectory)/SampleApp.CI/environment/templates/sampleapp.parameters.json”

  3. Replace tokens
    Now we need to update the tokens in our SetParameters file, that is used by web deploy. It is important that we run this task after running the deploy azure enviroment script, since we need the output variables from the resource group deployment. Remember, these variables are now available as environment variables, so they will be inserted in the same way as the variables that we have defined manually.

  4. Deploy Web app + Deploy SQL Database
    These steps just performs a simple deployment of an Azure Web App and a SQL dacpac deployment.


That’s it, happy deployment! Smile

New Swedish Meetup Group for Microsoft ALM and DevOps

We have decided that it is time to create a meetup group for people that are interested in the Microsoft ALM and DevOps story!

image


Together with Mathias Olausson and a few other people we have created a new Meetup group and announced the first meeting.


Our plan is to continue meeting every month or so to learn about and dicuss new concept and ideas in the area of ALRM and DevOps on the Microsoft stack. This is a wide area, which spans all roles in the development process,
so there will be something for everyone.


First meetup: Microsoft Team Services Agile Transformation Story + VS ALM Update

The first meeting is set to October 25th, where we will have Jose Rady Allende, a Program Manager on the Visual Studio Team Services tean, join us online to talk about the Microsoft Team Service Agile Transformation story.
We’ll also going to have a few lightning talks where we will talk about recent new additions to the TFS/VSTS platform

Meeting link:

http://www.meetup.com/swedish-ms-alm-devops/events/234449734/


There are already around 25 people that have signed up for it, so sign up before it gets full!


Heop to see you there!


Image result for donovan brown devops

Using Web Deploy in Visual Studio Team Services Release Management

This post does not really cover something new, but since I find myself explain this to people now and then, I thought that I’d write a quick post on the subject.

So, we want to create a web deploy package as part of our automated build, and then take this package and deploy it to multiple environments, where each environment can have different configuration settings, using VSTS Release Management. Since we only want to build our package once, we have to apply the environment specific settings at deployment time, which means we will use Web Deploy parameters.


Here are the overall steps needed:

  1. – Create a parameters.xml file in your web project
  2. – Create a publish profile for the web deploy package
  3. – Set up a VSTS build creates the web deploy package, and uploads the package to the server
  4. – Create a Release definition in VSTS that consumes the web deploy package
  5. – In each RM environment, replaces the tokens in the SetParameters file

Let’s run through these steps in detail:

Create a parameters.xml file

As you will see later on, a publish profile contains configurable settings for the web site name and any connection strings,that will end up in the *.SetParameters.xml file that is used when at deployment time. But in order for other configuration settings, like appSettings, to end up in this file, you need to define these settings. This is done by creating a file called parameters.xml in the root of your web application.

Tip: A fellow MVP, Richard Fennell,  has created a nifty Visual Studio extension that simplifies the process of creating the parameters.xml file. It will look at your web.config file and the create a parameters.xml file with all the settings that it finds.

image


In this case, I have three application settings in the web.config file, so I end up with this parameters.xml file. Note that I have set the defaultvalue attribute for all parameters to __TOKEN__. These are the configuration values that will end up in the MyApp.SetParameters.xml file, together with the web deployment package. We will replaced these values at deployment time, by a task in our release definition.

<parameters> <parameter name="IsDevelopment" description="Description for IsDevelopment" defaultvalue="__ISDEVELOPMENT__" tags=""> <parameterentry kind="XmlFile" scope="\\web.config$" match="/configuration/applicationSettings/MyApp.Properties.Settings/setting[@name='IsDevelopment']/value/text()" /> </parameter> <parameter name="WebApiBaseUrl" description="Description for WebApiBaseUrl" defaultvalue="__WEBAPIBASEURL__" tags=""> <parameterentry kind="XmlFile" scope="\\web.config$" match="/configuration/applicationSettings/MyApp.Properties.Settings/setting[@name='WebApiBaseUrl']/value/text()" /> </parameter> <parameter name="SearchFilterDelta" description="Description for SearchFilterDelta" defaultvalue="__SEARCHFILTERDELTA__" tags=""> <parameterentry kind="XmlFile" scope="\\web.config$" match="/configuration/applicationSettings/MyApp.Properties.Settings/setting[@name='SearchFilterDelta']/value/text()" /> </parameter> </parameters>

Creating a Publish Profile

Now, let’s create a publish profile that define how the web deployment package should be created. Right-click on the web application project and then select Publish. Then select the Custom option:

image


Since the publish profile will be used to create a web deployment package, I like to call it CreatePackage (but you are of course free to call it whatever you want)

image

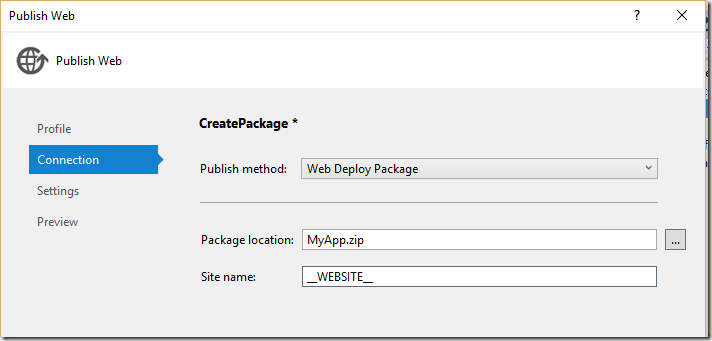
On the Connection tab, select Web Deploy Package as the publish method, then give the generated package a name (including .zip).

As the Web Site name, we enter a tokenized value __WEBSITE__. This token will also end up in the MyApp.SetParameters.xml file.

image

Save the publish profile and commit and push your changes. Now it’s time to create a build definition.


Create a Build Definition that generates a web deploy package

I won’t go through all the details of creating a build definition in VSTS, but just focus on the relevant parts for this blog post.

To generate a web deploy package, we need to pass some magic MSBuild parameters as part of the Visual Studio build task. Since we have a publish profile that contains our settings, we need to refer to this file. We also want to specify where the resulting files should be placed.

Enter the following string in the MSBuild Arguments field:

/p:DeployOnBuild=true /p:PublishProfile=CreatePackage /p:PackageLocation=$(build.stagingDirectory)

image


DeployOnBuild=true is required to trigger the web deployment publishing process, and the we use the PackageLocation property to specify that the output should be places in the staging directory of the build. This will make it easy to upload the artifacts at the end of the build, like so:

image


This will generate an artifact called drop in the build that contains all files needed to deploy this application using MSDeploy:

image

As you can see, we have all the generated web deploy files here. We will use three of them:

MyApp.zip – The web deploy package

MyApp.SetParameters.xml – The parameterization file that contains our tokenized parameters

MyApp.Deploy.cmd – A command file that simplifies running MSDeploy with the correct parameters


Creating a Release Definition

Finally, we will create a release definition that deploys this web deploy package to two different environments, let’s call them Test and Prod. In each environment we need to apply the correct configuration values. To do this, we have to replace the token variables in our MyApp.SetParameters.xml file.

There is no out of the box task to do this currently, but there are already several of them in the Visual Studio Marketplace. Here, I will use the Replace Tokens task from Guillaume Rochon, available at https://marketplace.visualstudio.com/items?itemName=qetza.replacetokens. Install it to your Visual Studio Team Services account, and then the task will be available in the build/release task catalog, in the Utility category:


image


Each environment in the release definition will just contain two tasks, the first one for the token replacement and the other one for deploying the web deploy package. To do this, we just run the MyApp.deploy.cmd file that was generated by the build. Since the parameters have already been set with the correct values, we can just run this without any extra arguments.

image


Also, we must specify the values for each variable in the environment. Right click on the environment and the add these variables:

image


Tip: Create the Test environment first with all variables and tasks. Once it’s done, use the Clone environment feature to create a Prod environment, and then just replace the configuration values


That’s it, now you can run the release and it will deploy your web application with the correct configuration to each environment.


image


Talking Visual Studio ALM Extensibility at DevSum16

Last year I had a great time speaking at the DevSum conference, the biggest .NET developer conference in Sweden. Back then, I talked about moving your development to the cloud using Visual Studio Team Services. Active Solution, where I work, was a gold partner for this event and in addition to me my colleagues Alan Smith and Peter Örneholm also spoke at the conference. We had a lot of fun in our booth showing the Lego robots running on Raspberry PIs, connected to Azure for movement control and result collection.

This year I had the fortune to be selected again to speak at DevSum16, and this time I will talk about the different options around integration and extensibility of the Visual Studio ALM platform. This means that I will talk about things like Service Hooks, OAuth, REST API and UI extensibility among other things.


Here is the session description (http://www.devsum.se/speaker/jakob-ehn/), hope to see you there!

Don’t be locked in – Integrate and Extend the Visual Studio ALM Platform

The days when you used one tool chain for all your development are long gone. Developing modern applications today often requires a variety of tools, both 3rd party tools and services

but also homegrown systems are often used as part of the process. In the new era of Microsoft the term “Open ALM” is key, focusing on trying to build best in breed tools for software development companies, but at the same time make sure that it is open and extensible.


In this session we will look at the different options for integrating and extending Visual Studio TFS and Team Services. We will look at:

  • Using Service Hooks to automate workflows with other services such as Trello, GitHub and Jenkins.
  • Utilizing the REST API to automate processes in TFS
  • Extending the Web UI itself with custom extensions, from simple context menus to full-fledged custom pages and hubs. We will also look at how we can publish these extensions
    to the new Visual Studio Marketplace

Publish a GitHub Release from Visual Studio Team Services

The new build system in Team Foundation Server 2015 and Visual Studio Team Services has from the start made it very easy to integrate with GitHub. This integration allows you to create a build in TFS/VSTS that fetches the source code from a GitHub repository. I have blogged about this integration before, at http://blog.ehn.nu/2015/06/building-github-repositories-in-tfs-build-vnext/.


Publisinh a GitHubRelease from VSTS

This integration allows you to use GitHub for source code, but use the powerful build system in TFS/VSTS to run your automated builds. But, when maintaining the project at GitHub you often want to publish your releases there as well, with the output from your build.

To make this easy, I have developed a custom build task lets you publish your build artifacts into a release at GitHub.

The task is available over at the new Visual Studio Marketplace, you can find the extension here:
https://marketplace.visualstudio.com/items?itemName=jakobehn.jakobehn-vsts-github-tasks


image

To use it, just press the Install button and select the VSTS account where you want to install it. After this, the Publish GitHub Release build task will be available in your build task catalog, in the Deploy category.

image


From Team Foundation Server 2015 Update 2, it is possible to install the extensions from the VS Marketplace on premise. To do so, use the Download button and follow the instructions.


After adding the build task to a build definition, you need to configure a few parameters:

image

These parameters are:

  • Application Name
    You can use any name here, this is what is sent to the GitHub API in the request header.
  • Token
    Your GitHub Personal Access Token (PAT). For more information about GitHub tokens, please see https://help.github.com/articles/creating-an-access-token-for-command-line-use/

    Repository Name
    The name of the repository where the release should be created

  • Owner
    The GitHub account of the owner of the release
  • Tag Name
  • A unique tag for the release. Often it makes sense to include the build number here
  • Release Name
    The name of the release. Also, including the build number here can make sense
  • Draft
    Enable this to create a draft release
  • Prerelease
    Enable this to create a prerelease

    Assets to upload
    Specified which files that should be included in the GitHub release


Hope that you will find this extension useful, if you find bugs or have feature suggestions, please report them on the GitHub site at https://github.com/jakobehn/VSTSGitHubTasks

Deploy Azure Web Apps with Parameterization

I have blogged before about how to deploy an Azure Web App using the new build system in TFS 2015/Visual Studio Team Services. In addition to configure an Azure service endpoint, it is really only a matter of using the built-in Azure Web App Deployment task.

However, in many cases I have decided not to use this task myself since it has been lacking a key feature: Applying deployment parameters using the SetParameter.xml file.

As I have mentioned a gazillion times, building your binaries once and only once is a key principle when implementing continuous delivery. If you are using web deploy for deploying web applications (and you should), you must then use Web Deploy parameters to apply the correct configuration values at deployment time.


Under the hood the Azure Web App Deployment  task uses the Publish-AzureWebsiteProject cmdlet that uses web deploy to publish a web deploy package to Microsoft Azure. Up until recently, this cmdlet did not support web deploy parameters, the only thing that you could substitute was the connecting string, like so:

Publish-AzureWebsiteProject -Name site1 -Package package.zip -ConnectionString @{ DefaultConnection = "my connection string" }

However, it is actually possible to specify the path to the SetParameter.xml file that is generated together with the web deploy package. To do this, you can use the –SetParametersFile parameter, like so:

Publish-AzureWebsiteProject -Name Site1 -Package package.zip -SetParametersFile package.SetParameters.xml

When using the Azure Web App Deployment task, there is no separate parameter for this but you can use the Additional Arguments parameter to pass this information in:

image

Note: In this case, I am using the Azure Web App Deployment task as part of a release definition in Visual Studio Release Management, but you can also use it in a regular build definition.

This will apply the parameter values defined in the QBox.Web.SetParameters.xml file when deploying the package to the Azure Web App.

If you are interested, here is the pull request that implemented support for SetParameters files: https://github.com/Azure/azure-powershell/pull/316

Downloading Build Artifacts in TFS Build vNext

Since a couple of months back, Microsoft new Release Management service is available in public preview in Visual Studio Team Services. According to the current time plan, it will be released for on-premise TFS in the next update (Update 2).

Using a tool like release management allows you to implement a deployment pipeline by grabbing the binaries and any other artifacts from your release build, and then deploy them across different environments with the proper configuration and approval workflow. Building your binaries once and only once is a fundamental principal of implementing continuous delivery, too much can go wrong if you build your application every time you deploy it into a new environment.


However, sometimes you might not have the opportunity to setup a release management tool like VSTS or Octopus Deploy, but you still want to be able to build your binaries once and deploy them. Well, you can still implement your deployment using TFS Build, but instead of building your source code during every build we download the artifacts from another build that already has completed.

Let’s look at how we can implement this using PowerShell and the REST API in TFS/VSTS.In this sample we will execute this script as part of a TFS build, in order to create a “poor mans” deployment pipeline. If you want to use the script outside of TFS Build, you need to replace some environment variables that are used in the script below.

Downloading Build Artifacts using PowerShell and the REST API

First of all, to learn about the REST API and other ways to integrate and extend Visual Studio, TFS and Visual Studio Team Services, take a look at https://www.visualstudio.com/integrate. This is a great landing page that aggregate a lot of information about extensibility.

Here is a PowerShell script that implements this functionality, as well as a few other things that is handy if you implement a deployment pipeline from a build definition.

[CmdletBinding()] param( [Parameter(Mandatory=$True)] [string]$buildDefinitionName, [Parameter()] [string]$artifactDestinationFolder = $Env:BUILD_STAGINGDIRECTORY, [Parameter()] [switch]$appendBuildNumberVersion = $false ) Write-Verbose -Verbose ('buildDefinitionName: ' + $buildDefinitionName) Write-Verbose -Verbose ('artifactDestinationFolder: ' + $artifactDestinationFolder) Write-Verbose -Verbose ('appendBuildNumberVersion: ' + $appendBuildNumberVersion) $tfsUrl = $Env:SYSTEM_TEAMFOUNDATIONCOLLECTIONURI + $Env:SYSTEM_TEAMPROJECT $buildDefinitions = Invoke-RestMethod -Uri ($tfsURL + '/_apis/build/definitions?api-version=2.0&name=' + $buildDefinitionName) -Method GET -UseDefaultCredentials $buildDefinitionId = ($buildDefinitions.value).id; $tfsGetLatestCompletedBuildUrl = $tfsUrl + '/_apis/build/builds?definitions=' + $buildDefinitionId + '&statusFilter=completed&resultFilter=succeeded&$top=1&api-version=2.0' $builds = Invoke-RestMethod -Uri $tfsGetLatestCompletedBuildUrl -Method GET -UseDefaultCredentials $buildId = ($builds.value).id; if( $appendBuildNumberVersion) { $buildNumber = ($builds.value).buildNumber $versionRegex = "d+.d+.d+.d+" # Get and validate the version data $versionData = [regex]::matches($buildNumber,$versionRegex) switch($versionData.Count) { 0 { Write-Error "Could not find version number data in $buildNumber." exit 1 } 1 {} default { Write-Warning "Found more than instance of version data in buildNumber." Write-Warning "Will assume first instance is version." } } $buildVersionNumber = $versionData[0] $newBuildNumber = $Env:BUILD_BUILDNUMBER + $buildVersionNumber Write-Verbose -Verbose "Version: $newBuildNumber" Write-Verbose -Verbose "##vso[build.updatebuildnumber]$newBuildNumber" } $dropArchiveDestination = Join-path $artifactDestinationFolder "drop.zip" #build URI for buildNr $buildArtifactsURI = $tfsURL + '/_apis/build/builds/' + $buildId + '/artifacts?api-version=2.0' #get artifact downloadPath $artifactURI = (Invoke-RestMethod -Uri $buildArtifactsURI -Method GET -UseDefaultCredentials).Value.Resource.downloadUrl #download ZIP Invoke-WebRequest -uri $artifactURI -OutFile $dropArchiveDestination -UseDefaultCredentials #unzip Add-Type -assembly 'system.io.compression.filesystem' [io.compression.zipfile]::ExtractToDirectory($dropArchiveDestination, $artifactDestinationFolder) Write-Verbose -Verbose ('Build artifacts extracted into ' + $Env:BUILD_STAGINGDIRECTORY)

This script accepts three parameters:

buildDefinitionName
This is a mandatory parameter where you can specify the name of the build definition from which you want to download the artifacts from. This script assumes that the build definition is located in the same team project as the build definition in which this script is running. If this is not the case, you need to add a parameter for the team project.

artifactsDestinationFolder
This is an optional parameter that let’s you specify the folder where the artifacts should be downloaded to. If you leave it empty, it will be downloaded to the staging directory of the build (BUILD_STAGINGDIRECTORY)

appendBuildNumberVersion
A switch that indicates if you want to append the version number of the linked build to the build number of the running build. Since you are actually releasing the build version that you are downloading artifacts from, it often makes sense to use this version number for the deployment build. The script will extract a 4 digit version (x.x.x.x) from the build number and then append it to the build number of the running build.

As an example, if the latest release build has the build number MyApplication-1.2.3.4, the build will extract 1.2.3.4 and append this to the end of the build number of the running build.


Running the script in TFS Build

Running a PowerShell script in TFS Build is really easy, but I’ll include it here anyway. Typically you will run this script in the beginning of a build in order to get the build artifacts, and then add the tasks related to deploying the artifacts in whatever way that fits.

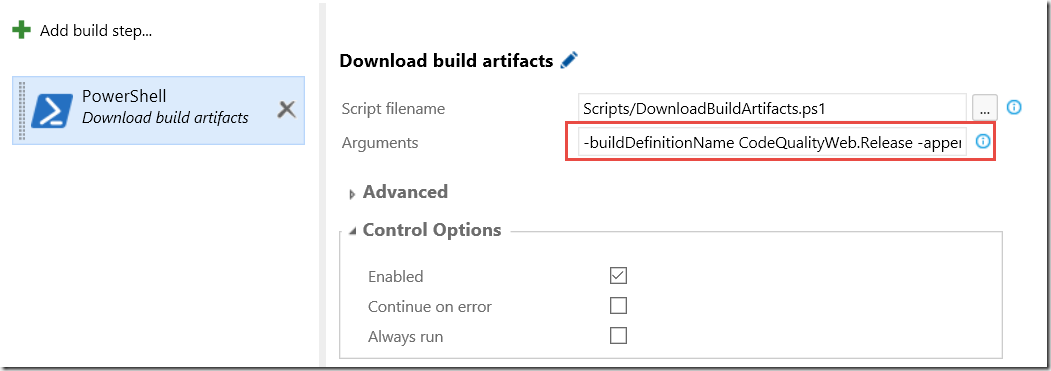
Add the script to source control and then add a PowerShell task to the build definition and select the script from the repository. Then specify the parameters of the tasks in the argument field

image

Here is a sample argument:

-buildDefinitionName MyApplication.Release –appendBuildNumberVersion

Where MyApplication.Release is the name of the build definition that have produced the build artifacts that we want to release.

Running this script as part of the build will not download the artifacts from the latest successful build of the linked build definition and place them in the staging directory. In addition it will append the version number of the linked build (x.x.x.x) to the end of the running build.

NB: You need to consider where to place this script. Often you’ll want to put this script together with the application that you are deploying, so that they can change and version together.


Hope you will find this script useful, le me know if you have any issues with it!

Happy building!


PS: If you want to learn more about implementing Continuous Delivery using Visual Studio Team Services and TFS, grab a copy of my and Mathias Olausson’s latest book “Continuous Delivery with Visual Studio ALM 2015

New Book – Continuous Delivery with Visual Studio ALM 2015

With today’s announcement at Microsoft Connect() about the public preview of the next generation of Visual Studio Release Management, it is also time to announce the (imminent) release of a new book that covers among other things this new version of RM.

Me and my fellow ALM MVP Mathias Olausson have been working hard during the last 6 months on this book, using early alpha and beta versions of this brand new version of Visual Studio Release Management. Writing about a changing platform can be rather challenging, and our publisher (Apress) have been very patient with us regarding delays and late changes!

About the book

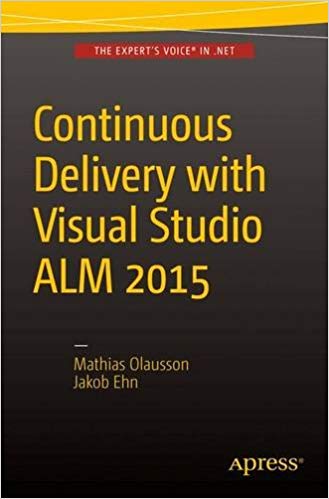
The book is titled Continuous Delivery with Visual Studio ALM 2015 and is aiming to be a more practical complement to Jez Humble’s seminal Continous Delivery book with a heavy focus of course on how to implement these processes using the Visual Studio ALM platform.

The book discusses the principles and practices around continuous delivery and continuous deployment, including release planning, source control management, build and test automation and deployment pipelines. The book uses a fictive sample application that we use throughout the book as a concrete example on how to go about to implement a continuous delivery workflow on a real application.

We hope that you will find this book useful and valuable!


Abstract

This book is the authoritative source on implementing Continuous Delivery practices using Microsoft’s Visual Studio and TFS 2015. Microsoft MVP authors Mathias Olausson and Jakob Ehn translate the theory behind this methodology and show step by step how to implement Continuous Delivery in a real world environment.

Building good software is challenging. Building high-quality software on a tight schedule can be close to impossible. Continuous Delivery is an agile and iterative technique that enables developers to deliver solid, working software in every iteration. Continuous delivery practices help IT organizations reduce risk and potentially become as nimble, agile, and innovative as startups.

In this book, you’ll learn:

  • What Continuous Delivery is and how to use it to create better software more efficiently using Visual Studio 2015
  • How to use Team Foundation Server 2015 and Visual Studio Online to plan, design, and implement powerful and reliable deployment pipelines
  • Detailed step-by-step instructions for implementing Continuous Delivery on a real project


Table of Content

Chapter 1: Introduction to Continuous Delivery
Chapter 2: Overview of Visual Studio 2015 ALM
Chapter 3: Designing an Application for Continuous Delivery
Chapter 4: Managing the Release Process
Chapter 5: Source Control Management
Chapter 6: PowerShell for Deployment
Chapter 7: Build Automation
Chapter 8: Managing Code Quality
Chapter 9: Continuous Testing
Chapter 10: Building a Deployment Pipeline
Chapter 11: Measure and Learn