Performance Tests for Azure Web Apps

Anyone that has been involved with setting up the infrastructure that is needed to perform on premise load testing of a realistic number of users knows how much work that is to both setup and to maintain. With Visual Studio Ultimate/Enterprise you needed to create a test rig by creating multiple machines and then installing a test controller and test agents on all the machines and configure them to talk to each other.

Another aspect of if is that the typical team don’t run load tests of their applications on a regular basis, instead it is done during certain periods or sprints during the lifecycle of the project. So the rest of time those machines aren’t used for anything, so basically they are just using up your resources.

Cloud Load Testing

With the introduction of Cloud Load Testing, that is part of Visual Studio Online, Microsoft added the possibility to use Azure for generating the load for your tests. This means that you no longer have to setup or configure any agents at all, you only need to specify the type of load that you want, such as the number of users and for how long the test should run. This makes it incredibly easy to run load tests, and you only pay for the resources that you use. You can even use it to test internal application running behind a firewall.

So, this feature has been around for a couple of years, but there has always been a problem with discoverability due to it being available only from inside the Visual Studio Online portal. So for teams that uses Azure for running web apps but are not using Visual Studio Online for their development, they would most likely never see or use this feature.

But back in September Microsoft announced the public preview of perfomance testing Azure Web Apps, fully integrated in the Azure Portal. It still needs a connection to a Visual Studio Online account, but as you will see this can easily be done as part of setting up the first performance test.

Let’s take a quick look at how to create and run a performance test for an Azure Web App.


Azure Web App Performance Test

The new Performance Test functionality is available in the Tools blade for your web app, so go ahead and click that.

image


The first time you do this, you will be informed that you need to either create a Visual Studio Account or link to an existing one. Here I will create a new one called jakobperformance.

Note that:

  • It must have a unique name since this will end up as <accountname>.visualstudio.com)
  • It does not mean that you have to use this account (or any other VSO account for that matter) for your development.


image

Currently the location must be set to South Central US, this is most likely only the case during the public preview.


Image result for nice icon

When you do this, you will receive a nice little email from Microsoft that includes a lot of links to more information
about how to get started with cloud load testing.

A simple thing really, but things like this can really make a difference when you are trying a new technology for the first time.

image 


So, once we have create or linked the VSO account we can go ahead and create a new performance test. Here is the information that you need to supply:

URL
The public URL that the performance test should hit. It will be default be set to the URL of the current Azure Web App, but you can change this.

Name
The name of this particular test run. As you will see, all test runs are stored and available in the Performance Test blade of your Azure Web App, so give it a descriptive name.

Generate Load From
Here you select from which region that the load should be generated from. Select the one that most closely represent the origin of your users.

User Load
The number of users that should hit your site. While this feature is in public preview you don’t have to pay for running these load tests, but there will some limits in how much load you can generate. You can contact Microsoft if you need to increase this limit during the preview period.

Duration (Minutes)
Specifies for how long (in minutes) that the load test should run


image


Once this is filled out, hit Run Test to start the load test. This will queue the performance test and then start spinning up the necessary resources in Azure for running the load test.


image


Clicking on the test run, you will see information start to come in after a short period of time, showing the number of requests generated and some key performance characteristics of how your application behaves under pressure.


image

Of course, this type of load testing doesn’t cover all you need in terms of creating realistic user load, but it is a great way to quickly hit some key pages of your site and see how it behaves. then you can move on and author more complex load tests using Visual Studio Enterprise, and run them using Azure as well.


Go ahead and try it out for yourself, it couldn’t be easier and during the public preview it is free of charge!

10 Features in Team Foundation Server that you maybe didn’t know about

I often talk to different teams about how they work with Team Foundation Server or Visual Studio Online. I get a lot of questions about different features, and some of them tend to come up more often than other. So here is a list of 10 features in TFS that I get questions about regularly or that I have noticed a lot of teams don’t know about. It is by no means exhaustive, and it is a mixture of smaller and larger features, but hopefully you will find something here that you didn’t know about before.


1. Associate Work Items in Git commits from any client

Associating work items to your changesets in TFS have always been one of the more powerful features. Not in itself, but in the traceability that this gives us.
Without this, we would have to rely on check-in comments from the developers to understand the reason for a particular change, not always easy when you look at changes that were done a few years back!

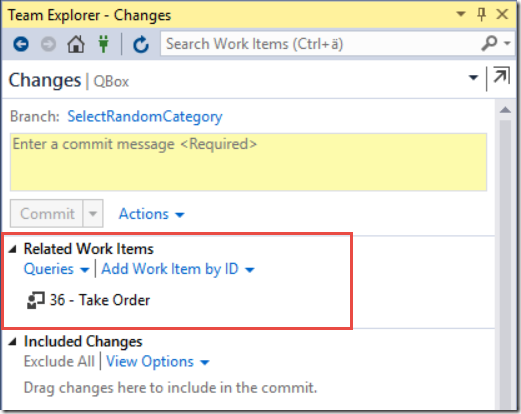
When using Git repos in TFS, and you use the Git integration in Visual Studio you have the same functionality that lets you associate a work item to a commit, either by using a work item query or by specifying a work item ID.
image

But a lot of developers like to use other Git tooling, such as Git Extensions, SourceTree or the command line. And then we have the teams that work on other platforms, perhaps developing iOS apps but store their source code in a Git repo in TFS. They obviously can’t use Visual Studio for committing their changes to TFS.

To associate a commit with a work item in these scenarios, you can simply enter the ID of the work item with a # in front of it as part of the commit message:

git commit –a –m “Optimized query processing #4321”

Here we associate this commit with the work item with ID 4321. Note that since Git commits are local, the association won’t actually be done  until the commit has been pushed to the server. TFS processes git commits for work item association asynchronously, so it could potentially take a short moment before the association is done.


2. Batch update work items from the Web Access

Excel has always been a great tool for updating multiple work items in TFS. But over the years the web access in TFS has become so much better so that most people do all their work related to work item management there. And unfortunately, it is not possible to export work item queries to Excel as easily from the web as it is from Visual Studio.

But, we can update multiple work items in TFS web access as well. These features have gradually been added to Visual Studio Online and is now part of TFS 2015 as well.

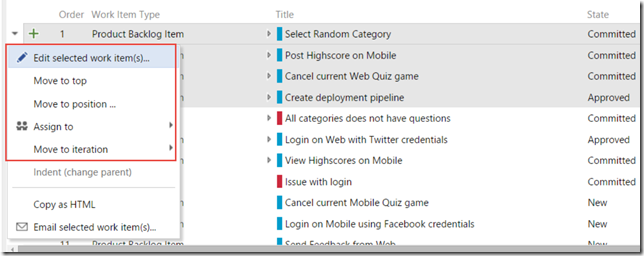
From the product backlog view, we can select multiple work items and the perform different operations on them, as shown below:
image

 
There are a few shortcut operations for very common tasks such as moving multiple backlog items to a iteration, or assigning them to a team member.
But then you have the Edit selected work item(s) that allows us to set any fields to a new value in one operation.
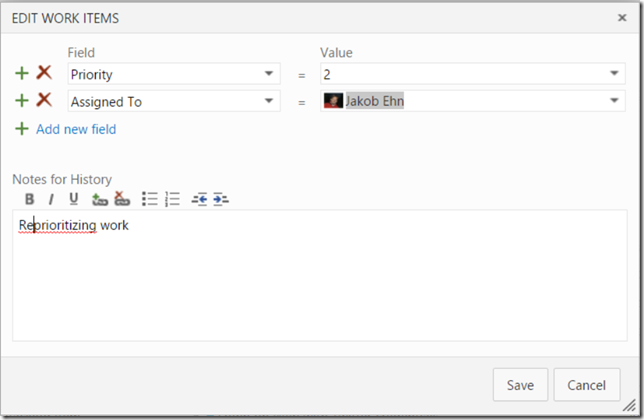
image

You can also do this from the sprint backlog and from the result list of a work item query.


3. Edit and commit source files in your web browser

Working with source code is of course done best from a development IDE such as Visual Studio. But sometimes it can be very convenient to change a file straight from the web access, and you can! Maybe you find a configuration error when logged on a staging environment where you do not have access to Visual Studio. Then you can just browse to the file in source control and change it using the Edit button:
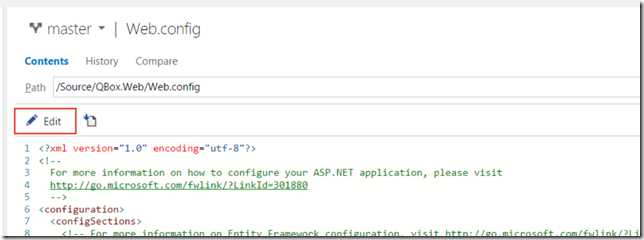
image


After making the changes, you can add a meaning commit message and commit the change back to TFS. When using Git, you can even commit it to a new branch.

image


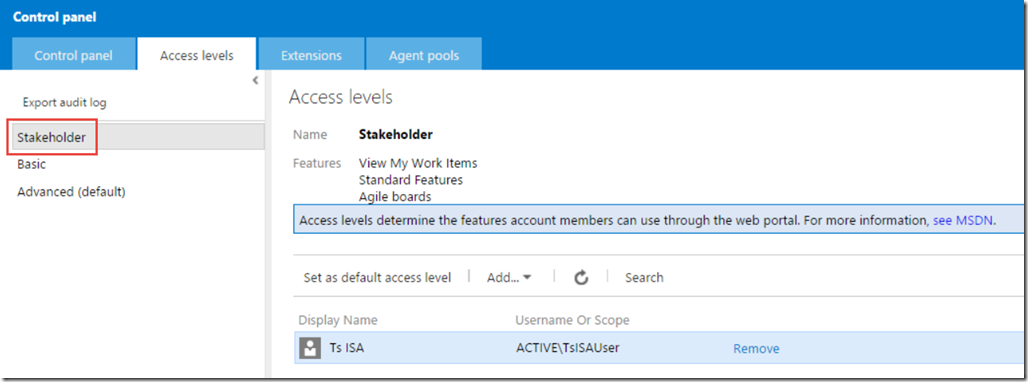
4. Bring in your stakeholders to the team using the free Stakeholder license

Normally, every team member that accesses TFS and reads or writes information to it (source code, work items etc) need to have a Client Access License (CAL). For the development team this is usually not a problem, often they already have a Visual Studio with MSDN subscription in which a TFS CAL is included. What often cause some friction is when the team try to involve the stakeholders. Stakeholders often include people who just want to track progress or file a bug or a suggestion occasionally. Buying a CAl for every person in this role usually ends up being way to expensive and not really worth it.

In TFS 2013 Update 4 this was changed, from that point people with a stakeholder license does not a CAL at all, they can access TFS for free. Buth they still have a limited experience, they can’t do everything that a normal team member can. Features that a stakeholder can use include:

  • Full read/write/create on all work items
  • Create, run and save (to “My Queries”) work item queries
  • View project and team home pages
  • Access to the backlog, including add and update (but no ability to reprioritize the work)
  • Ability to receive work item alerts


image


To learn more about the Stakeholder license, see  https://msdn.microsoft.com/Library/vs/alm/work/connect/work-as-a-stakeholder


5. Protect your Git branches using branch policies

When using Team Foundation Version Control (TFVC) we have from the first version of TFS had the ability to use check-in policies for enforcing standards and policies of everything that is checked in to source control. We also have the ability to use Gated Builds, which allows us to make sure that a changeset is not checked in unless an associated build definition is executed successfully.

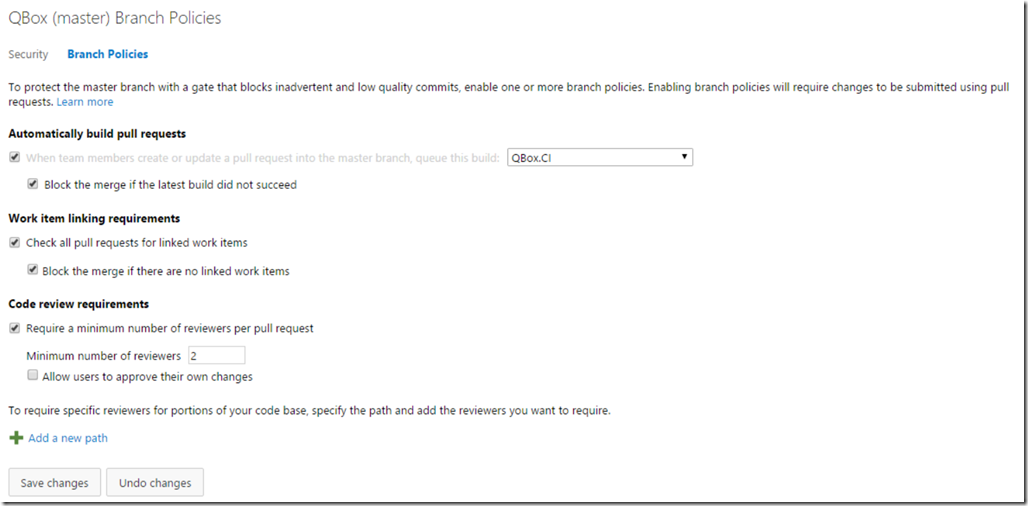
When Git was added to TFS back in 2013, there was no corresponding functionality available. But in TFS 2015 now, the team has added branch policies as a way to protect our branches from inadvertent or low quality commits. In the version control tab of the settings administration page you can select a branch from a Git repo and then apply branch policies. The image below shows the available branch policies.
image


Here we have enabled all three policies, which will enforce the following:

  • All commits in the master branch must be made using a pull request
  • The commits in the pull request must have associated work items
  • The pull request must be reviewed by at least two separate reviewers 
  • The QBox.CI build must complete successfully before the pull request can be merged to the master branch


I really recommend that you start using these branch policies, they are an excellent way to enforce the standard and quality of the commits being made, and can help your team improve their process and help move towards being able to deliver value to your customers more frequently.


6. Using the @CurrentIteration in Work Item Queries

Work Item Queries are very useful for retrieving the status of your ongoing projects. The backlogs and boards are great in TFS for managing the sprints and requirements, but the ability to query on information across one ore more projects are pivotal. Work item queries are often used as reports and we can also create charts from them.

Very often, we are interested in information in the current sprint, for example how many open bug are there, how many requirements do we have that doesn’t have associated test cases and so on. Before TFS 2015, we had to write work item queries that referenced the current sprint directly, like so:

image

The problem with this was of course that as soon as the sprint ended and the next one started, we hade to update all these queries to reference the new iteration. Some people came up with smart work arounds, but it was still cumbersome.


Enter the @CurrentIteration token. This token will evaluate to the currently sprint which means we can define our queries once and they will continue to work for all upcoming sprints as well.


image

this token is unfortunately not yet available in Excel since it is not team-aware. Since iterations are configured per team, it is necessary to evaluate this token in the context of a team. Both the web access and Visual Studio have this context, but the Excel integration does not, yet.

Learn more about querying using this token at https://msdn.microsoft.com/en-us/Library/vs/alm/Work/track/query-by-date-or-current-iteration


7. Pin Important Information to the home page

The new homepage has been available since TFS 2012, and I still find that most teams does not use the possibility to pin important information to the homepage enough.
The homepage is perfect to show on a big screen in your team room, at least if you show relevant information on it.

We can pin the following items to the home page:

  • Work Item Queries
    The tile will show the number of work items returned by the query . Focus on pinning queries where the these numbers are important and can trigger some activity. E.g. not the total number of backlog items, but for example the number of active bugs.
  • Build Definition
    This tile shows a bar graph with the history of the last 30 builds. Gives a good visualization of how stable the builds are, if you see that builds fails every now and then you have a problem that needs to be investigated.
  • Source control
    Shows the number of recent commits or changesets. Will let you know how much activity that is going on in the different repos
  • Charts
    Charts can be created from work item queries and can also be pinned to the home page. Very useful for quickly give an overview of the status for a particular area


Here is an example where we have added a few items of each type

image


8. Query on Work Item Tags

Support for tagging was first implemented back in TFS 2012 Update 2. This allowed us to add multiple tags to work items and then filter backlogs and query results on these tags.
There was however a big thing missing and that was the ability to search for work items using tags.

This has been fixed since TFS 2013 Update 2, which means we can now create queries like this.

image

It is also possible to work with tags using Excel, this was another big thing missing from the start.

Unfortunately it is not yet possible to setup alerts on tags, you can vote on this feature on UserVoice here: http://visualstudio.uservoice.com/forums/121579-visual-studio/suggestions/6059328-use-tags-in-alerts


9. Select how you want to handle bugs

One of the most common questions I get when talking to teams that use TFS is how they should handle bugs. Some teams want to have the bugs on the backlog and treat them like requirements. Other teams want to treat them more like tasks, that is adding them to the corresponding user story or backlog item and use the task board to keep track of the bug.

The good think is that you can configure this per team now. On the team settings page, there is a section that lets you configure the behavior of bugs.

image


To learn more about controlling the behavior of bugs, see https://msdn.microsoft.com/Library/vs/alm/work/customize/show-bugs-on-backlog


10. Integrate with external or internal services using Service Hooks

Extensibility and integration are very important to Microsoft these days, and this is very clear when looking at the investments for TFS 2015 that included a bunch of work in this area. First of all Microsoft has added a proper REST API for accessing and updating most of the available artifacts in TFS, such as work items and builds. It uses OAuth 2.0 for authentication, which means it is based on open modern web standards and can be used from any client on any platform.

In addition to this, TFS 2015 also support Service Hooks.  A service hook is basically a web endpoint that can be called when something happens, in this case in TFS. So for example, when a backlog item is created in TFS we might want to also create a card in Trello. Or when a new change is committed into source control, we might want to kick off a Jenkins build.

Here is a list of the services that are supported out of the box in TFS 2015:

image

And the list keeps growing, in Visual Studio Online there are already 7 more services offered, including AppVeyor, Bamboo and MyGet.

Note that the list contains one entry called Web Hooks. This is a general service configuration in which you can configure a HTTP POST endpoint that will receive messages for the events that you configure. The messages can be sent using JSON, MarkDown, HTML or text. This mean that you can also integrate with internal services, if they expose HTTP REST endpoints.


To learn more about service hooks, see https://www.visualstudio.com/en-us/integrate/get-started/service-hooks/create-subscription

Generate custom build numbers in TFS Build vNext

By now, many of you should have had the chance to at least play with the new build system that was released in TFS 2015 and Visual Studio Online. Here is an introductory post I wrote about it when it entered public preview back in January.

Doing the basic stuff is very easy using the new build system, especially if you compare it with the old one, which is now referred to as XAML builds. Creating and customizing build definitions is just a matter of adding the tasks that you want to use and configure them properly, everything is done using the web interface that is part of the TFS Web Access.

Build Number Format

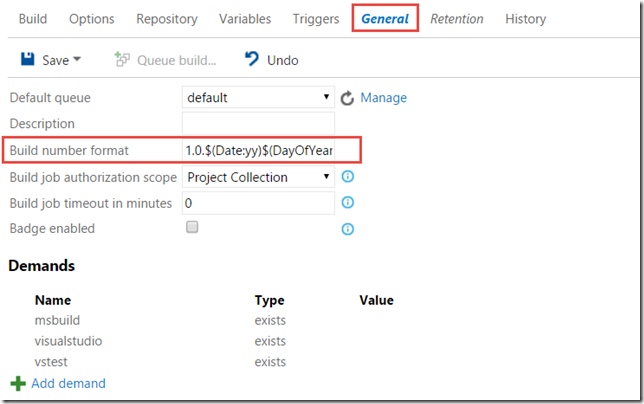
There are (of course) still some things that are not completely obvious how to do. One of these things is how to generate a custom build number for a build. Every build definition has a build number format field where you can use some macros to dictate what the resulting build number should look like.

image

The build number format can contain a mix of text and macros, in the above example I have used some of the date macros to generate a build number that uses todays date plus an increment at the end.

Generating a custom build number

Sometimes though you will have the requirement to generate a completely custom build number, based on some external criteria that is not available using these macros.

This can be done, but as I mentioned before, it is not obvious! TFS Build contains a set of logging commands that can be used to generate output from a task /typically a script) that is generated in a way so that TFS Build will interpret this as a command and perform the corresponding action. Let’s look at some examples:

##vso[task.logissue type=error;sourcepath=someproject/controller.cs;linenumber=165;columnumber=14;code=150;]some error text here

This logging command can be used to log an error or a warning that will be added to the timeline of the current task. To generate this command, you can for exampleuse the following ‘PowerShell script:

Write-Verbose –Verbose “##vso[task.logissue type=error;sourcepath=someproject/controller.cs;linenumber=165;columnumber=14;code=150;]some error text here”

As you can see, there is a special format that is used for these commands:  ##vso[command parameters]text. This format allows the build agent to pick up this command and process it.

Now, to generate a build number, we can use the task.setvariable command and set the build number, like so:

##vso[task.setvariable variable=build.buildnumber;]1.2.3.4


This will change the build number of the current build to 1.2.3.4. Of course, you would typically generate this value from some other source combined with some logic to end up with a unique build number.

image


You can find the full list of logging commands at https://github.com/Microsoft/vso-agent-tasks/blob/master/docs/authoring/commands.md

Building GitHub repositories in TFS Build vNext

In the brave new world of Microsoft where a lot of the frameworks and languages that they build now are open sourced over at GitHub, it comes as no surprise that GitHub is nicely integrated into both
Visual Studio and TFS Build vNext. This makes it very easy to setup builds that gets the source code from your GitHub repo but uses TFS Build vNext to build it. It also allows you to setup CI builds, that is 
builds that trigger automatically when someone does a commit in the corresponding Git repo.


Let’s see how this work:

  1. First, you’ll need a GitHub repo of course.

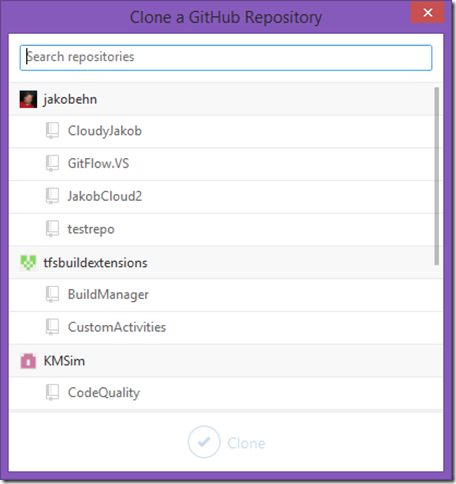
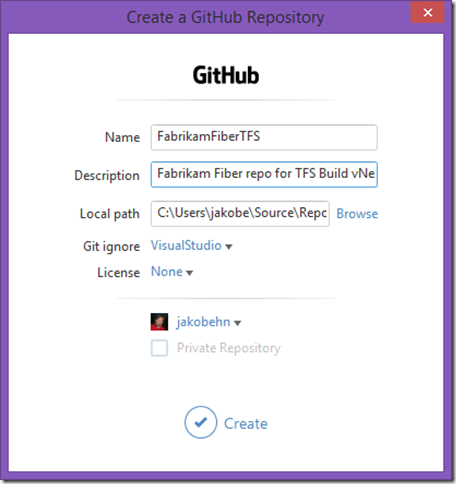
    Note: If you haven’t checked out the GitHub for VisualStudio extension yet, try it out. Makes it easy to clone your existing repos as well as creating new
    ones, right inside Visual Studio.

    image      image 
    Clone existing repos                                                                                       Create a new GitHub repo

  2. Here, I create a FabrikamFiberTFS repo on GitHub where I’ll upload the code to
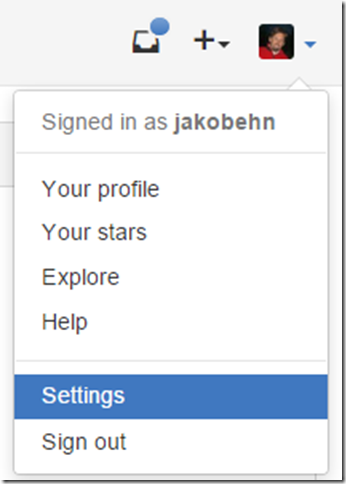
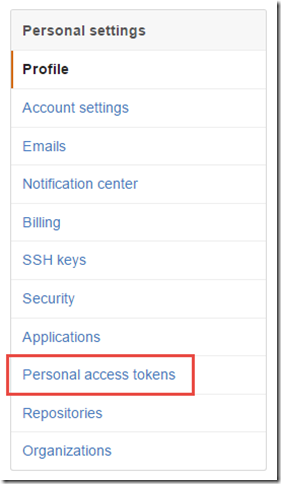
  3. Now, to enable the TFS Build vNext integration, you need to create a Personal Access Token in GitHub. To do this, click the Settings link below your profile image in
    GitHub, and then click on the Personal Access Token link:

    image         image
     

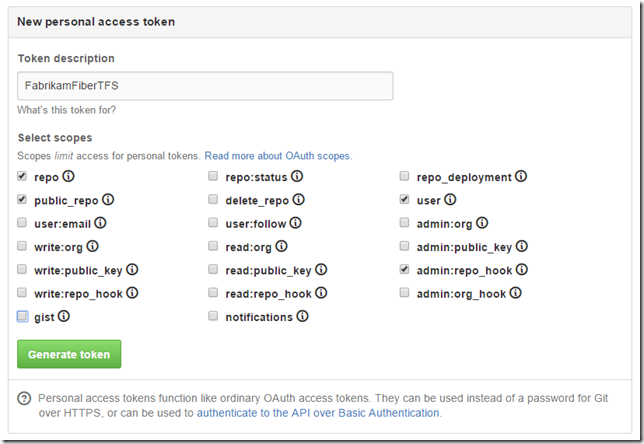
  4. Give the access token a name that you will remember(!), and then give it these permissions:

    image

    NOTE: In order to configure triggering CI builds, you must have admin permissions on the GitHub repo.

  5. Save it, and the copy the access token that is displayed.

    NOTE: Store this token somewhere safely, you will not be able to view it again. You probably want to setup a personal access token that works
    for all your GitHub repos, if so you need to remember this access token.

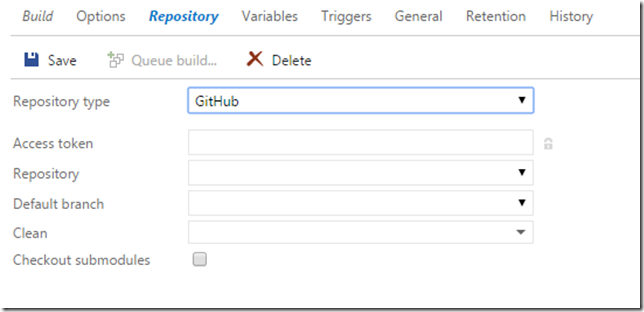
  6. Now, create a new build definition in your Visual Studio Online/TFS team project. Head over to the Repository tab, and select GitHub as your repository tab:

    image

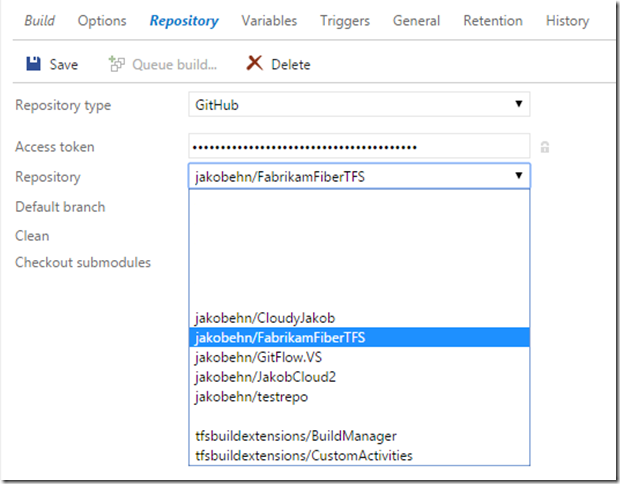
  7. Paste your token in the Access Token field. This will populate the Repository drop down and let you select amongst your existing GitHub repositories:

    image

    You will also be able to select which branch that should be the default branch.

  8. To enable continuous integration for your build definition, go to the Trigger tab and check the Continuous Integration checkbox. When saved, this build
    definition will now use the repo_hook permission against your GitHub repository to respond to commit events.
  9. Save you build definition, and commit a change to your GitHub repository. A new build should be queued almost immediately.
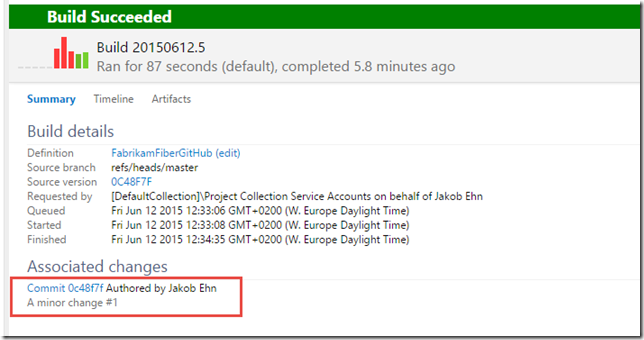
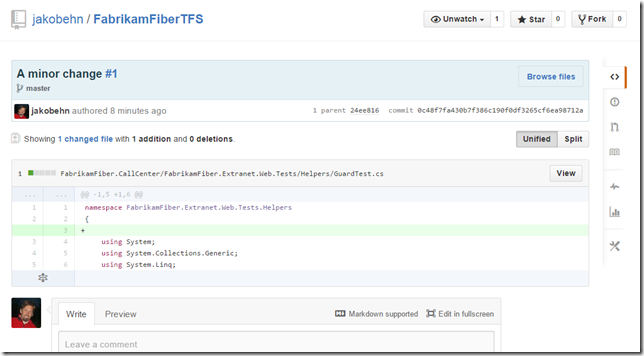
  10. When the build completes, you will see the associated commit as usual in the build summary. However, this commit link now points to the GitHub commit page instead:

    image

    Clicking the link shows the commit in GitHub:

    image

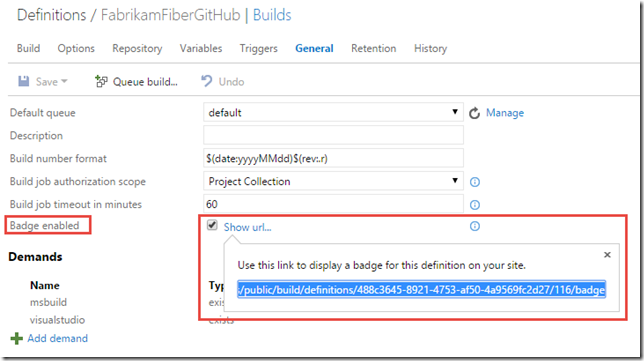
  11. To round this up, we will add a Build Badge to our Welcome page to get an indication of the current status of the build. Go to the General tab, check
    the Badge enabled checkbox and save the build definition. This will expose a link that shows you the public URL to a dynamically generated icon that
    shows the status of the latest build for this particular build definition:

    image

  12. Go to the home page and then to the Welcome page tab. If you haven’t created a welcome page yet, do so. Then add the following markdown to the page:

    # FabrikamFiberTFS Build Status
    ![](URL_FROM_BUILD_BADGE_LINK)

    In my case, the link looks like this:

    # FabrikamFiberTFS Build Status
    ![](https://jakob.visualstudio.com/DefaultCollection/_apis/public/build/definitions/488c3645-8921-4753-af50-4a9569fc2d27/116/badge)

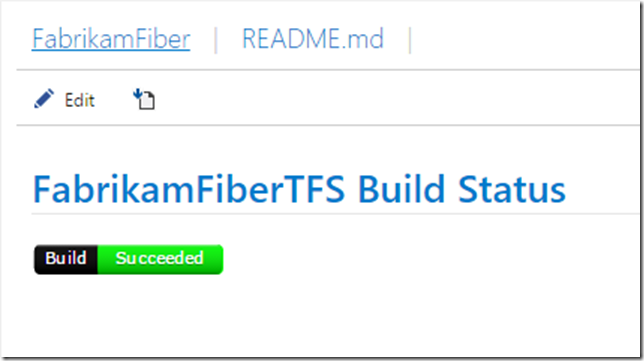
  13. Save it and you will see a nice little badge showing the status of the latest build:

    image

Deploying an Azure Web Site using TFS Build vNext

TFS 2015 is around the corner, and with it comes a whole new build system. All the biggest pain points from the existing build system (now called “XAML builds”) are gone and instead we get a light weight build system with a web UI that makes it very easy to customize our build processes and that doesn’t perform a lot of magic such as redirecting your build output for example.

In this post, I will show you just how easy it is to setup a build that builds a standard ASP.NET web application, generates a web deploy package as part of the build and then pick up this package and deploys it to a Azure web site.
As part of this, you will also see how smooth the integration with Azure is when it comes to connecting your subscription.

 
Sample Application

For this blog post I will use the common FabrikamFiber sample application, the full source for this is available at https://fabrikam.codeplex.com/

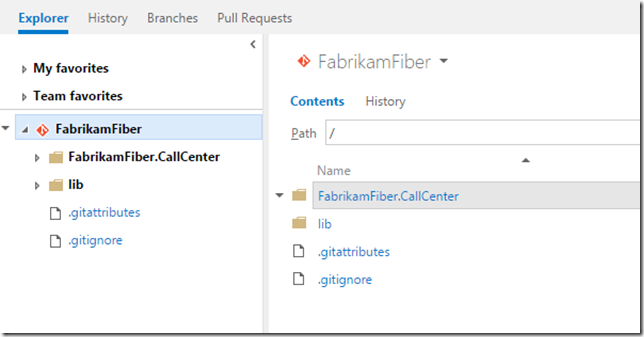
I have created a new team project called FabrikamFiber on my local TFS 2015 instance, and pushed the source to the default Git repo in this team project:

image

So, let’s see how we can build, test and deploy this application to Azure.

Register your Azure subscription in TFS
First of all, you need to add your Azure Subscription to TFS. You only need to this once of course (or at least one per subscription in case you have several).
This is done on the collection level, by using the Services tab:

image

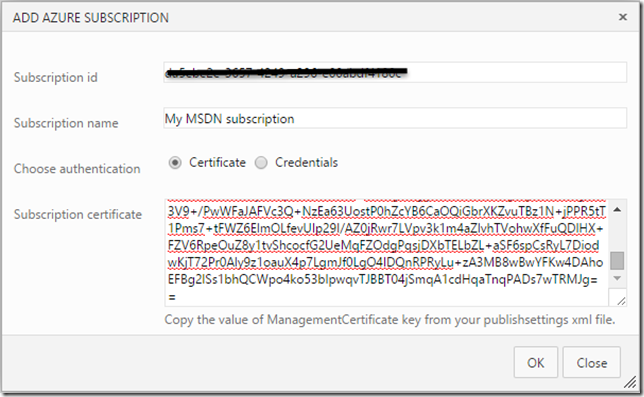
Click the Add new Azure Subscription link on the top left. Now you need to enter the Subscription Id and the subscription certificate (you can use credential as well, but using the certificate option is more secure). 
To get this information, follow these steps:

  • Open a Windows PowerShell windows in administrative mode
  • Type  Get-AzurePublishSettingsFile
  • This will open a web browser and automatically download your subscription file
  • Open the subscription file (named <SubscriptionName>-<Date>-credentials.publishsettings
  • In this file, locate the Subscription Id and the ManagementCertificate fields

Now, copy these values into the Add Azure Subscription dialog:
image

Press OK. After it is saved, you should see your subscription to the left and some general information:
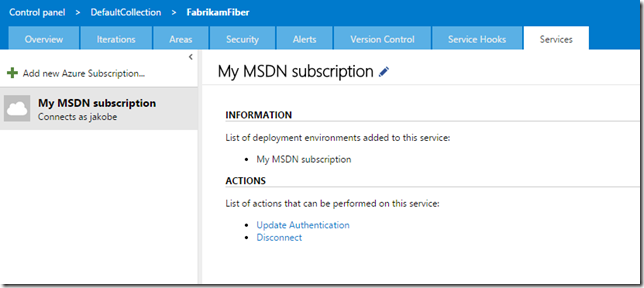
image

That’s it, now we can crate a build definition for our application.
 

Create a Build Definition

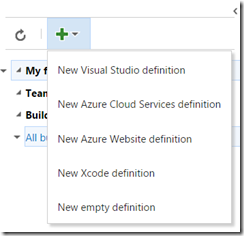
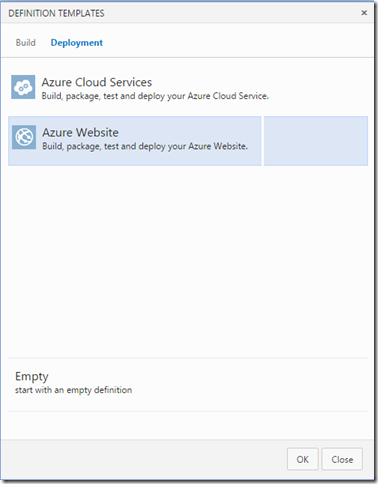
Go to the team project where the source is located and click on the Build Preview tab. Click on the + button to create a new vNext definition:
Now you can select a definition template for your build definition. Go to the Deployment tab and select the Azure Website template:


image


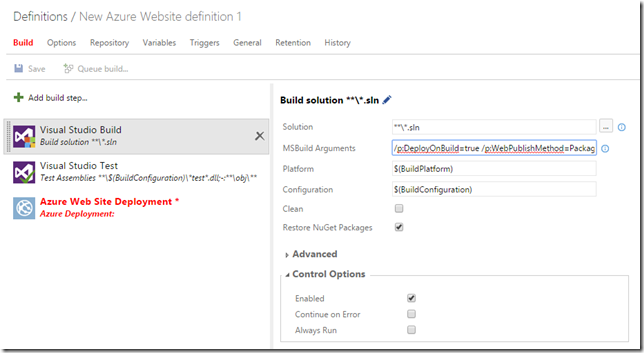
This will create a build definition with three steps, one for build the solution, one for running all the tests and one for deploying a web site to Azure.
Note: For this post, I disabled the test step since not all tests pass in the default FabrikamFiber solution.


image


If you take a look at the Visual Studio Build step, you can see the arguments that are passed to MSBuild

/p:DeployOnBuild=true /p:WebPublishMethod=Package /p:PackageAsSingleFile=true /p:SkipInvalidConfigurations=true /p:PackageLocation=”$(build.stagingDirectory)”

These are standard MSBuild parameters for triggering and configuration web deploy during compilation. These specific settings will create a web deploy package and put it in the staging directory of the build definition.


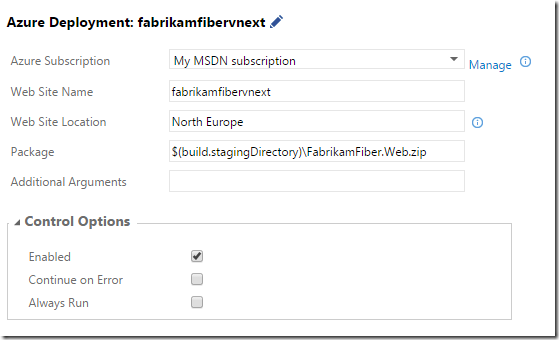
Now, over to the deployment step. Here you can see that you can select your Azure subscription that we registered before. In addition we give the web site a unique name, this name is what the public web site will be called,in this case
it will be http://fabrikamfibervnext.azurewebsites.net.  We also need to specify the Web Site Location for this web site.

The final parameter that we need to specify is the Package. By default it will fetch all zip files located in the staging directory. I want to deploy the FabrikamFiber.Web application, so I change this to $(build.stagingDirectory)FabrikamFiber.Web.zip.

image

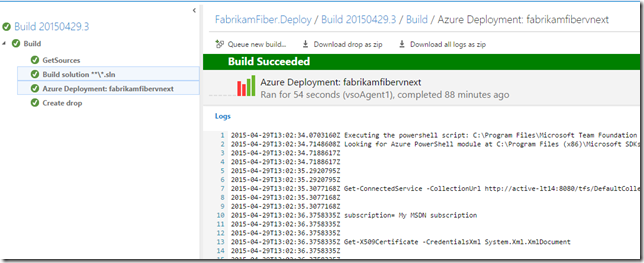
That’s it! Save the build definition and queue a new build.After it has completed, you should see a log that looks something like this and you should have a web sites published in Azure.
As you can see, all steps in the process are shown to the left and you can easily see the output from each step.


image


Deploying Multiple Web Sites

If you’re familiar with the FabrikamFiber sample solution, you know that it actually has two web applications in the same solution, FabrikamFiber.Web and Fabrikamfiber.Extranet.Web.

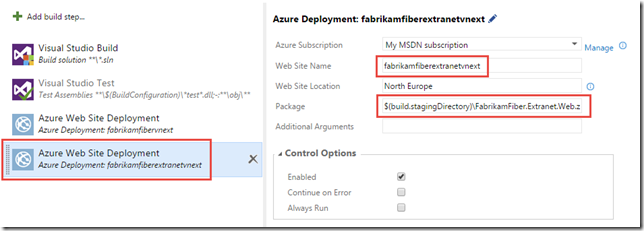
So, how do we go about to deploy both web sites as part of our build? Well, it couldn’t be easier really, just add a new Azure Web Site Deployment build step and reference the other web deploy package:


image

This will now first build the solution and then publish both web sites to Azure.


Summary

Now you have seen how easy it is to build and deploy web applications using TFS Build vNext.

Speaking at DevSum 2015

Image result for devsumVSO


This year I’ll be presenting at DevSum, which is the largest .NET conference in Sweden. I’ll be talking about Visual Studio Online, Microsoft cloud offering for your development projects. I will go through all the major features of VSO, such as source code hosting, agile planning tooling , automated builds, test management and integration with other 3rd party service such as Trello and AppVeyor. I will also talk about how you can migrate your existing projects to VSO


I’ve inserted the abstract of the session below, you can find the full information here

http://www.devsum.se/speaker/jakob-ehn/ 

Hope to see you there!


Moving your development to the Cloud using Visual Studio Online

Did you know that Visual Studio Online supports all aspects of your development process? In addition to keeping track of your source code (using Git or TFVC), you
can manage your product- and sprint backlogs, run automated builds in the cloud, define and execute test plans and create and manage release pipelines using
Visual Studio Release Management. On top of this, VSO integrates with several other popular services such as Jenkins, AppVeyor, Trello and CampFire, which means
that you can move to VSO and still use other services in the ecosystem.

In this session we will do a complete tour of what Visual Studio Online has to offer, and discuss the differences and pros/cons compared with on premise.
We will also talk about how you can go about to migrate your development to VSO.

Trigger Releases in Visual Studio Release Management

In my previous post, I showed how you can trigger a release in Visual Studio Release Management from a TeamCity build step.

When Visual Studio Release Management 2013 RTM’ed, it came with customized TFS build templates that made it easy to trigger a release from a TFVC or Git build in TFS. These build templates relied on the ReleaseManagementBuild command line client, so it required the VSRM client being installed on the build server.

Then, with the update train of Visual Studio 2013, new functionality such as vNext deployments, support for Powershell DSC etc was added. Together with this a new REST API was introduced that removes the need for a command line application to trigger a release. However, this REST API _only_ works for vNext deployments, and it will most likely never be implemented for agent based deployments. Basically all new functionality in the release management area only works for vNext deployements, so you should be looking to move in that direction.

Also, in VS 2013 Update 4 support was added for connecting to the Release Management service running in Visual Studio Online. With this option, another way of triggering release was added, in which the Release Management service listens for build completion events in TFS which will kick off a release. It is still possible to use the API however, in cases where you don’t run TFS Build.


So, since this is rather confusing at the moment and causes a lot of questions, I decided to summarize the currently available combinations and the options that you have when it comes to triggering a release in VSRM:


Source

Release Management

Deployment Type

Options

VSO Build

VSO

vNext

Automatically (through build completed event)

VSO Build

VSO

Agent-Based

N/A

TFS Build

On-Premise (Update 3)

vNext

REST API

TFS Build

On-Premise (Update 3)

Agent-Based

ReleaseBuildTemplate

3rd party/share

VSO

vNext

REST API

3rd party/share

VSO

Agent-Based

N/A

3rd party/share

On-Premise (Update 3)

vNext

REST API

3rd party/share

On-Premise (Update 3)

Agent-Based

ReleaseManagementBuild.exe

Note that some of these combinations are not supported at the moment, those are marked with N/A.

Hope that helps

TFS Build vNext – A Preview

Currently, Microsoft is working hard on a complete rewrite of the TFS Build system. They announced this, among other things, at the Connect event back in November and did a short demo of it. It is not yet available, but as part of the MVP program, a few of us has now been fortunate enough to get access to an early preview of the new build system.

Note: This version is in pre-alpha state, meaning that a lot of things can and will change until the final version!

Microsoft will enable a beta version to a broader public on Visual Studio Online later on this year, and it will RTM in TFS 2015. I will write a series of blog posts about Build vNext as it evolves. In this first post I will take a quick look at how to create and customize build definitions and running them in the new Web UI.

Key Principals

The key principals of TFS Build vNext are:

  • Customization should be dead simple. Users should not have to learn a new language (Windows Workflow anyone?) in order to just run some tool or script as part of the build process
  • Provide a simple Web UI for creating and customizing build definitions. No need for Visual Studio to customize builds anymore.
  • Support cross platform builds (Linux, MacOS…)  As in most other areas right now, Microsoft is serious about supporting other platforms than Windows, and TFS Build won’t be an exception.
  • Sharing build infrastructure. The concept of a build controller tied to a collection is gone, instead we will create agent pools at the deployment level and connect agents to those.
  • Don’t mess with the build output and keep my logs clean. One of the most frustrating things about the current version of TFS Build is that by default it doesn’t preserve the output structure of the compiled projects, but instead places them beneath a common Binaries directory. This causes all sort of problems, such as post build events that are dependent on relative path etc.

    CI build == Dev build !

  • Work side by side with the existing build system. All your existing XAML build definitions will continue to work just like before, and you will be able to create new ones. But don’t expect anything to be added in terms of functionality to the XAML builds


Creating a build definition in vNext

In this post, I will show how easy it is to create a  new build definition in Build vNext, and customize it to update the version info in all the assembly files using a PowerShell task with a custom script.

Note: There will probably be a versioning task out of the box in the final release, but currently there isn’t.

Let’s get started:

  1. From the dropdown, you can select from a list of build definition templates. These templates are created by saving an existing build definition as a template. Currently, they are scoped to the team project level: 

    image

    Here I’m going to select the Visual Studio definition template.

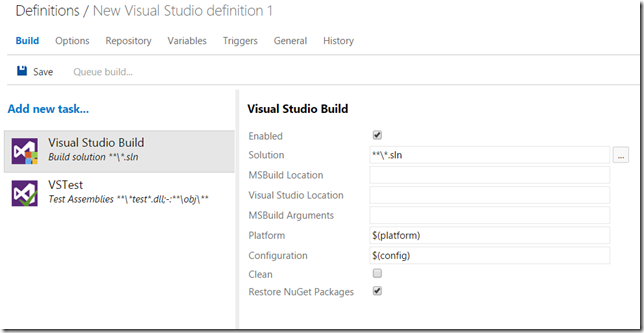
  2. This results in a build definition with two tasks, one that compiles the solution and one that runs all the unit tests using the Visual Studio test runner task

    image 

  3. Selecting a task shows the properties of that task to the right, the properties of the Visual Studio Build task is shown above. Some of these properties are typed, meaning that for example the Solution property let’s you browse the current repository to select a solution. By default, it will locate all solution files and compile them (using the ***.sln pattern)

    You can also see that the Platform and the Configuration property uses the variables $(platform) and $(config). We will come back to them shortly.

  4. The first thing we want to do typically is specifying which repository that the build will download the source from. To do this, select the Repository tab:

    image

    Looking at the Repository type field, since this is a Git team project it will let me choose either Git (which means a git repo in the current team project) or GitHub, which actually lets me choose any Git repo. In that case I will need to enter credentials as well. When selecting the Git repo type, i can then select the repo (Visual Studio ALM in this case) from the current team project, and then I can select the default branch in a drop down.

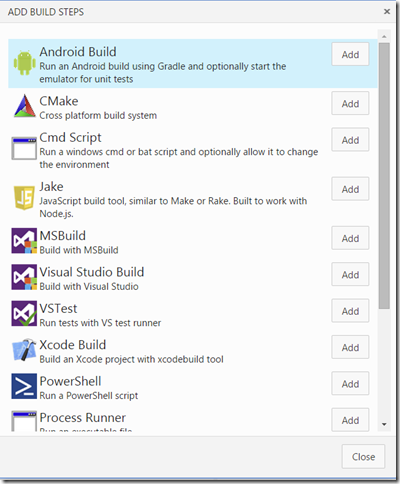
  5. If you want to add more tasks to the definition, go back to the Build tab and click on the Add new task link. This will display a list of all available tasks, shown below:

    image

    The list of tasks here are of course not complete, but as you can see there are a lot of cross platform tasks there already. To add a task to the build definition,  select it and press Add.
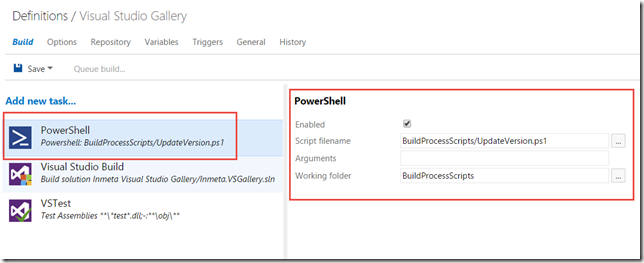
    Here, I will select the PowerShell task that I will use to version all my assemblies:

    image 

    When adding a new task it will end up at bottom of the task list, but you can easily reorder the tasks by using drag and drop. Since I must stamp the version information before i compile my solution, I have dragged the PowerShell task to the top. This task then requires me to select a PowerShell file to execute, and I also specified a working folder since the script I am using assumes this. All paths here are relative to the repository.

    Note: Although currently not possible, it will be possible to rename the build tasks

  6. On the Triggers tab, the only option available right now is to trigger the build on every check-in (or push in the case of Git). I can also select to batch the changes, which is the same thing as the Rolling build trigger in the existing version of TFS build.
    This means that all changes that are checked in during a running build will be batched up and processed in the next build as soon as the current build has completed.

    In addition we can specify one or more branches that should trigger this build.

     image

    Tip: The filter strings can include * as a filter, which lets me for example specify refs/heads/feature* as a filter that will trigger on any change on any branch that starts with the string feature.

  7. On the Variables tab, we can specify and add new variables for this build definition. Here you can see the config and platform variables that were referenced in the Build tab:

    image

  8. Last, let’s take a look at the Options tab. The MultiConfiguration option enables us to build the selected solution(s) multiple times, each time for every combination of the variables that are specified here. By default, it will list the config and platform variables here. So, this means that the build will first build my solution using Debug | Any CPU, and the it will compile it using Release | Any CPU.

    If I check the Parallel checkbox, it will run these combinations in parallel, if there are multiple agents available of course.

    image

    Also, we can enable copy to Staging and Drop location here. The build agent will copy everything that matches the Search pattern and place it in the staging folder

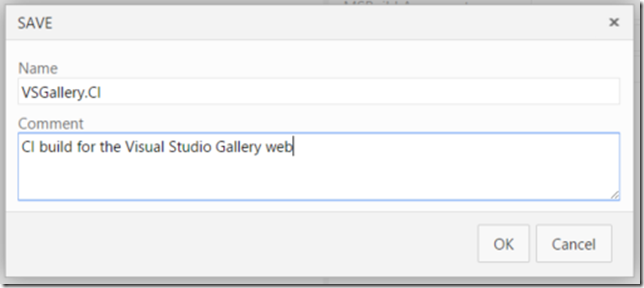
  9. Finally, let’s save the new build definition. Note that you can also add a comment every time you save a build definition:

    image

    These comments are visible on the History tab, where you can view the history of all the changes to the build definition and view the changes between any of the changes. Nice!


Running a Build

The build definition is complete, let’s kick off a build. Click on the Queue build.. button at the top to do this. This will show the live output of the build, both in a console output window and in an aggregated view where the status of each task is shown:

image


Here you can note several nice features of build vNext:

  • The console output shoes the exact output from each task, just like it would if you ran the same command on your local machine
  • The aggregated view to the left shows the status and progress of every task which makes it very clear how far in the process the build is
  • This view also show parallel builds, in this case I have enabled the MultiConfiguration option and have two build agents configured, meaning that both Debug|AnyCPU and Release|AnyCPU are being processed in parallel on separate agents.
  • If you select one of the tasks to the left, you will see the build output for this particular task

 
When the build completes, you will see a build summary and you can also view a timeline of the build where the duration of each task is shown:


image

Trigger Visual Studio Release Management vNext from TeamCity

The last couple of updates to Visual Studio has included a lot of new functionality for Visual Studio Release Management. The biggest one is the introduction of so called vNext releases, that leverages Powershell DSC for carrying out the provisioning and deployments of environments and applications.

Also included in Visual Studio 2013 Update 3 was the introduction of a REST API that allows us to both trigger new releases and read back information about them. This API is only available for vNext release templates, and will probably not be implemented for the “old” agentbased deployments.

This REST API opens up a lot of integration possibilities, for example we don’t have to use TFS Build to automatically trigger a release. In this post, I will show how we can use the popular TeamCity build server from JetBrains to trigger a release as part of the build.

 
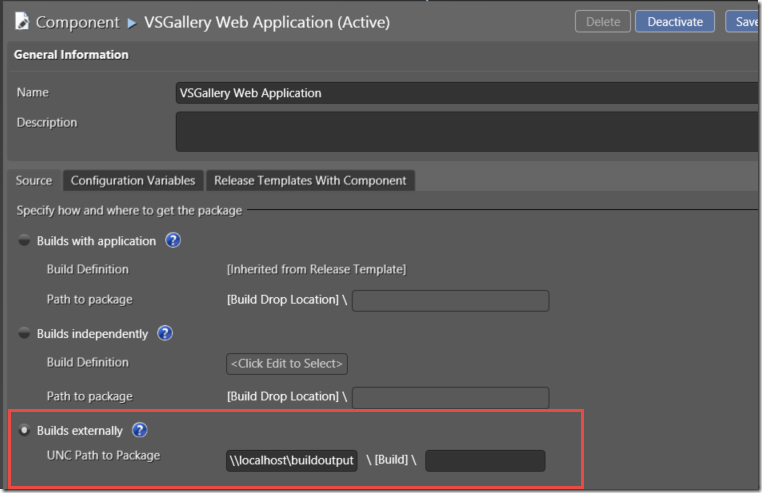
First of all, we need to setup a release template in Visual Studio Release Management. I won’t go through all the details here, the most important once is that the components that we define must use the UNC Path as the source parameter:

image

Here I have specified a shared folder, \localhostbuildoutput. Beneath this path, VSRM will look for a folder that typically correspond to a build number that we will pass in using the API, as you will see later on.

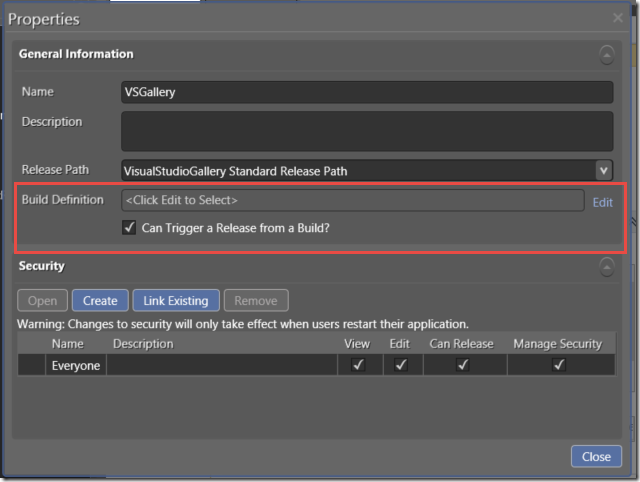
Next, we create our release template. To be able to trigger a build using the API, make sure that you tick the “Can trigger a release from a Build?” checkbox:

 image


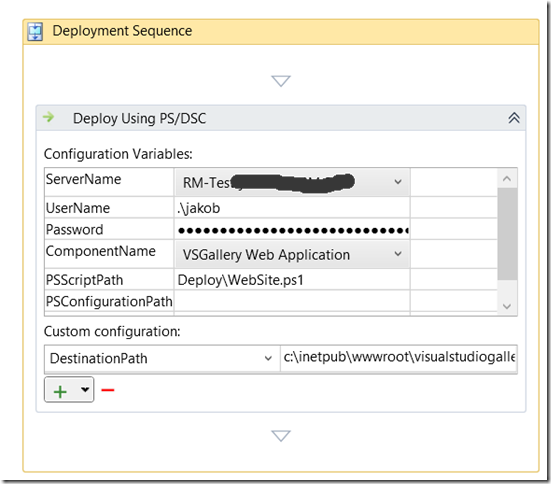
Then we define our deployment sequence, in this case I just have one action for deploying my web site using a PowerShell script:

SNAGHTML5c6e9ead

There is nothing really nothing special here, I refere to the DeployWebSite.ps1 which is a PowerShell DSC script that installs my web site. I have also a DestinationPath variable that is referenced in the DSC script and specifies where the web site should be installed on the server.


Now, to trigger a release of this release template we are going to use a PowerShell script, that we can execute using TeamCity. I have used a sample from Microsoft and modified it to use parameters.

Here is the full script:


param( [string]$rmServer, [string]$rmUser, [string]$rmPassword, [string]$rmDomain, [string]$releaseDefinition, [string]$deploymentPropertyBag ) $deploymentPropertyBag = $propertyBag = [System.Uri]::EscapeDataString($deploymentPropertyBag) $exitCode = 0 trap { $e = $error[0].Exception $e.Message $e.StackTrace if ($exitCode -eq 0) { $exitCode = 1 } } $scriptName = $MyInvocation.MyCommand.Name $scriptPath = Split-Path -Parent (Get-Variable MyInvocation -Scope Script).Value.MyCommand.Path Push-Location $scriptPath $orchestratorService = "http://$rmServer/account/releaseManagementService/_apis/releaseManagement/OrchestratorService" $status = @{ "2" = "InProgress"; "3" = "Released"; "4" = "Stopped"; "5" = "Rejected"; "6" = "Abandoned"; } #For Update3 use api-version=2.0 for Update4 use api-version=3.0. $uri = "$orchestratorService/InitiateRelease?releaseTemplateName=" + $releaseDefinition + "&deploymentPropertyBag=" + $propertyBag + "&api-version=3.0" $wc = New-Object System.Net.WebClient #$wc.UseDefaultCredentials = $true # rmuser should be part rm users list and he should have permission to trigger the release. $wc.Credentials = new-object System.Net.NetworkCredential("$rmUser", "$rmPassword", "$rmDomain") try { $releaseId = $wc.UploadString($uri,"") $url = "$orchestratorService/ReleaseStatus?releaseId=$releaseId" $releaseStatus = $wc.DownloadString($url) Write-Host -NoNewline "`nReleasing ..." while($status[$releaseStatus] -eq "InProgress") { Start-Sleep -s 5 $releaseStatus = $wc.DownloadString($url) Write-Host -NoNewline "." } " done.`n`nRelease completed with {0} status." -f $status[$releaseStatus] } catch [System.Exception] { if ($exitCode -eq 0) { $exitCode = 1 } Write-Host "`n$_`n" -ForegroundColor Red } if ($exitCode -eq 0) { "`nThe script completed successfully.`n" } else { $err = "Exiting with error: " + $exitCode + "`n" Write-Host $err -ForegroundColor Red } Pop-Location exit $exitCode

Basically, this script calls the following REST API endpoint:

http://RMSERVER/account/releaseManagementService/_apis/releaseManagement/OrchestratorService/InitiateRelease?releaseTemplateName=RELEASEDEFINITION&deploymentPropertyBag=PROPERTYBAG&api-version=3.0 


This REST endpoint returns a release id, which we can use to read the status of the release. The script loops until the status is not “In Progress” and the quits and returns an exit code depending on how the release went.


The parameters of the above endpoint are:

  • RMSERVER

    The URL including port to the release management server, typically somthing like contoso.com:1000 

  • RELEASEDEFINITION

    The name of the release template that we want to trigger.

  • PROPERTYBAG

    Now this one is a bit special. This is an array of key/value which is not yet documented but it typically looks like this:

  • { "Component1:Build" : "Component1Build_20140814.1", "Component2:Build" : "Component2Build_20140815.1", "ReleaseName" : "$releaseName" }

    The first two lines references two different components in RM. Here I have just called them Component1 and Component2. The :Build is a keyword and must be there. The value part is the build number, which RM will append to the UNC path that we defined earlier. Note that we can use different build numbers per component here if we want to.

    The last line is a predefined keyword that allows us to specify the name of the release, something that we actually can’t do using the RM client or the standard RM TFS Build release template so this is a nice feature.


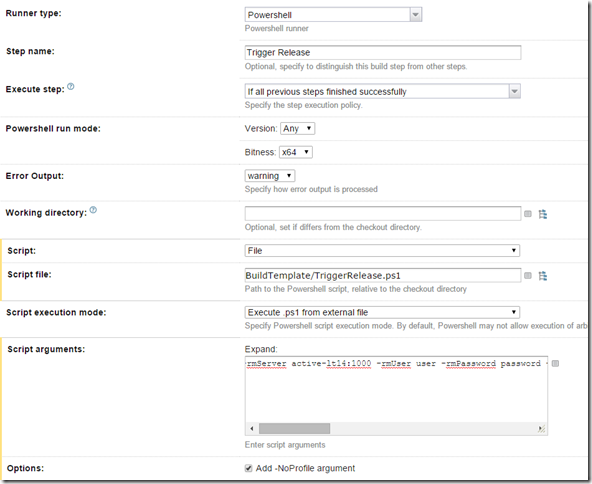
So, to execute this script in TeamCity, add the above script to repository and then add a PowerShell build step at the end of your build in TeamCity that looks something like this:

image 


The Script Arguments property is the tricky part, since we have to escape the quotes for the propertyBag parameter, and we will also use the %env:BUILD_NUMBER% variable from TeamCity for the build number. Here is the full string as an example:

-rmServer SERVER:1000 -rmUser USER -rmPassword PASSWORD -rmDomain DOMAIN -releaseDefinition VSGallery -deploymentPropertyBag “{“VSGallery Web Application:Build” : “%env.BUILD_NUMBER%”,”ReleaseName” : “%env.BUILD_NUMBER%”}”


Running this build in TeamCity will now trigger a release in Release Management:

image

Using Log4Net for Application Insights

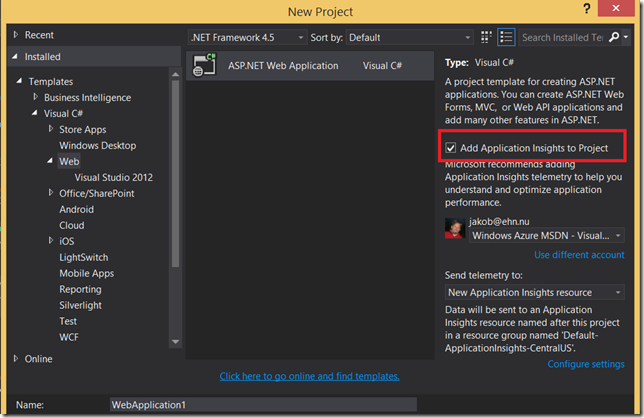
Getting started with Application Insights (AI) in a new or existing application is very easy. From Visual Studio 2013 Update 3 it is even integrated right into the New Web Project dialog:


image


When you select this option, Visual Studio will automatically create a new instrumentation key for you that identifies the web application, and insert the necessary Javascript into your master layout page that takes care of sending usage information to Application Insights. Try running your application, click around a few times, and you will see information showing up in the Azure portal within, literally, a few seconds.

NB: you can also perform this operation later on, by select XXXX from the context menu in Solution Explorer.

This will give you a lot of information such as page views, response times, user information like browser version and geographic location. If you want to add custom tracing, you can do this using the Application Insights Telemtry SDK It exists both for .NET code and JavaScript, so you can add tracing both on the backend and the frontend.

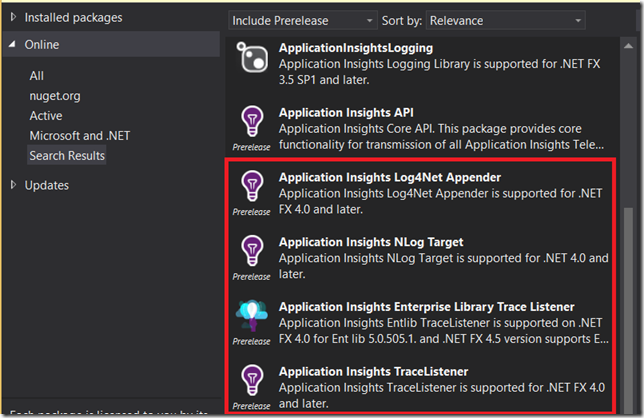
Now, this is very nice for a new project but what if you have an existing application that already contains a lot of code for writing trace and debug information? Perhaps you are using Log4Net or the TraceListener class to emit diagnostic information in some way. Well, the good news is that the nice fellows over at Microsoft thought about this. They have created a set of public NuGet packages that makes it very easy to forward the information that you are logging to Application Insights. This means that you won’t have to rewrite any of the existing code and still have the tracing information show up in the portal.

For example, if you are using Log4Net you can use the Microsoft.ApplicationInsights.Log4NetAppender package that will send the information you log using the Log4Net API to AI. It is implemented as a standard Log4Net Appender class, which makes it very easy to use. Just add the package to the projects that performs logging, and the following information will be added to your configuration file:

<log4net> <root> <level value="ALL"/> <appender-ref ref="aiAppender"/> </root> <appender name="aiAppender" type="Microsoft.ApplicationInsights.Log4NetAppender.ApplicationInsightsAppender, Microsoft.ApplicationInsights.Log4NetAppender"> <layout type="log4net.Layout.PatternLayout"> <conversionPattern value="%message%newline"/> </layout> </appender> </log4net>

Now, you existing logging Log4Net code..

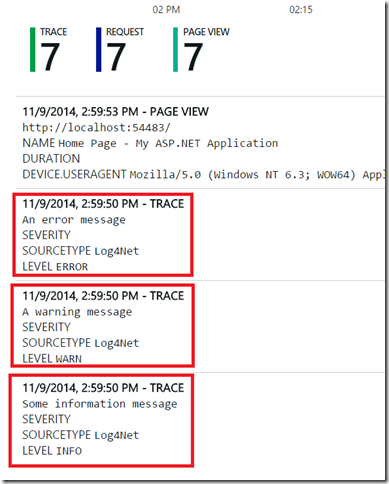
log4net.Config.XmlConfigurator.Configure(); var logger = log4net.LogManager.GetLogger(this.GetType()); logger.Info("Some information message"); logger.Warn("A warning message"); logger.Error("An error message");


Will end up as Trace information in the Azure Portal;


image

 
Since this is a regular log4net appender, you can apply the standard filters, to include or exclude certain types of information.

Microsoft has also implemented NuGet packages for NLog and also a TraceListener class, for use when you do standard .NET tracing. In addition, there are some 3rd party packages that covers other logging frameworks such as Serilog:


image


Happy logging!